Additional Wireless Security Measures
Additional Wireless Security MeasuresTurn Off SSID Broadcasting?
I used to be a big proponent of turning off the broadcasting of your WAP's SSID in order to hide it from would be hackers. The theory was turning off SSID broadcast makes it harder for outsiders to use your network since they would first have to guess your SSID. Since then, it was demonstrated to me just how simple and effective it is to use a wireless hacking program that can sniff out the SSID of a WLAN even if it is not being broadcast in the usual fashion. The program isn't particularly hard to find, so I've changed my viewpoint to hide it if you want to, but don't expect that will do much. I've also had trouble with some wireless Ethernet adapters (in laptops) reconnecting to the WLAN if the SSID broadcast is off.
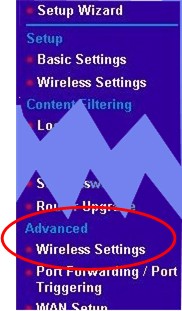
In order to turn off the SSID broadcast, you'll need to find that setting in your router's configuration. For the WRT624, that setting is on the Advanced Wireless Settings page. Click on the Wireless Settings menu entry under the Advanced heading.
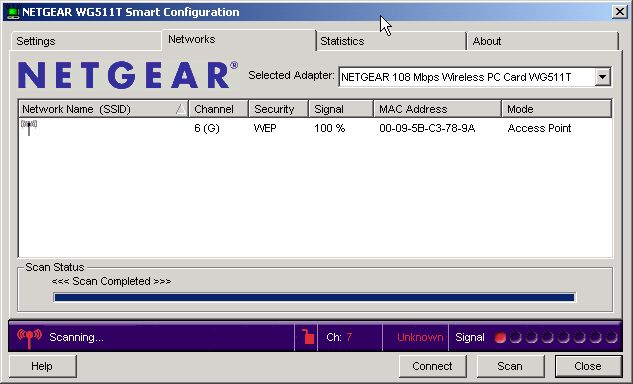
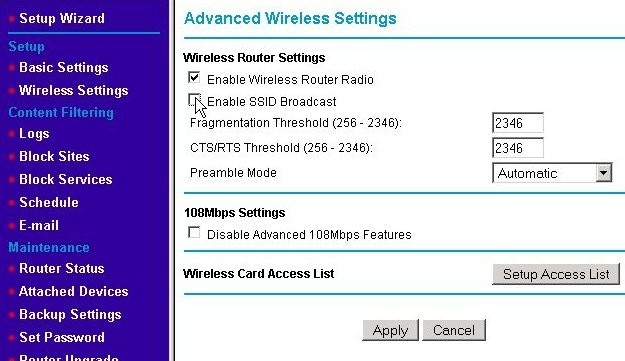
On the Advanced Wireless Settings screen, click on the Enable SSID Broadcast checkbox to clear it (so there is no "check" in the box) and hit the Apply button. If you go to the Networks tab of the WG511T wireless Ethernet adapter's configuration utility (as you did in the section Set the Wireless Ethernet Adapter's Channel and SSID to the WAP's New Settings), you will still see the Network name if you scan for networks. This is because that adapter already knew the name.
However, any adapter that did not already know the SSID of your network will see the following if they do a scan. The wireless adapter can see that there is a wireless network operating at the "G" speed on channel 6, but it can't determine the Network Name. Thus it is blank.
Enable Wireless Encryption
Not all hackers just want to use your wireless LAN; some want to monitor it to learn personal information, passwords, and credit card numbers. If your WLAN is operating in a small office, a hacker may be interested in learning your trade secrets, active court cases, or delivery schedule. Tools exist for hackers to capture and analyze your wireless network traffic without appearing to be connected to your WLAN. For these reasons, encrypting the traffic on your wireless LAN is almost essential. It also just happens to keep freeloading neighbors off your WLAN, too.
Initially, there was no encryption available on 802.11 networks as security was an optional part of the standard. Later, Wired Equivalent Privacy (WEP) encryption became available. However, WEP has some well-documented weaknesses that were found soon after its introduction. (Still, WEP is better than no encryption, and 128-bit WEP is better than 64/40-bit WEP.) Any hacker with enough time within range of your wireless network can capture enough wireless traffic to break WEP's encryption. WEP may keep the 10 year old next door off your WLAN, but nowadays, it won't even slow down anyone that is determined to compromise your wireless network. A decent WEP cracking program on a modest laptop can generally crack a WEP password in under 10 minutes.
Later versions of the 802.11 specification promoted Wi-Fi Protected Access (WPA) Pre-Shared Key (WPA-PSK) as the encryption protocol. WPA-PSK is much stronger than WEP while still based upon it, which let existing routers take advantage of it with only firmware upgrades. The next picture shows setting the WPA-PSK with the Netgear WRT624 using the Basic Wireless Settings page. (Remember to first set the wireless settings on the WAP and then go back and set the wireless Ethernet adapter to match.) Click on the radio button next to "WPA-PSK" and then enter a passphrase.
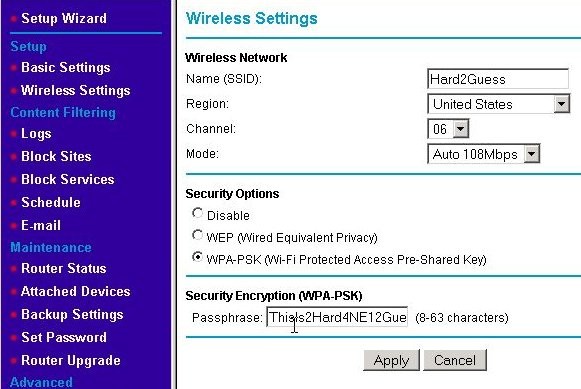
Unfortunately, WPA-PSK can also be compromised and has since been updated to WPA2. The newer WPA2 encryption can be compromised, but has technologies in it to make it much more difficult. If your wireless equipment supports WPA2 using that is more secure than WPA. WPA2 also comes in a couple of flavors: TKIP and AES. Both are good, but AES is better. If given a choice, use AES. Any recently manufactured wireless equipment should support WPA2 and AES. Using a passphrase of 21 characters or more makes it significantly more difficult so long as a strong password (i.e., void of common dictionary words) is used. This is these types of encryption are particularly susceptible to dictionary attacks against passphrases. The passphrase can be to 63 characters in length. Making the phrase longer and more complex and using a mix letters (upper and lower case), numbers and special characters makes the password significantly more difficult to crack. One way to do this is a way that is easier to remember is to substitute numbers for certain letters (that have the effect of spelling those letters backward or look similar to the original letter). For example, use "3" instead of "E" or "e" and "1" instead of "I." As mentioned, using special characters is very good. For example, using '!' as a substitute for the word "not" or '&' for "and". The passphrase "Th1s1s!MyP@55p4r@53UF00l" is a much stronger than "thisisnotmypassphraseyoufool" will ever be. Just be sure to remember what your scheme is.
Once the WAP has been set and the Apply button pressed, you will loose connectivity with your wireless LAN until the wireless Ethernet adapter has been changed to match the WAP's new settings. With the Netgear WG511T, this is done using the Settings tab in the Smart Configuration utility. Click on the Advanced radio button.
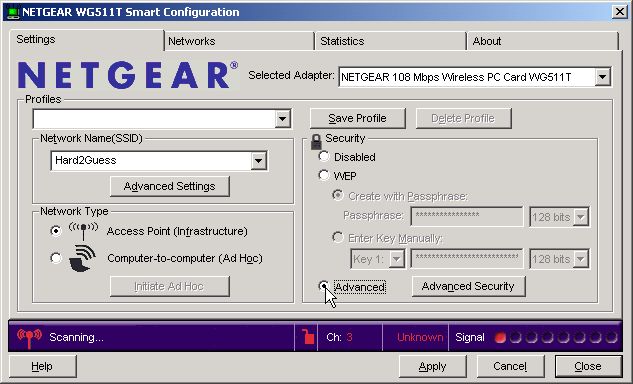
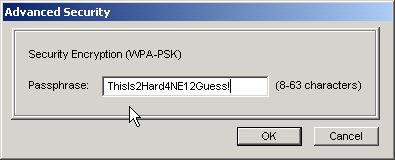
This will cause the Advanced Security dialog to appear. Enter the same passphrase you used for the WAP and press the OK button.
For most types of wireless Ethernet adapters, changing to the Wireless Access Point's SSID and encryption method with the proper passphrase is all this is required. The card should now be able to connect to the WAP and send & receive data as it did when it was set to the defaults. If there is a problem at this point, try re-entering the passphrase on the wireless Ethernet adapter (and check that it matches what was entered for the WAP). It may be necessary to reset the WAP (router) and the wireless adapter back to the defaults and try again.
Configuring MAC Address Filtering
One of the earliest forms of WLAN protection was MAC Address Filtering. The term "MAC" is short for Media Access Control. Every hardware device on an 802 network (wired or wireless) has a unique MAC address. This is not the same as the IP address; the MAC address can be thought of as "stamped" onto that network device. It's much like the VIN number found on an American automobile. To start, open a Command Prompt window as shown below.
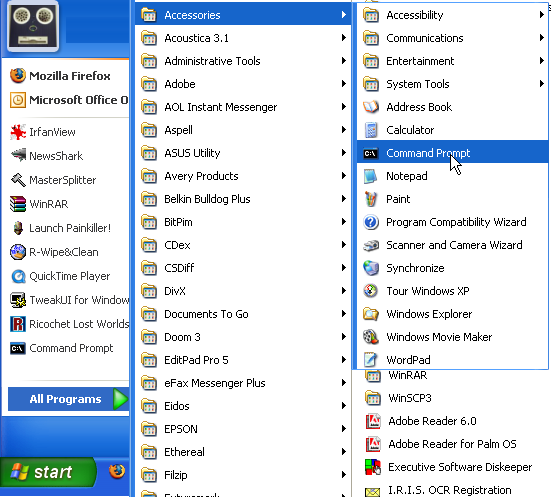
In the Command Prompt window, type in the command ipconfig /all, the "Physical Address" listed is the MAC address for the Ethernet adapter in use.
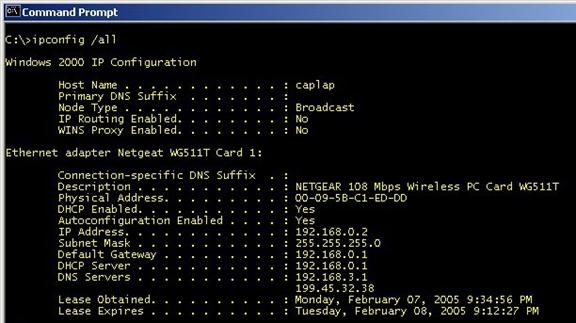
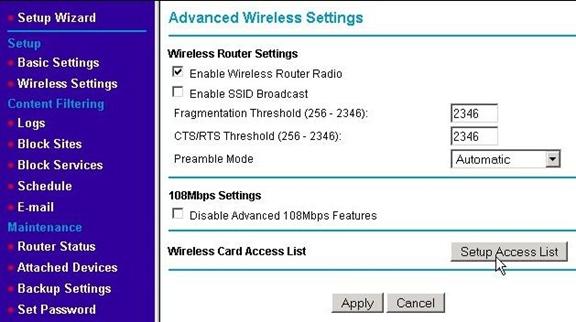
Most WAPs will let you enter a list of MAC addresses of "approved" wireless devices that will be allowed to use the WAP's services and connect via a wireless connection. (Some routers also have a list for wired devices kept either separately or in combination with the wireless list.) Using "MAC address filtering," as it is called, helps to keep people from using your network, but it does nothing to keep them from capturing the traffic generated by it. (Hence, encryption is still needed.) Also, MAC addresses are not secure; programs exist that will allow the MAC address of a wireless card to be temporarily changed to mimic any MAC address - including one in your approved list. This is just one more tool to help keep unwanted wireless devices off your network. To set up MAC Address Filtering on the WRT624, go to the Advanced Wireless Settings page using the left menu. Then click on the Setup Access List button.
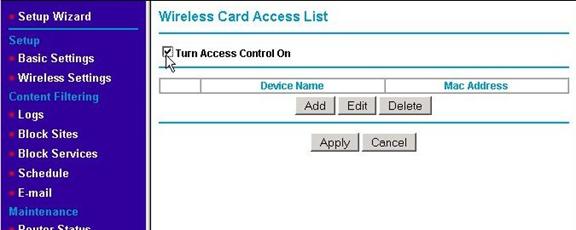
Check the "Turn Access Control On" check box and hit the Apply button.
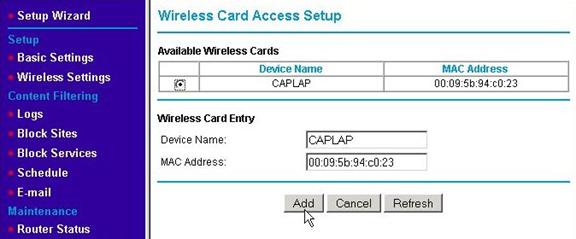
This will refresh the page with a list of wireless adapters currently in range. Most WAPs start with a list of devices currently connected in order to make it easy to set up the initial list.
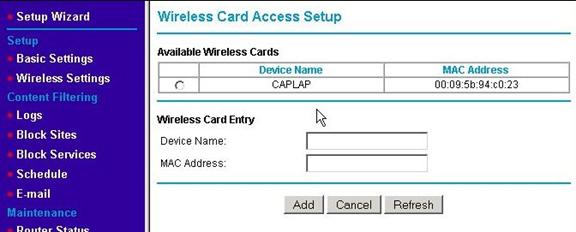
Select the radio button next to the one(s) you wish to include. You can also manually enter the MAC address (found using the ipconfig /all command in the Command Prompt window).
Disabling an Unused Wireless Network
If your ISP supplied your router, it will likely include wireless networking built in. By default, it is usually enabled and either not secured or secured only with the factory default settings. If this is the case, and you aren't going to use the wireless capabilities, you should disable them completely - unless you want to provide free Internet service to your neighbors (which likely violates the Terms of Service with your ISP). If you don't, they can use your wireless connection freely for any purpose they choose such as illegal file downloading and sharing. This is especially prevalent in townhomes and apartment buildings. If the RIAA lodges a complaint about illegal file sharing, it will be traced to the IP in use by your account. Your ISP will generally terminate your service permanently without question upon receipt of the complaint even if you weren't aware of the activities taking place. Even if they aren't doing anything illegal, they may be doing things that use lot's of your network's bandwidth, and it's quite possible they will be able to see and inspect the devices on your network. Let's avoid that.
If you aren't going to use the wireless capabilities, the best thing to do is to shut them off. (If you are going to use wireless networking, you want to configure your network to use wireless encryption and perhaps take other security precautions.) How the wireless is shut off varies between different makes and models of routers. You will need to consult the user's guide for your router. What you are looking for is something that disables wireless networking or disables the wireless radio. In the example below, the check box is simply labeled, "Enable Wireless Router Radio." Take care not to confuse this with a setting to Enable the SSID broadcast. These two settings are not the same and disabling the SSID broadcast does not disable wireless networking.

If you've ventured this far, congratulations! You've reached the end of configuring the wireless network medium. Now it's time to go back to Configuring Your Network. Having gone through this section, you have a leg up on that task because we had to do a good portion of it in order to configure the radio medium. Don't worry if you don't need to do some of the tasks in that section because they were already done when you went through this section.
