Troubleshooting
TroubleshootingNetwork Testing and Troubleshooting
So what do you do if you've followed this (and maybe other) home networking guides step-by-step, but still something's not right. Everything works except .... Or everything has been working great for weeks, but now one of the computers can't connect, and you don't know why. This section is dedicated to troubleshooting those pesky network problems. When I started writing this "quick" guide to home networking, which later turned in to the full-length novel it is today, this is the section I was most interested in writing. Network problems are bound to happen given enough time. I play with my home network a lot, so I tend to cause my own problems. (First rule of engineering: If you mess around with something long enough, you will eventually be successful in breaking it.)
These steps are the ones that I follow myself, so I'm certain they can help at least some of you out of a jam. The first time you are bringing up a new home network or adding new device (e.g., computer, Xbox 360) to an existing network, it's a good idea to follow the steps in order. However, when troubleshooting a device that had been working you might want to skip right to test 4 or test 5. I don't usually start with test 1 in that case myself. I start farther down and if a test fails, I work my way backwards towards test 1. After you've done this for a while, you'll get a feel for where to start just by the way the failure behaves, but these steps are always here in case you encounter a problem that resists being solved.
The subsections here fall into four categories of testing: testing the Ethernet Adapter (test 1 and 2), testing LAN Functionality (tests 3, 4 and 5), testing Internet connectivity (tests 6 and 7), and diagnosing a slow network (tests 8, 9 and 10). Within each category, there are two or three tests to perform. The basic approach is to check the adapter itself to see if the problem is within the computer's own hardware. If these tests pass, we move out from the system under test to the LAN. Network-wise, this is the next link in the change. If the LAN tests pass then we move outward again to the Internet connection (also called the Wide Area Network or WAN). The four category covers the case where the Internet connection is not down, but the performance is not what it once was or seems slower than it is advertised at. Finally, there is a short section that discusses useful tools for diagnosing networks.
Test 1: Making Sure the Ethernet Adapter is Recognized
Test 1: Making Sure the Ethernet Adapter is RecognizedTesting the Ethernet Adapter
When I originally wrote this troubleshooting guide, not all PCs had an Ethernet adapter. Nowadays, it's pretty much a given. Even so, it's quite possible - especially when building a new computer from scratch or reinstalling Windows - that the drivers are not installed and the adapter isn't working. There are some easy tests that can be done. If you can't get similar successful results to those you will see in this section, then your Ethernet card/port/adapter is not properly installed or the drivers it relies upon are not properly installed. You'll likely just be wasting your time to even try to go on. These tests are simple, but it's also essential that your Ethernet ports pass them.
Software driver upgrades have also been known to cause issues and break working systems. Sometimes issues arise because the system is trying to be "smart." I have a laptop that attempts to conserve battery life by turning off the power to the wired Ethernet port when it's running on the battery. If there isn't a wired Ethernet connection up when I unplug the AC power, it shuts the port off. The bad thing is it doesn't turn the port back on when inserting a cable thereafter so long as it remains on battery. (There's a Control Panel in my particular case that will let me re-enable the wired Ethernet port.) Other laptops have a physical switch that turns off the wireless Ethernet adapter. These can get switched off by accident. Suffice it to say there are cases where an Ethernet adapter may not be recognized even when you know it is (or was) there.
Test 1: Making Sure the Ethernet Adapter is Recognized

The first test is to just verify that the Ethernet port is recognized by the operating system. We will be using a Windows 10 operating system for the screenshots. (The original graphics in this section were taken from a mix of Windows 2000, XP and Vista, Windows 7, and Windows 10 machines - just to give you an idea of how long these issues have been around.) In most of the tests, the various flavors of Windows machines have the same tools with a slightly different look. Occasionally, manufacturers forget to install the drivers for some of their devices, and sometimes a driver installed for some completely different device can interfere with the LAN driver. For me, this occurs most often when performing a major upgrade (such as upgrading from Windows 10 to Windows 11).
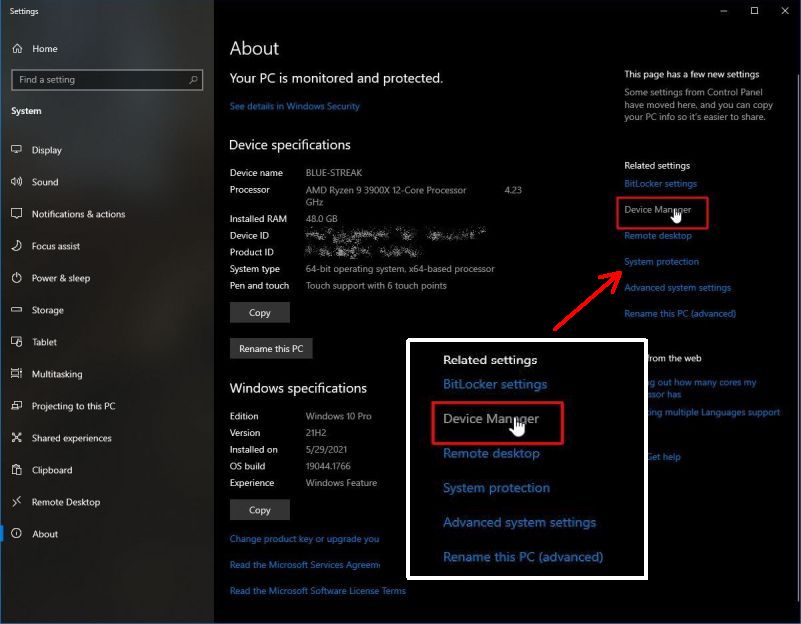
The System Properties dialog window will appear as shown below. Next, click on the Device Manager link.
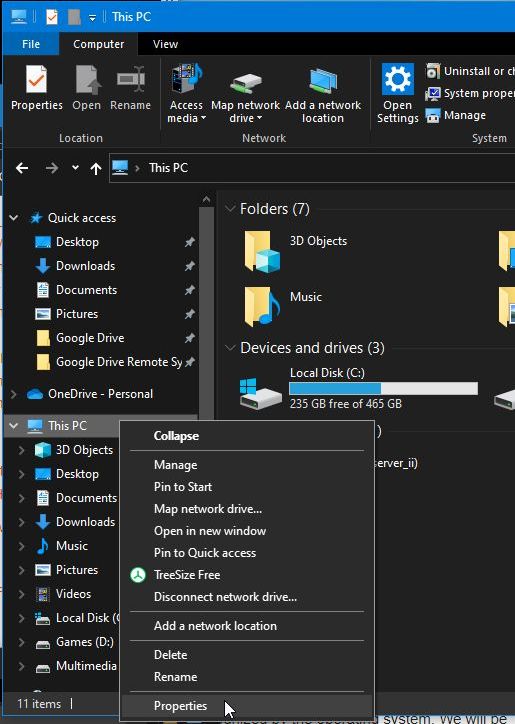
If you don't have a My Computer icon, right-click on the name of your computer in any Windows File Explorer window and pick Properties from there (as shown below).
In the System Settings dialog that appears, click in the Device Manager link.
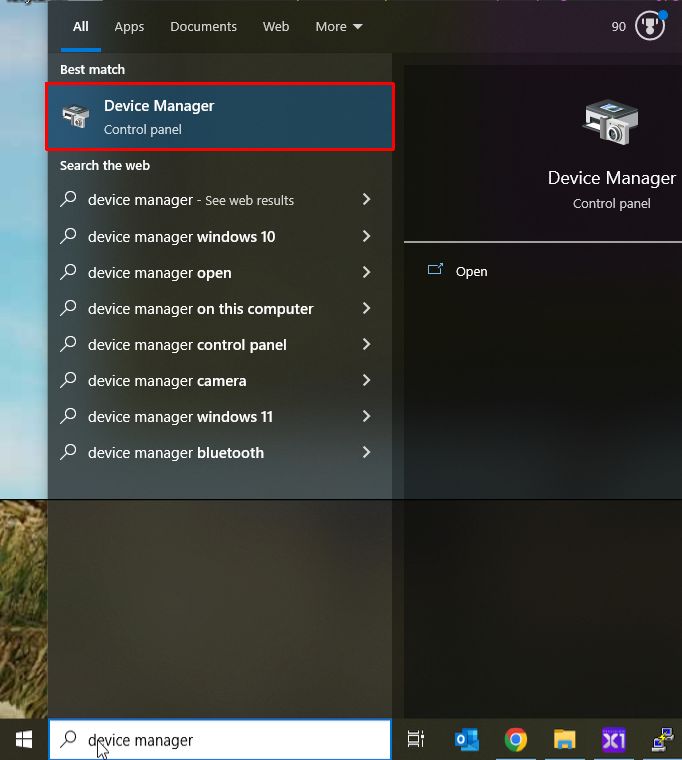
Alternatively, click on the Start button (typically in the lower-left corner), and type device manager into the search box. Choose the Device Manager Control Panel from the list (as highlighted in the picture below).
Regardless of the operating system path that brought you here, the Device Manager dialog window should now be displayed. It is roughly the same for all versions of Windows.
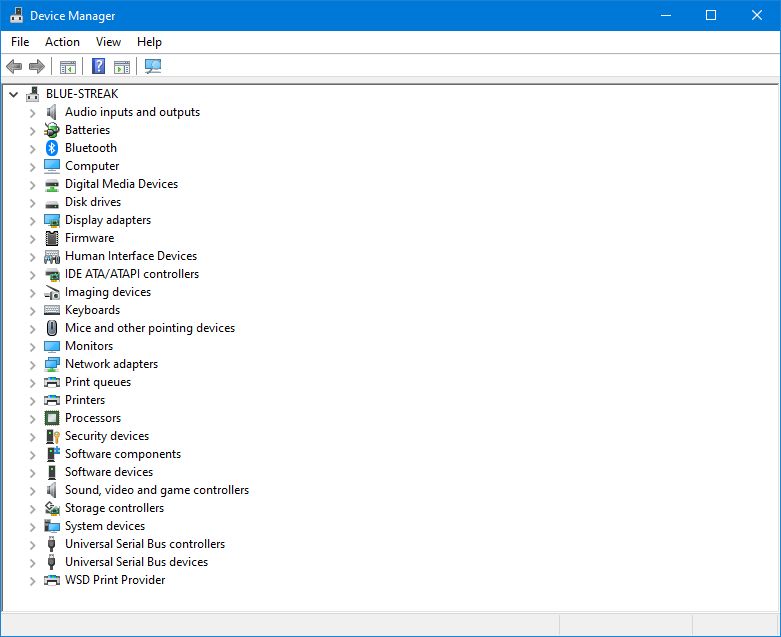
If your Ethernet adapter is recognized as a device by the operating system, it will appear under the Network adapters portion of the Device Manager list. (By default, the devices are listed alphabetically by type.) If you see Network adapters listed, click on the "caret" to the left of it to expand that entry. You could see your specific Ethernet card (NIC) listed there as shown below. If you don't see such an entry, see Problem 1: There isn't any entry named "Network adapters" in the Device Manager or there is no entry in the Network adapters that corresponds to my Ethernet adapter.
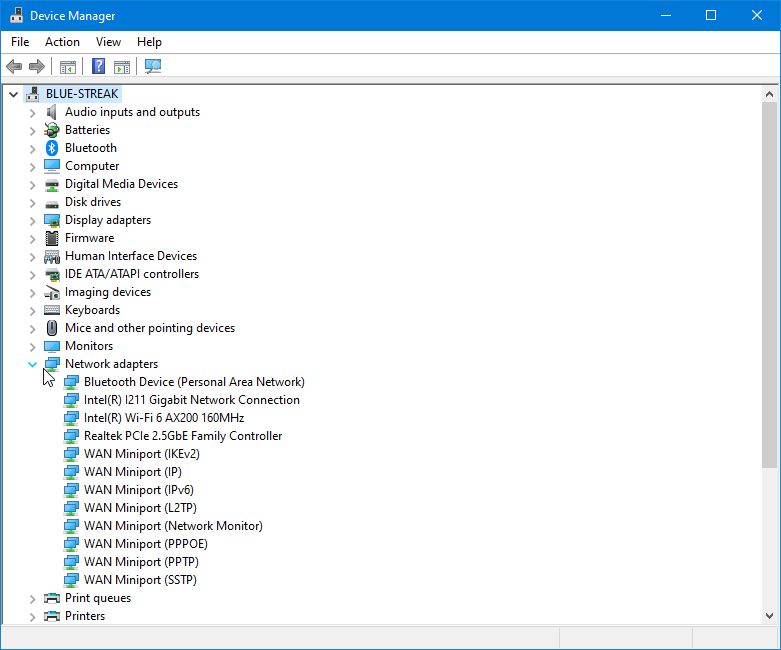
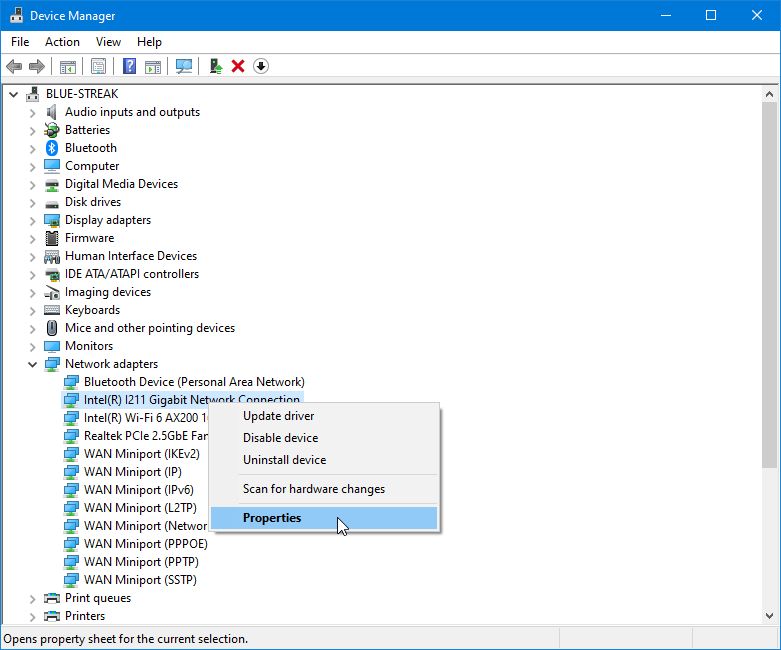
The computer shown above has two Ethernet adapters (Intel I211 Gigabit Network Connection and Realtek PCIe 2.5GbE Family Controller) and a wireless Internet adapter (Intel Wi-Fi 6 AX200 160MHz). Right-click on the entry for the network adapter that we are troubleshooting (e.g., Intel I211 Gigabit Network Connection) and choose Properties from the pop-up menu. (You can also just double-click on the entry.)
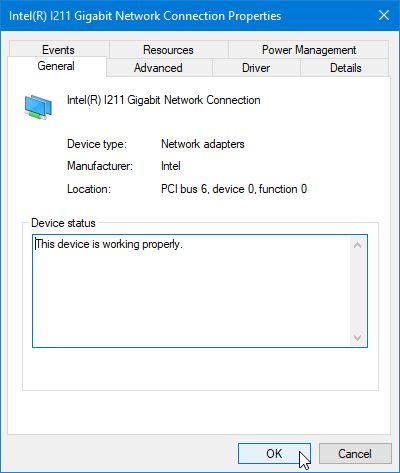
The properties of your Ethernet adapter should look similar to the one below. Pay particular attention to the line that reads, "This device is working properly." This is what we want it to read.
Problem 1: There isn't any entry named "Network adapters" in the Device Manager or there is no entry in the Network adapters that corresponds to my Ethernet adapter
The usual culprit is a bad or missing driver when you know you have the Ethernet adapter installed, but it doesn't appear under the Network adapters list. Look in the Device Manager for the Other devices entry. (Generally, there will not be an Other devices entry if all devices are installed properly on your PC or there will not be any devices listed under the entry.) If there is one, expand it by clicking on the plus sign. If you see a device with a name similar to "Ethernet Controller," it's almost guaranteed you have a (lack of a) driver problem. Possible solutions:
- Uninstall the device and let it be rediscovered upon reboot.
- Get the latest drivers from the manufacturer. (Make sure you know your card's exact manufacturer, model number, and version. I used several Linksys LNE100TX cards in the past, and there were three or four versions of that model. Each used a different driver.)
Problem 2: There is an error message in the Device status field (and/or there is an exclamation mark in the Device Manager next to the adapter)
What you want this field to say is, "This device is working properly." If you have any other message, you likely have a wrong, corrupted or missing driver. Microsoft has a nice list of the device manager error codes here, along with some suggested solutions. Generally, uninstalling and reinstalling the correct driver fixes this issue.
Test 2: Testing Basic Local Connectivity
Test 2: Testing Basic Local ConnectivityTest 2: Testing Basic Local Connectivity with ping and ipconfig
In this part, we run a simple localhost ping test to ensure that the computer can talk to itself properly. That may sound strange, but the operating system uses the localhost IP for many things. It is also a further step in ensuring things are going right, and it's simple to perform. If this test works, it doesn't guarantee that your network is set up correctly, but it if fails, it almost guarantees that this computer won't communicate with any network.
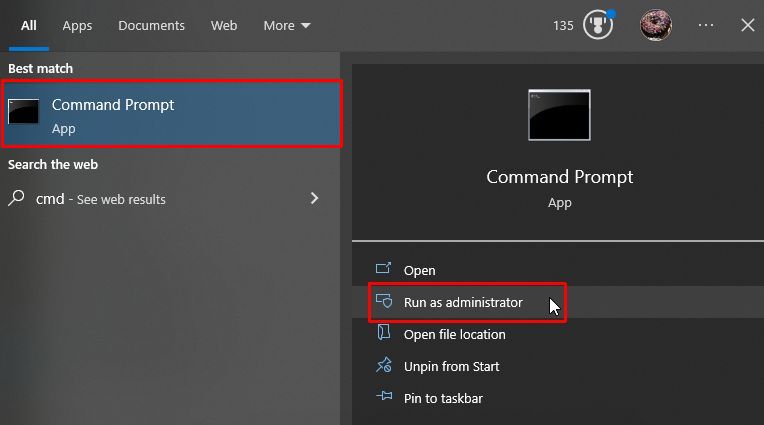
First, we need to open a Command Prompt window, which can be done in several ways. One way is to type cmd into the Search box of the Task Bar, as shown below.
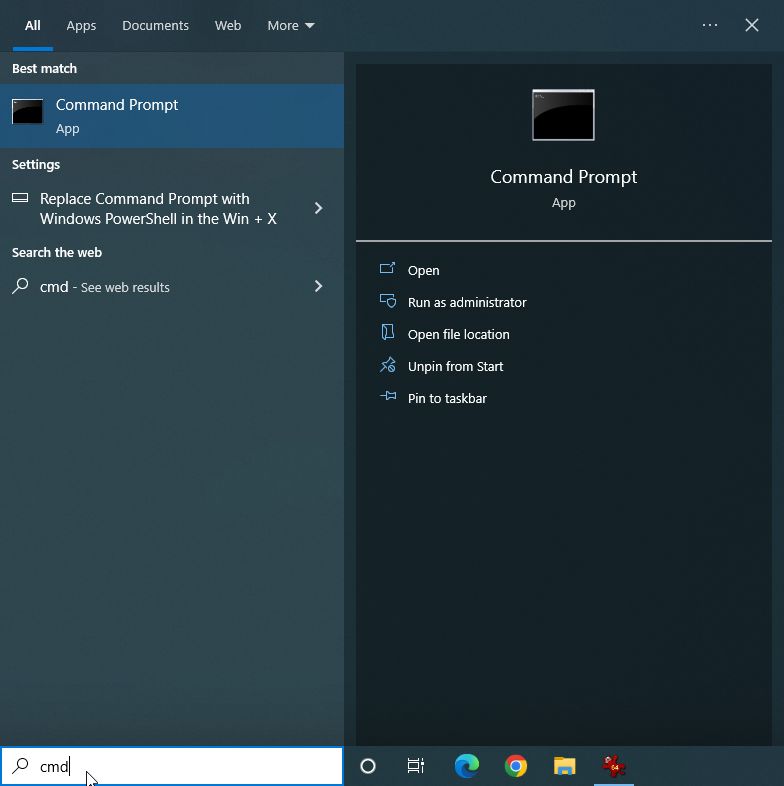
This will bring up a list of matches for the text typed, which should include the Command Prompt app, as shown below. Click on the Command Prompt app entry to expand the choices for starting a command prompt window (which will be shown to the right). Click on the Run as administrator entry from the list of choices below the Command Prompt.
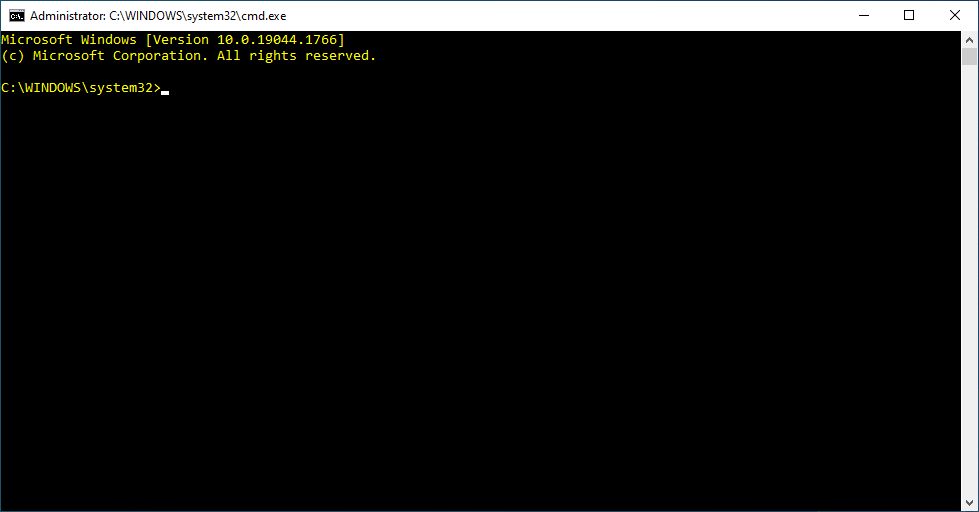
An administrator Command Prompt window like the one shown below should open.
In the Command Prompt window, type in the ipconfig command at the prompt and hit return.
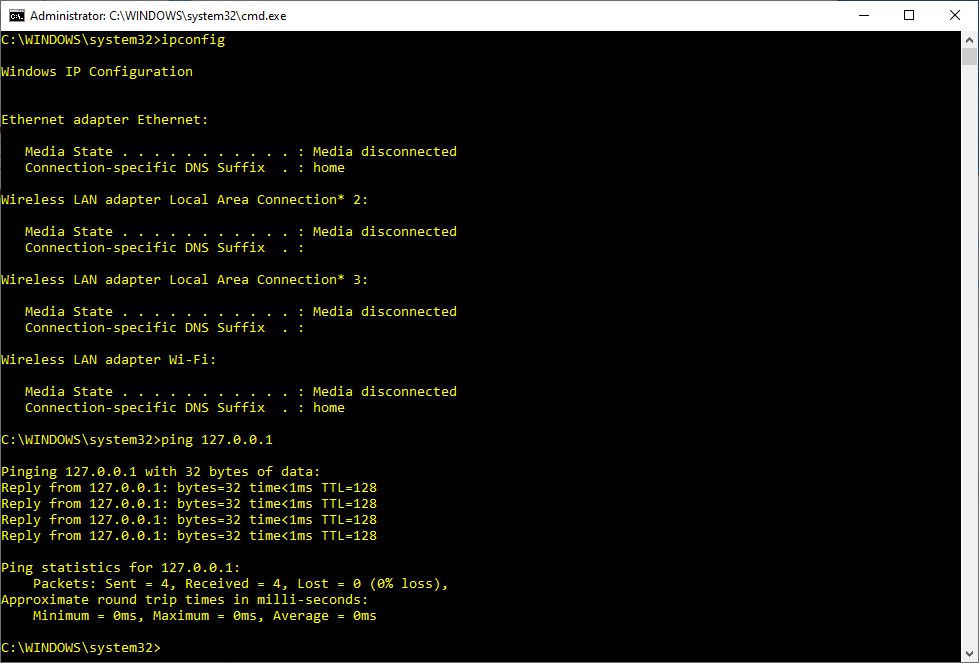
We are seeking additional confirmation that the Ethernet adapter is present and recognized. Don't worry about the IP addresses returned from the ipconfig command at this time; see if you have one or more adapters listed. (Note: To establish a valid link, you may have to connect a cable between your Ethernet adapter and a port on your [router or] switch. Some Ethernet adapters require this before they are recognized as being present.)
Next, type in the command ping 127.0.0.1 as shown in the screenshot above. The IP address 127.0.0.1 is reserved as the "localhost" or "loopback" address for every device to refer to itself. It's always a valid address for the machine. Typing ping localhost will result in the reply responses shown above. Later, we'll assign an IP address (or have one assigned to us), but the localhost name is always available. If everything is set up properly, you will see replies from the ping command like the ones shown below. Technically, you should always be able to ping 127.0.0.1 even if there is no Ethernet adapter installed in your computer so long as the basic networking software has been installed. The localhost ping verifies that.
If you aren't getting this, you should recheck that your Ethernet adapter and the required drivers are installed (and that you've installed the proper drivers for the operating system you are using). I've never had this fail if with an Ethernet adapter that's correctly installed.
If you typed ipconfig and got something like the following response, check to make sure your network card is still properly inserted. You should also redo test number 1.
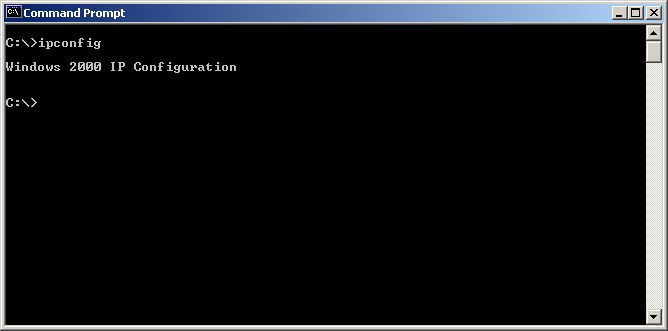
Back in the days before built-in Ethernet ports were common in laptops, I occasionally forgot to insert my laptop card. The above response is what I got in that case. Also, I've seen cases where the Ethernet cable was jerked on hard enough (e.g., stepped on or tripped over) to pull the Ethernet adapter partially out of the PCI slot in a desktop machine. If you suddenly start getting the above response on a desktop machine that's been working fine "forever," either the card has become unseated from the PCI slot, or it has just plain died. I've had both happen. (Check the cable as well.) If you get the above response from a new Ethernet adapter, it usually means the drivers installed weren't the right ones or failed to load for some reason. Although rare, I have had a brand new Ethernet adapter fail right out of the box.
Test 3: Check the Link Lights
Test 3: Check the Link LightsTest 3: Check the (Physical) Link Lights
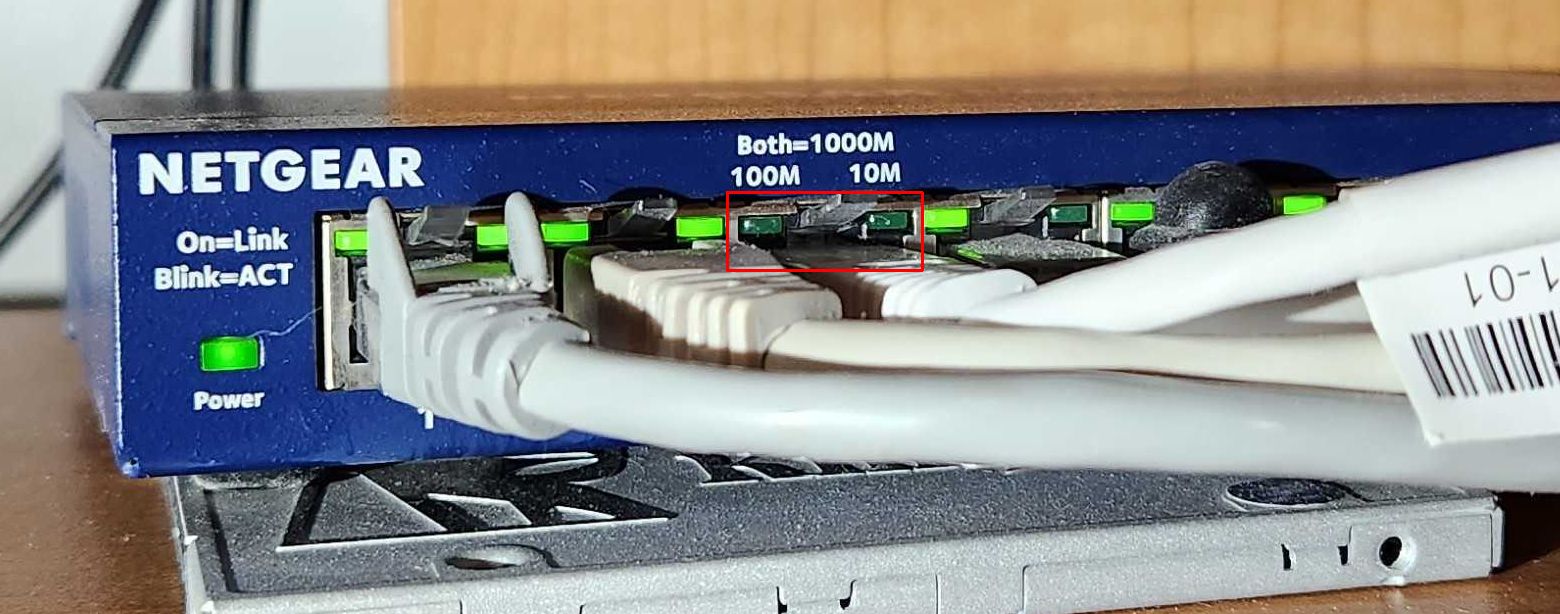
If you've made it past tests 1 and 2 (and the problem still persists), it's time for one of the quickest tests you can do. Look at your router or the switch to which the device is connected and ensure that the link lights for that device are (still) on. This may seem ridiculously simple, but kids are kids, cats are cats, and bad things can happen to network cables even if you haven't touched them. The cat doesn't have to chew completely through the cable. Just piercing the outer shell and severing one of the eight wires inside is sufficient. Swapping the cable for a known, working one for a quick test can verify whether that's the case. In the picture above, the link lights for the device attached to port 3 are not on. Either that device is turned off, the cable is disconnected, or the cable (or port) is bad.
Cables aren't the only culprit to problems at this step (but they are the most common). Power supplies on routers and switches fail from time to time. I've had switches that just decided not to switch anymore. I had a switch that used to run just fine for about a month at a stretch and then freeze completely. All the lights would be on, but the link light never blinked, indicating traffic being passed. With that switch, just unplugging and plugging it back in made it start working again. When this reached maximum annoyance, I replaced the switch. If you run the ping test from step 2 while watching the router/switch, you should see at least one of the lights on the port (corresponding to the device from which the ping is being run) blinking to indicate activity.
Occasionally, one of the ports on a switch will fail while the others remain working. Try swapping the cable to an unused port (or temporarily try a used port, but don't forget to plug the other cable back in if it's in use). If the cable works fine on an alternate port, you might have been trying to use an uplink port or a port that has gone dead. In the latter case, replacing the switch is probably a good idea. I had an Ethernet cable that got hit by lightning during one particularly bad storm. One switch, the Ethernet card on a printer, and another Ethernet adapter were killed instantly. However, one of the other switches was apparently among the walking wounded. At first, one port stopped working, and then another. A good static electric shock can do this as well. If you find one dead port on a switch, expect another and then expect to replace the switch.
Test 4: Checking for a Valid IP Address
Test 4: Checking for a Valid IP AddressTest 4: Checking for a Valid IP Address
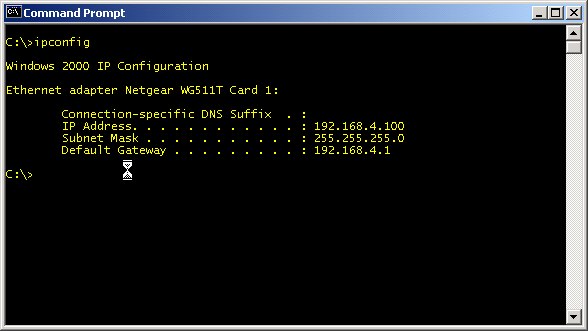
At this point, we've verified that we have a viable network adapter, the adapters drivers are loaded such that it can talk to itself using a localhost ping, and that the link light on the router shows that the cable is connected and a link established. Now we need to see if we have or can get a valid IP address. We can do this by using ipconfig in a command window to see what our IP address is. An ideal result is to see something like the following screen.
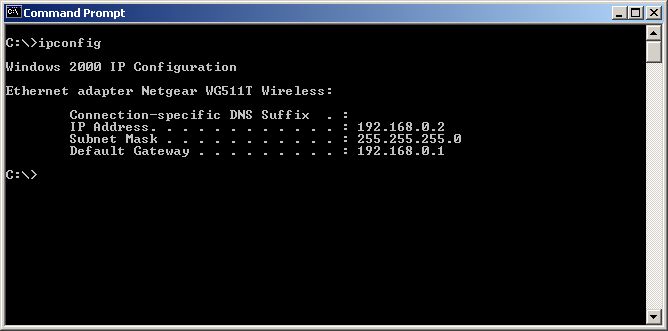
This shows that was have an IP address of 192.168.0.2. If we are using the DHCP protocol to get our IP addresses from a DHCP server (most likely built-in to our router), this means that we have connected to the server and retrieved an address. (See Using DHCP IP Address Assignment for Automatic Configuration for details on how to set your Ethernet adapter to use a DHCP server.) If we are using static IP addressing, we should see the static IP address we assigned to this machine. (See Fixed/Static IP (Manual IP) Assignment for details on using static IP addresses.)
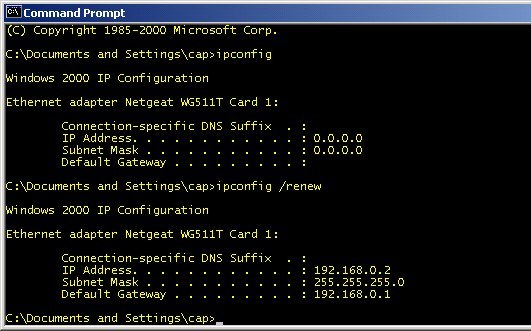
When using DHCP assigned IP addresses, a couple of anomalous situations can occur. If you execute an ipconfig command and get back an IP address of 0.0.0.0 as shown in the top half of the screen below, most likely your machine has lost its "lease" on the DHCP address it had and then failed to get another. I most often see this when I have reset or reconfigured the router. As shown in the bottom half, performing an ipconfig /renew will generally cause the machine to get a new DHCP IP address.
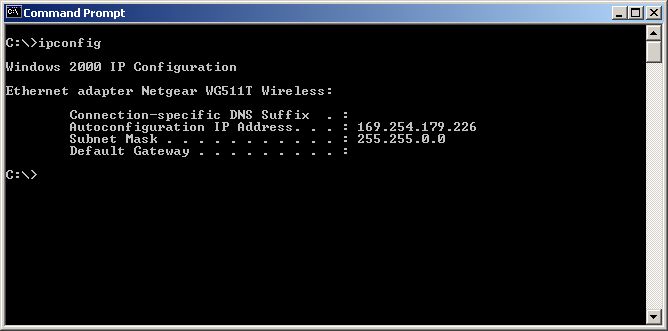
The second anomalous result and the one I see more often is a when the machine failed to get a response from the DHCP server within a given amount of time. The IP address assigned to the adapter is not valid for the LAN and seems almost whimsical.
If you are just setting up your home network for the first time (or installing a new router/firewall), you may want to make sure that the DHCP is on. (See Changing the DHCP Server's IP Assignment Range for details on how to check.) Most routers will have it turned on by default, so assuming you did not explicitly turn it off, the most likely suspects are the cable and Ethernet adapter - in that order. Try a different cable. Retry Test 1: Making Sure the Ethernet Adapter is Recognized and Problem 1: There isn't any entry named "Network adapters" in the Device Manager or there is no entry in the Network adapters that corresponds to my Ethernet adapter. If you are getting this result with a wireless Ethernet adapter, most likely your wireless medium configuration is not correctly set up. (See Configuring the Radio Medium for a Wireless Access Point and Wireless Ethernet Adapters.)
For an established home network - that is one that has been up and working for a while - when the DHCP request times out and gets a bogus IP address like the one above, the usual suspect is the connection to the router and most likely the cable. If the Ethernet adapter is a wireless adapter, usually the wireless configuration has gotten changed and the system can no longer connect or you were (are) out of range of the WAP when the lease expired.
Occasionally, I've had a router just "go stupid" and stop communicating. This usually requires a power cycle to recover. Since most routers don't seem to come with an on/off switch, this means pulling the plug.
Test 5: The LAN Ping Test
Test 5: The LAN Ping TestTest 5: The Handy-Dandy LAN Ping Test
You might wish to repeat the test Test 1: Making Sure the Ethernet Adapter is Recognized and check that you are not having Problem 1: There isn't any entry named "Network adapters" in the Device Manager or there is no entry in the Network adapters that corresponds to my Ethernet adapter (at least the second one) before proceeding. What we are about to do is to ping from one of the connected computers to either one of the other computers in our local area network or to the Router/WAP. (If you have a Local Area Network without any WAP or router, you will need to ping one of the other machines.) If you are pinging one of your other machines, make sure it is on and configured appropriately. You may want to do a quick check to make sure the link lights on the router or switch are still lit for both machines (as outlined in test 3). For this section, my LAN IP addresses start with 192.168.4. When you are executing the commands shown in this section, substitute the beginning three octets (numbers before and between the periods) below with the ones for your LAN.
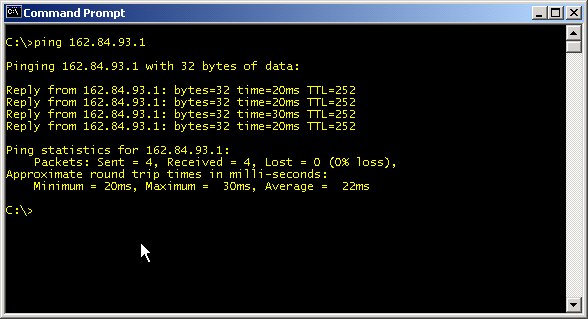
Open a command window if you don't already have one open. At the command line, you are going to be typing something like ping 192.168.4.1. If you have in router in your network, substitute the address of your router's LAN IP address for the one above. If you have an isolated LAN with no router and you are connecting your devices together with a simple switch, use the IP address of another machine on your LAN as the target of your ping. Successful results of ping-ing that IP address are shown in the window below. You will see the "Reply from <the IP address of the device you pinged> ..." along with the number of bytes sent (and returned) in the ping packet and the round trip time it took for the ping to complete. (Note that round trip time is the time taken for the message to travel from your machine to the pinged device and back again.) Since we are pinging another device on the same LAN (a.k.a., another device on the same "wire" although that's more figurative than exact), the time is very small. By default, Windows pings the target device four times. (We will see how to change that number later.) The statistics for the four pings is also given at the very bottom including the number of messages sent, received, and lost and the minimum, maximum, and average round trip time.

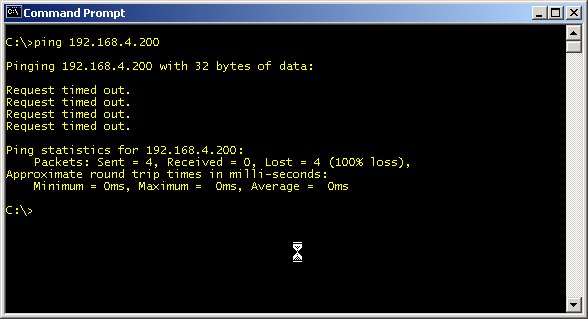
Unsuccessful ping attempts will usually have results like those in the following screen. If your ping test was successful, skip on to the next section, Test 6: The Handy-Dandy WAN Ping Test.

Possible Causes of a LAN Ping Test Failure
Incorrect IP Address: Check to make sure that the IP address you typed in the ping command was the correct one. Typing four sets of numbers is error-prone at best, and I get them wrong all the time. (This is why the Domain Name Service came about.) If you pinged the IP address you intended, type the ipconfig command into your Command Prompt window. For my network, the result looks like the following screen.
My IP address is 192.168.4.100 (as I am using a static IP address for this example and that's the number to which I explicitly set my Ethernet adapter). Since my network number is 192.168.4.0, any other device on my LAN will also start with 192.168.4. Make sure that the IP address you tried to ping is on the same network as (i.e., the first three numbers match) the machine you are pinging from.
Once your network is set up and working, this number will rarely change (unless you like to play with your network a lot like I do). However, if you recently reset the router (using the router's reset button) or you upgraded the router's firmware, the router's LAN IP address may have been reset to the default settings. (See Changing the Router's LAN (Internal) Network Number for the general procedure on how to set those back to the numbers you chose for your LAN.)
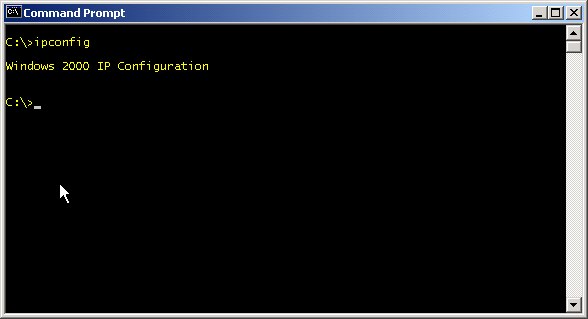
Check the Ethernet Adapter: If you got a response from the ping like the one below, which is just the title "Windows 2000 IP Configuration" and nothing else (with your operating system's name in place of "Windows 2000"), this usually means that your Ethernet adapter isn't inserted (generally applicable only to laptops) or at least, is no longer recognized. If your Ethernet adapter is a PCI or USB version, check to make sure it is still firmly seated in the PCI slot or USB port, respectively. (Sometimes removing and reinserting the PCI card or USB adapter will fix the problem.) If your Ethernet adapter is permanently attached to your motherboard, this is rarely the problem. However, a hard yank of someone tripping over an Ethernet cable has been known to break an Ethernet adapter off of the motherboard. Check the lights on the motherboard's Ethernet adapter (and the corresponding light on the switch/router) to make sure they are still lighting when the cable is inserted. If an built-in Ethernet adapter becomes inoperative, you can add a PCI or USB Ethernet adapter in its place.
Assuming that we are not having a physical problem with the Ethernet adapter, this is a good time to try to recall any hardware or software you recently installed before the problem began. Hardware conflicts are rarer than they once were, but do still occur. Software conflicts that prevent the Ethernet adapter's drivers from loading also occur. Test 1: Making Sure the Ethernet Adapter is Recognized will help in determining if this is the problem.
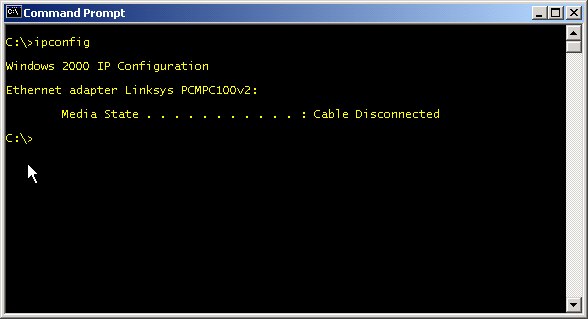
Check the Ethernet Cable: If the response from the ping mentions something like "Cable Disconnected" or "media error," the problem is usually with the Ethernet cable. This may also be reported by some wireless Ethernet adapters when the wireless configuration is incorrect and the adapter can't communicate with the WAP. However, the link between the adapter and switch has failed. Check to make sure the router/switch is still on and the link lights are on as well. If the cable is bad, the link and activity lights on the adapter and on the switch will not be lit for that cable.
Try another cable if possible to see if the problem disappears. Cat and dog chewing notwithstanding, it's somewhat rare for a cable to suddenly fail somewhere along the middle (unless you've tightly bent the cable around a corner, which can cause failure over time due to the strain). Usually the problem is in the boots/connectors. Try flexing the cable at the point it goes into the connector and remove and reinsert the connector into the Ethernet port on both ends of the cable.
Upon occasion, routers and switches just loose their sanity and stop communicating (as do the other devices attached) with the network. Try turning off the device and the router and turn them back on. Also, I've had single ports on a router fail, so try the cable in an alternate port on the router. (The latter is pretty rare, but I've had it happen on three different switches/hubs at various times.)
Windows XP Firewall or Other Personal Firewall: If you are pinging a Windows machine with a personal firewall installed, you may get a window on the target machine asking you to create a rule for incoming ICMP pings. It is safe to allow pings for those machines inside your LAN, so allow ping, but only for machines in the IP address range of your LAN. Some personal firewalls may just deny incoming pings without asking you to add a rule or informing you of the denied request. In this case, you may have to explicitly add a rule to allow pings from other devices on your LAN. Recently, Windows XP users who applied Service Pack 2 got an extra surprise because it turned on the Internet Connection Firewall as a part of its emphasis on increased security. Network services of all sorts that previously had been working fine suddenly stopped.
Ping Test Tip
When you're trying to track down a cabling problem on your LAN, repeatedly pinging another device like the router can be quite helpful. However, by default, the ping command in Windows only pings four times and exits. In order to make it ping more times, the "-n" option can be used. Typing ping -n 1000 <IP address> for example will cause the ping command to be issued 1000 times. That's usually enough time to fiddle with the cable and ports. To stop the ping before it reaches 1000 pings, hit CTRL-C (the Control [CTRL] key and the letter C together).
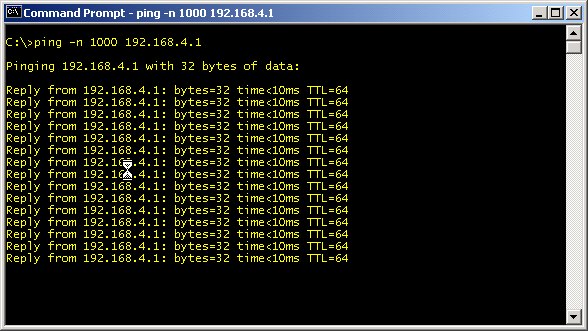
While the computer is pinging the other device, you should be able to see the activity lights on the router for that port flicker indicating activity.
Test 6: The WAN Ping Test
Test 6: The WAN Ping TestTest 6: The Handy-Dandy WAN Ping Test
If you are having trouble reaching services on the Internet (e.g., email, web sites, game servers), it's a good idea to first try at least one quick LAN ping test (from the computer to the router) as shown in Test 5: The Handy-Dandy LAN Ping Test. Once you have checked and passed the LAN ping test, a good approach is to first ping things relatively "close" from a network point of view and then ping IP addresses further and further away. This helps isolate if the problem is in your network, your ISP's network or even further out.
Baby Step 1: Ping Your Router's WAN Gateway Address
The first step is to ping the gateway address that your router is using to communicate with the rest of the Internet. If you have a fixed IP address, this is relatively simple because your ISP will have told you what your gateway address is when they assigned you your IP address. Open a command window and type ping followed by your WAN gateway address as in the screen below.
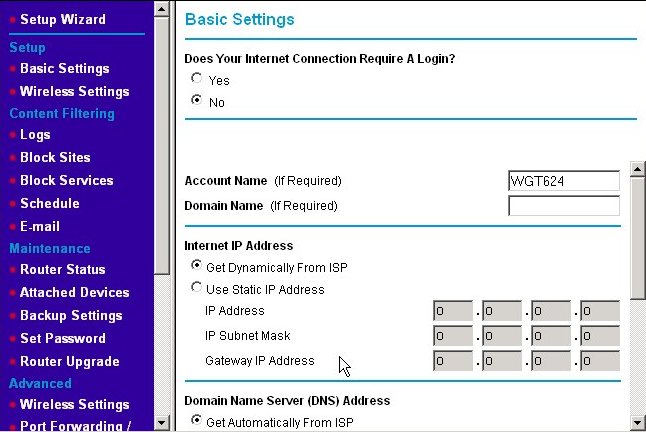
If you have a dynamically assigned IP address, determining your gateway address can be a bit trickier, but your router will likely give you a hand. First, you first need to find out if your router has successfully retrieved an IP address from your ISP's DHCP server. Your router's status page should list your current external IP address. The follow screen capture illustrates that case.

Recall that for the purposes of demonstrating the various problems that can occur, I have set up a test network inside my real home network. This is why the IP address I received is another non-routable (private) IP address. The IP address retrieved was 192.168.3.41 in this case. (See Private IP Addresses for more details on private IP addresses.) When you look at the status page for your router, it will likely be a public IP address like 162.84.93.33. The gateway address was also retrieved at the same time, which is 192.168.3.1. Most routers will display the gateway address they received in the DHCP response. Substitute that IP address in the ping command shown above. If it doesn't display the gateway explicitly, try using the first three octets (e.g., 162.84.93) and end with a .1 (for a full IP address of 162.84.93.1). In the command window above, the ping to 162.84.93.1 is a ping to my ISP's WAN gateway for a real IP address. If your ping test is successful, skip to the next step, Baby Step 2: Ping Your ISP's DNS Server. If not, proceed into the following troubleshooting section.
Troubleshooting a WAN Gateway Ping Failure
If you aren't able to successfully ping your ISP's gateway address (or you aren't getting a valid IP address returned from a DHCP request), the problem is generally isolated to the connection between your router and DSL/cable modem or the modem's connection to the ISP. It's also possible your ISP may be having a temporary (planned or unplanned) outage.
Log into your router and browse to its status page. (If you are unable to log into your router, check to make sure it has power. Also, try to ping the router's LAN IP address as was done in Test 5: The Handy-Dandy LAN Ping Test.) If your router shows an Internet address that is not valid (like 0.0.0.0 in the screenshot below) most likely you've lost connectivity with your ISP. (That's assuming you had connectivity before. If your high-speed connection is a new installation, it may not be active yet.) The first thing to check is the power on the modem and Internet/WAN lights on the router and modem.
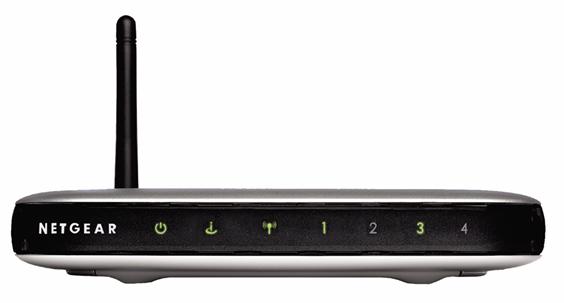
On the example router shown here, the Netgear WGT624, the power indicator is the light to the far left and the light that is second from the left, which is a lowercase letter "i" with a circle partway around the bottom, is the WAN/Internet port. They are green when the router has power and the connection to the DSL or cable modem is correct, respectively. If the power light is not lit, check your power adapter and power connection on the back of the unit to make sure they are plugged in. If it is, try moving it to another plug. (Use an extension cord if it's inconvenient to move the router.) I've have a number of those little power adapter "bricks" die, so don't be surprised to find out that the router won't power up even when you try a working outlet. (Radio shack has substitutes for these with variable DC voltage outputs and tips that will work with all sorts of devices. Check to make sure the amperage is sufficient.)
Next, check the corresponding lights on your Cable or DSL modem. On the example cable modem shown to the right, the power light is at the top and labeled "Power" and the LAN light is labeled PC/Activity and is the second light from the bottom. Finally, check that your connection to your ISP is established.
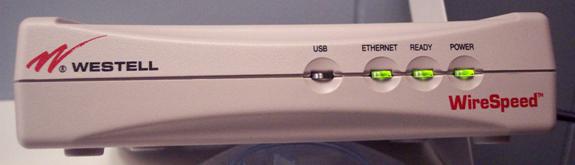
On most DSL modems I have used, there is a single light labeled "Internet," "Ethernet," "WAN Connection" or something similar. It should be lit and steady when the connection is established to your ISP but no traffic being sent or received. Typically, the light will blink or flicker when Internet network activity is occurring in either direction. Note the Ethernet light is on in the picture below.
If the Ethernet light is not lit, it's time to start suspecting your service from your ISP is down. First, make sure that the telephone line from the DSL modem to the wall is secure. You may want to try another telephone wire just to be sure. Also, check to see if your regular phone service is working. If both your DSL and telephone service are out, your line may have been cut or disconnected. That's a problem for your phone company to deal with. If the problem lies just in your DSL connection, you should call your ISP's technical support and see if there is a general problem they are aware of, if they are doing some planned upgrades or maintenance they didn't notify you about, and if you are the only person with an outage and need to report it.
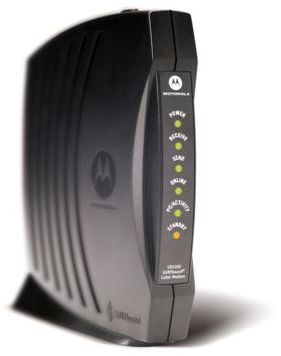
On the particular cable modem shown here, the Motorola SB5100, three lights are used to show you the status of your cable connection to your ISP. The first light (second from the top under the Power light) is labeled "Receive" and is the receive channel established light. It is lit when a downlink (incoming) connection from your ISP is established. The next light down is labeled "Send" and is lit when an uplink (outgoing) channel to your ISP has been established. If either the Send or Receive light is not lit, it's probable that your cable service is down or the cable is broken or disconnected. The next light is labeled "Online" and indicates all necessary negotiation such as DHCP address assignment has completed. When this light is not lit, it generally means that the DHCP negotiation failed either initially during power on or after a DHCP IP address lease has expired and a new IP address could not be retrieved from your ISP's DHCP server. If your cable appears to be in working order, you should call your cable Internet service provider to find out is a general problem they are aware of, if they are doing some planned upgrades or maintenance they didn't notify you about, and if you are the only person with an outage and need to report it.
Baby Step 2: Ping Your ISP's DNS Server
Once we've been able to ping our ISP's gateway, the first "network hop" outside of our own equipment, the next test is to see if we can reach our ISP's DNS servers. We will do this by pinging the IP address of one of those servers. Of course, before we can do that, we need to know what those IP addresses are. If you have fixed/static IP service, as part of your initial sign-up package or email, your ISP should have included the IP addresses of the DNS servers it wants you to use. They will generally give you two (or more) addresses. We need two so that our router can still have DNS services if one of the servers goes down. (Remember, the DNS service is used resolve the names of Internet sites like "www.godiva.com" to their respective IP addresses. Without the DNS service, we won't be able to reach any web sites other than by IP address.) If your ISP didn't supply those IP addresses, check their web site or call their technical support line and ask for them.
If you have dynamic IP address service using your ISP's DHCP server to get your Internet IP address, you may have to do a bit more hunting. You should be able to call your ISP and ask for the numbers, as was mentioned above, or your ISP may have listed them for you when you signed up. Like we did in the last section (to find out your currently assigned IP address), we can use your router's status page to find out your current DNS server IP addresses (if you have ever successfully used the service in the past). The Basic Settings screen of the Netgear WGT624 gives this right below the Internet IP address as demonstrated below.
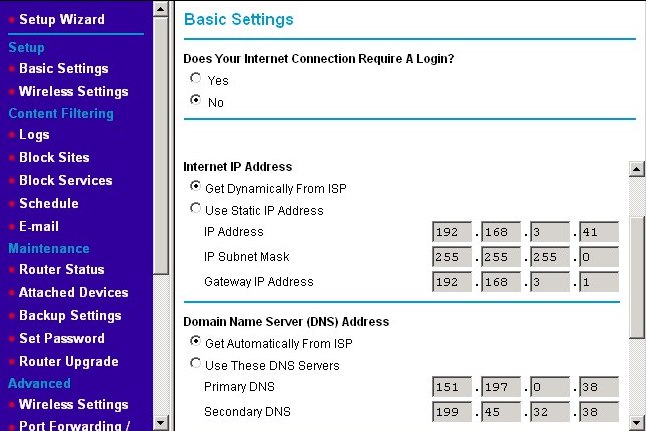
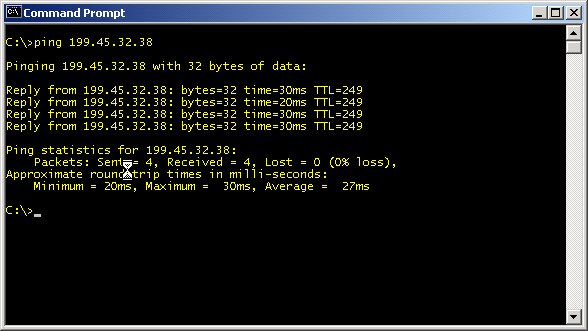
The two IP addresses in this example are 151.197.0.38 and 199.45.32.38. Now that we know the IP addresses of our DNS servers, we can proceed with the ping test. Try both IP addresses to see if the ping test passes by reaching the DNS server. An example using the second of my example DNS servers is shown in the following screen capture. If you are successful with your ping test here, skip to Baby Step 3: Ping A Well-Known IP Address. Otherwise, continue on into the following troubleshooting section.
Troubleshooting a DNS Server Ping Failure
If the ping test to your gateway address for your ISP passes, but your ping test to your ISP's DNS servers fail, your ISP may be having a problem within their internal network or their DNS servers are down. Interestingly, if the DNS servers are down, we actually still have full connectivity to the Internet, but we've lost the capability to resolve names into their corresponding IP addresses. Without that capability, we won't be able to browse the Internet, fetch email, access game servers, or anything that else we try to access by name. Unfortunately, it also may be true that the DNS servers are fine, but your ISP does not allow pings to their DNS servers. If you suspect that this is the case after following the procedures in this section, try the tests in Test 7: Testing for DNS Functionality. (Note to ISPs: It's perfectly acceptable to reject or drop ping requests originating from the Internet at large, but you should accept ping requests from your own clients. Note to others: I have yet to have an ISP that blocks ping requests to DNS servers from their clients.)
Another possibility is that the IP addresses for the DNS servers have changed, but your ISP didn't inform you. (This is usually only a problem with static IP address accounts as dynamic IP addresses will get the new DNS server IP addresses the next time your router retrieves an IP address from your ISP's DHCP server. If you do start having this problem and you are using dynamic IP addressing with your ISP, try rebooting or power cycling your router to force it to get the new information.) One of my previous ISPs liked to move their DNS services from one IP address to another without informing anyone. They didn't do it often; the IPs changed maybe once or twice a year at most. First, they would move one and some time later they would move the other. Also, if your ISP gets bought out by another ISP or your ISP buys another ISP in the same geographic area, they may decide to consolidate DNS servers and other resources, which may change the IP addresses you need to use.
As a final check, try pinging one or more of the IP addresses in the following list: 198.41.0.4, 192.228.79.201, 192.33.4.12, 128.8.10.90, 192.203.230.10, 192.5.5.241, 192.112.36.4, 128.63.2.53, 192.36.148.17, 192.58.128.30, 193.0.14.129, 199.7.83.42, & 202.12.27.33. These are the IP addresses of the Internet's root DNS servers (current as of December 12, 2008). These occasionally do change, but only one or two and even then only over a period of years. When you try to browse to an address that your ISP's DNS server doesn't have, it consults a DNS server ranked above it. If that DNS server doesn't know the address, it contacts a DNS server higher up the chain of DNS servers until one of the root servers is reached. These are the addresses of those root servers. They may know the answer directly. They may know which DNS server to contact as the primary DNS server responsible for that domain name. If they don't know the address for a name and can't find a server that does know, the name doesn't exist as far as the Internet is concerned. Not all of these DNS servers allow themselves to be pinged, but most do.
If you try four or five of the IP addresses in that list and none of them respond, the problem is in your ISP's internal network or their connection to the rest of the Internet. You aren't able to reach IP addresses outside of your network, but you can reach the gateway. This is a problem for your ISP to solve, so you need to call their technical support line. If the problem is this big, they're almost certainly going to be already aware of it, but they should be able to give you the scope of the problem and when they think it will be fixed.
On the other hand, if at least one of those root DNS server IP addresses responds to a ping, your ISP's DNS servers are down, they don't respond to ping requests, their addresses have changed an you weren't notified or your ISP is having problems with loosing DNS requests (because of faulty equipment or an overloaded, congested network). The problem may clear up after a short while in the case of congestion, but this is still a problem you should contact your ISP about. Not all of the network problems you'll encounter on the Internet are yours. When you call your ISP's technical support line, verify that the DNS servers are up, and if they are, what their IP addresses are.
Baby Step 3: Ping A Well-Known IP Address
If you are not able to ping your DNS servers (See the previous step.), it's a sure bet that you won't be able to complete this step. However, even if you are able to ping something at the IP address your ISP's DNS servers are supposed to be at, all you really know is that some device at that address responds to a ping. The next test, Test 7: Testing for DNS Functionality, will help us determine if that machine is really a DNS server.
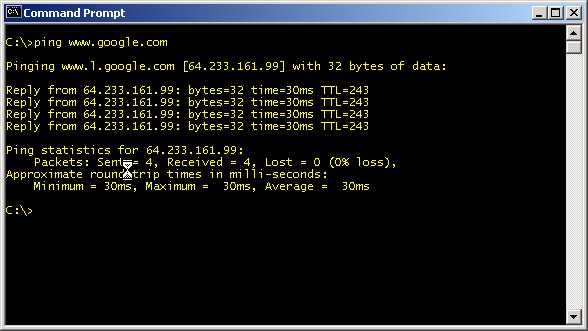
This test is to ping a well-known site like www.google.com or www.ebay.com or your ISP's web server (e.g., www.verizon.com, www.xfinity.com). The successful results of such a ping are shown below. If you get a successful ping to one of these sites, but you can't reach a particular site like www.joes-small-insignificant-web-site-is-down.com, your connection is probably just fine. Poor Joe, however, has got a problem with his/her site. If one well-known site doesn't answer the ping, try another. Every site goes down occasionally. They might just be doing routing maintenance or upgrading. If pinging Google and one or two other well-known sites all fail, go to the trouble shooting section below.
Troubleshooting a Well-Known Site Ping Failure
Assuming you've gone through the previous (baby) steps, troubleshooting here means we were able to ping our gateway and beyond that to some device(s) that we believe to be our ISP's DNS server(s). Unfortunately, pinging a system beyond that failed. This might be because our ISP's DNS servers are not working correctly or your ISP's connections beyond its own network are experiencing problems. Now, we'll try to determine which.
If pinging a well-known site like www.google.com returned "Unknown host" then it is likely your ISP's DNS servers are down. This is because sites like Google and Ebay are highly redundant and at least one of their machines should respond. You may again want to try pinging the root DNS servers (using their IP addresses) given in the list in the previous section. If you can reach two or three of them, it's even more likely dealing with a DNS server failure at your ISP. If we cannot reach the root DNS servers either, the ISP's network connection to the rest of the world is in question. It's time to call your ISP's friendly technical support line in either case.
If pinging www.google.com returned "Destination host unreachable" or "Request timed out," the DNS servers are probably working fine, but the ISP is having connection problems to the rest of the Internet. It's still time to call your ISP. If you have success pinging the well-known sites, but you try this same test for www.joes-small-insignificant-web-site-is-down.com and get either of these responses, it's most likely Joe's site that is down, not your ISP. Joe's site may also have moved to a new IP address, but your ISP's DNS servers haven't been updated yet. In either case, wait a while and try again. Don't call your ISP about Joe's site being down (unless you are Joe and your ISP is hosting your web site). They don't care about Joe. They don't care if you can't reach Joe, because they probably can do a thing about it. On the other hand, if you can't reach Google, that might spark their interest.
Test 7: Testing for DNS Functionality
Test 7: Testing for DNS FunctionalityTest 7: Testing for DNS Functionality
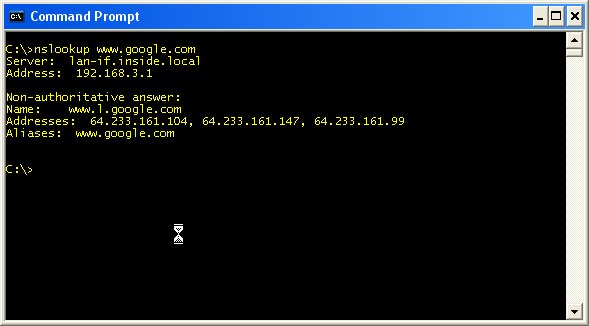
The function of the DNS server was the topic of Introduction to the Domain Name Service. Everything from the game your are playing, your email program, your web browser and most other programs that use the Internet will use DNS servers to look up the IP addresses for names. You can look up IP addresses, too, using the nslookup command in a command prompt window. It's a good test when you are having trouble reaching sites on the Internet. The basic nslookup command starts an interactive session as shown in the following screenshot.
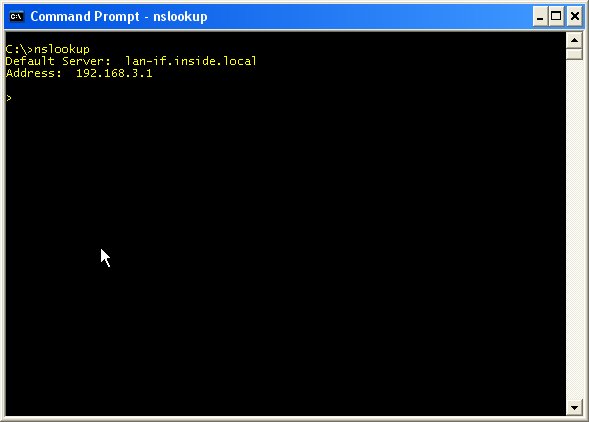
The nslookup session starts with the program displaying name and IP address of the default DNS server in use and the ">" prompt signifying that nslookup is waiting for a command. You should see one of the IP addresses that your ISP gave you (either statically or dynamically via your ISP's DHCP server) for your DNS servers in place of the IP address above. Some routers mask your ISP's DNS server by offering a "pass-through" service at your LAN's gateway address. In that case, the DNS server your see will be that IP address (e.g., 192.168.0.1) If you get "DNS request timed out" instead of the ">" prompt, you are having trouble reaching your ISP's DNS servers. We'll cover that in a minute, but for now, let's assume the DNS server is responding and nslookup is waiting for a command. We'll start with the most basic and most often used command, the name to IP address lookup. We do that by typing any site name at the ">" prompt. For example, I typed www.google.com and got the response you see in the screenshot below.
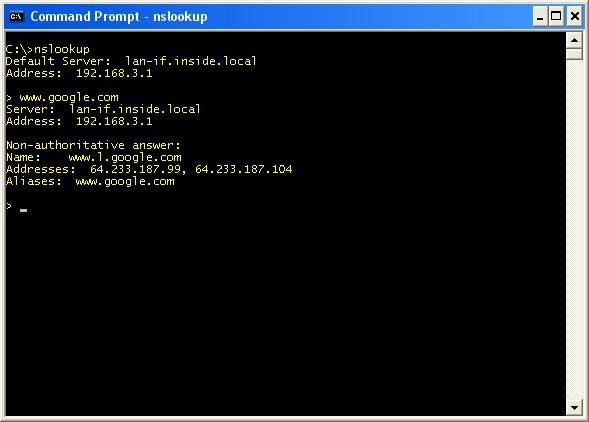
Unlike most sites, Google resolves to more than one IP address. The is because Google servers are replicated and geographically distributed all over the world, so more than one may be useable by your computer at any given time. This is also why Google makes a good test subject. Even if one or more Google servers are down at any given time, it's a good bet that at least some of them are up and responding and those will be the ones the DNS query returns.
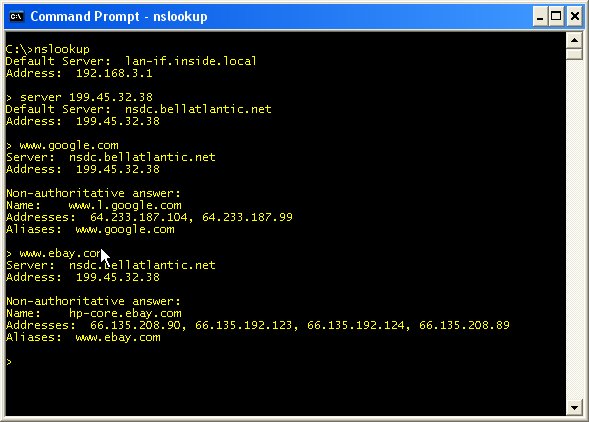
You can pick the DNS server you wish to use by using the server command as shown in the screenshot below. I explicitly changed to one of my ISP's DNS servers using the command server 199.45.32.38 and hitting enter. The nslookup program acknowledged my change by listing the new "Default Server." Again, I try the names of a few well-known sites that are likely to be known by any DNS server.
Next, I could try my ISP's other DNS server using the server command as above and the IP address of my ISP's other DNS service. It's a good idea to check both DNS servers provided by your ISP (or more if more are provided). If your ISP moves one of its DNS servers to a new IP address, the other one in your list will be used automatically. However, you've now lost DNS redundancy, which was the reason for having more than one DNS server available in the first place. If the remaining server should fail, be taken down for maintenance, or also have its IP address changed, you won't be able to access sites on the Internet except by IP address.
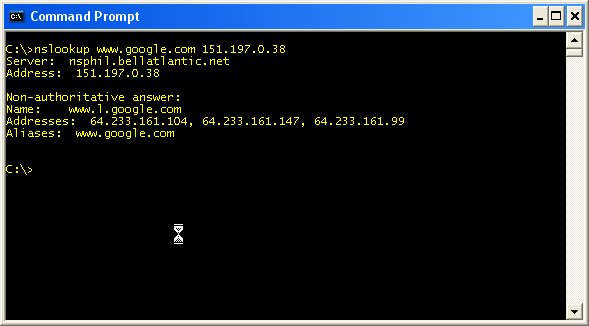
Finally, you can specify which DNS server to use when using the command line as shown in the next screenshot. This is also useful if you are getting the "DNS request timed out" error using your default DNS server. You can attempt to use your alternate (a.k.a., secondary) DNS server by putting its address.
If secondary DNS query works, but your primary DNS server query did not, you might want to temporarily switch the order of the DNS servers listed in the TCP/IP properties for your Ethernet adapter. In Windows XP and Vista and even when using dynamic IP addressing, you can explicitly set the DNS servers to use as shown in the following screenshot.
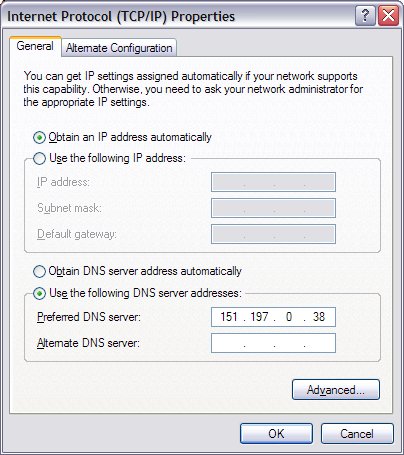
The example above supposes that the lone entry we are using for DNS is the secondary DNS server that we could successfully query. There is an alternative when you are using dynamic IP addressing for your LAN using your router's DHCP server. In this case, you can change the DNS addresses listed in your router's configuration page. The devices on your LAN would then need to ask for new dynamic IP addresses (e.g., using ipconfig /renew in a command prompt window). This may be simpler than changing each device individually.
Test 8: Testing Your Network Speed
Test 8: Testing Your Network SpeedDiagnosing a Slow or Overloaded Network
At some time, you'll likely find yourself noticing that your network seems sluggish. It's not down, but things web pages seem to be taking significantly longer than usual to appear in the browser, downloading files is slow or maybe the ping times to your favorite gaming server seem to have increased for no reason. This section of troubleshooting is to show some tools for use in diagnosing these sorts of problems.
Test 8: Testing Your Network Speed
If you are diagnosing a slowdown in your network, the first thing to test is to see if your local LAN is the problem or not. It could just be that the particular web site or game server to which you are connecting is congested. Your Internet connectivity is fine if that is the case, so there may be nothing you can do. On the other hand, there may be something within your LAN that's causing your slowdown. A quick way to check this is by using one of network speed test tools like the ones found at DSLReports.com, Speedtest.net or Speakeasy Speed Test. With the latter two tools, you (usually) choose the server that is closest to your geographic location. With the DSL Reports speed test, it picks a number of servers - both close and far geographically (either you can share your location or it will approximate it based on your IP address). It then runs simultaneous tests to those servers to get a composite picture. My results from the DSL Reports speed test are shown below.
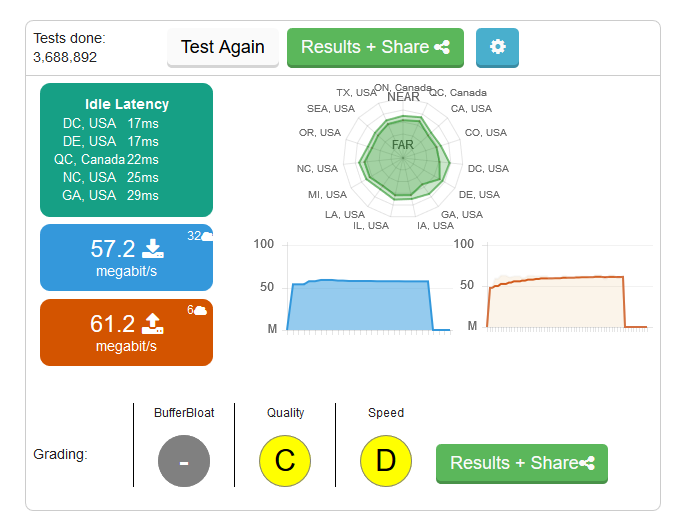
I pay for 50/50 Mbps FIOS service and am getting upload and download speeds of 57.2 Mbps and 61.2 Mbps, respectively. This test shows that I'm getting a bit more than what I'm paying for. If I was having trouble connecting to a particular web site or game server but still got results like those above, I would have to conclude that my connection is fine, but there is a problem somewhere between my ISP and that server. One thing I might try in this case is use one of the tests that would let me pick a test server that is geographically nearer to the site I'm trying to reach (assuming I knew that information) and run the test again. If that test shows reasonable speeds, it's probably a problem with the site itself. Don't be surprised, however, if the speed test results when going across the country are significantly lower than those going 20 miles from your home. That's not unusual nor is there anything wrong (most likely).
If you don't see the expected speeds, first check that your test machine is the only one using the Internet connection. One thing you should do (or be prepared to do) is to disconnect all devices from the LAN except the one doing the speed testing. Physically disconnect the cables from the router/switch. This also includes shutting down any wireless connections from cell phones, laptops/netbooks/gaming consoles/TVs/DVRs and the like. (We often forget those are even on the network.) It may be easier to log onto the router and shut off the wireless radio temporarily. Run the speed test again to check that the result is the same.
What if the tests indicate you aren't getting the speeds you expect? (That is, what if you're not getting the speeds you paid for?) Assuming you have picked the nearest server to your location and maybe a few others in the same general area, if none of the sites return test speeds in the vicinity of what you should be getting, the next question is, "Is it them or me?" Is the problem inside your LAN, your portion of your ISP's network or somewhere else? Time to do some more testing.
Test 9: Checking LAN Usage
Test 9: Checking LAN UsageTest 9: Checking LAN Usage
If network speed tests indicate you aren't getting the speeds you expect, the next step is to see if the problem is within your LAN or in the Internet. If your connection is shared among several devices used by others besides yourself, now is the time to ask around if anyone is downloading or uploading anything (large). It's also possible that one of the devices is doing an automatic update that you are unaware of. A cursory check can often find out who/what the culprit is. If not, it's time to do some snooping .. literally.
Tools that monitor network traffic (also called network "sniffers" or "snoopers") can be helpful with this step to some degree. Windows doesn't come with any such tools. There are few free tools available, but they can be difficult to set up and the results can also be difficult to interpret. One of the best I have found is Paessler's PRTG Traffic Grapher. It comes in both freeware and commercial editions. The freeware edition is limited to 100 "sensors," where a sensor is a network traffic metric. For checking LAN usage, we only need one sensor - one that monitors all network data as seen by the LAN adapter on which the software is running. This tool can be used for many other things than just checking your LAN usage.
If you think you might be interested in such a tool, go to Paessler's web site and download the the freeware edition of the PRTG Traffic Grapher. (The version at the time this example was created was 9.1.6.1962.) You can download a PDF version of the manual found at this link. There is also an HTML version of the manual. Both contain installation and operational instructions.
Unfortunately, running this tool on one of the machines on the LAN yields an incomplete picture. You may recall that in the discussion on hubs and switches, once the switch has learned where the devices on the network are attached, it only sends data to the ports that require it. That means you will see all the data coming to and from the particular machine upon which the monitoring tool is running, but none of the traffic from the other devices on the network unless the monitoring machine is the source or target of the traffic. There are enterprise-level (i.e., more costly) switches that allow a monitoring port to be enabled such that all traffic is sent to it, but those found in typical home and small offices do not.
Monitoring tools are still useful to verify that the ISP's connection is up, but given that a typical home user can't rely on such tools to get a picture of the whole network, we have to resort to more rudimentary methods - seeing the lights. In Test 3: Check the Link Lights, we checked that the lights we expected to be are were indeed lit. In nearly all routers/switches, there is one light per port. If the port is connected to a device, the light is lit. The light remains steady when there is no traffic coming from or going to that port. On the other hand, the light will flicker or blink to indicate traffic on that port.
Start by checking the link/activity lights on the router (or switch) closest to your ISP Internet connection. If you have a port on your router that is flashing wildly, you have your first clue. If this is a stand alone switch and two of the ports are flashing wildly and more or less in concert, you again are narrowing the search. Typically, one of ports connects to another switch or directly to the router that shares the Internet. Whatever device is connected to the other port is probably the cause of the slowdown. It doesn't necessarily have to be another computer/Xbox/etc. hogging the Internet connection. If you have one computer transferring a lot of large files to another computer over the LAN such as when doing a full backup, that may well generate sufficient traffic to slow down the LAN to the point the Internet connection is also affected.
Once you know which device (or devices) are involved, it's time to investigate them more closely. If this is little Billy's gaming PC, he may be updating a game on "patch Tuesday." Sometimes these patches are several hundred megabytes in size. With the increased use of online game (purchasing) services like Steam, downloading several gigabytes of data isn't unusual. It may well be your network is slow for just such a reason. Time to ask Billy what's up and also time to remind him of the family downloading etiquette. It may also be a good time to explain to little Billy that while downloading games for free from BitTorrent sounds neat, one letter from the RIAA to your ISP about alleged copyright infringement may well end your family's Internet fun for good (at least with that ISP). Other possibilities include such things as the Xbox getting an Xbox Live update or even your DVR or DVD player getting a new firmware update. If you suspect a computer, but can't isolate what exactly the source is, installing something like the network monitor mentioned above can be a big help.
What do you do if, on the other hand, you look at your link lights and none of them are blinking madly? You see an occasional blink a couple times a second, but by and large, nothing really seems to be going on on your LAN. In this case, it may be time to give your ISP's technical support line a call. Before calling, disconnect all devices from the LAN except the one doing the speed testing. Physically disconnect the cables from the router/switch as necessary. This also includes shutting down any wireless connections from laptops/netbooks/Nintendo DSi's/TVs/DVRs and the like. When you call your ISP's technical support line, they may ask how many computers are sharing the connection, so it's good to be able to say credibly that you only have one device at the moment - the one reporting the sub par speeds. I have even gone so far as to hook up a laptop directly to the connection from my ISP - bypassing the router/firewall/switch completely - in order to test the connection. That configuration pretty much rules out any possibility that the problem is in your router or elsewhere on your LAN.
ISP's can generally run their own speed tests to your neighborhood or even your specific connection. Don't be surprised to call and find out they are already aware of and working on the problem. If you are a cable modem subscriber, don't be surprised if this problem tends to crop up every weekday around the time kids are getting home from school. The first thing they often do is check their email, their Facebook/Twitter account (or whatever social networking site is currently popular) and then play a game or two. Some portion of most cable networks are shared among several customers or whole neighborhoods. During the peak times of the day, the shared portion becomes saturated with traffic. In this case, you may need to complain to your cable provider about the problem - possibly on a daily basis. They can do things to balance the network up to and including running more cable.
Test 10: Using the netstat command and TCPView to Check Port Usage
Test 10: Using the netstat command and TCPView to Check Port UsageTest 10: Using the netstat command and TCPView to Check Port Usage
What happens if you can trace a network slowdown to a particular computer, but nobody knows what could be causing it to use so much bandwidth? The device could be running any number of legitimate background updates or services that use an Internet connection. Unfortunately, the same machine could have been compromised by a trojan hourse or virus and now it's relaying tons of spam email or acting as an illegal file sharing service. We need to invesigate what processes are using the ports on your system and how they are using them. (This is when installing a network traffic monitoring tool like Paessler's PRTG Traffic Grapher can be quite helpful since we've narrowed the problem down to a machine [or two].) Luckily, there are some tools and Windows and some nice free tools to help us with this step. The first one we'll mention is the netstat command.
The command "netstat" is short for "network status." It can used to show the configuration and status of the network on the machine on which it is run. It's a good idea to periodically run the netstat command to see what services you have listening for connections. If you see a port listed that is new and unexpected, it is a good idea to do a Google search on that protocol and port. For example, if I look on a Windows XP system that is connected to a few services on the Internet, I might see the following screen.
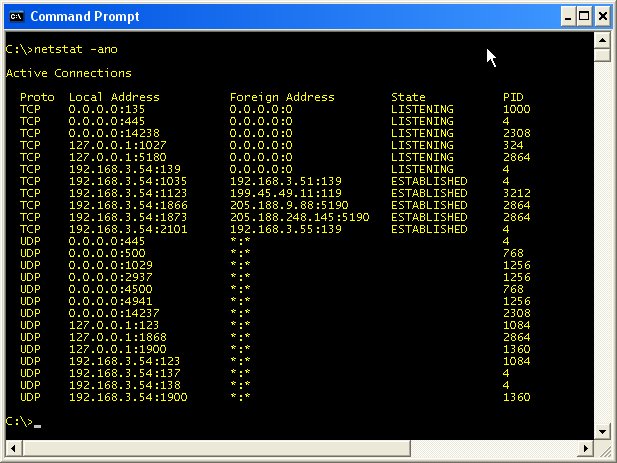
The "-a" option instructs netstat to display the active network connections. It lists the protocol (either TCP or UDP), Local (IP) Address, Foreign (remote IP) Address, and the connection's state (for TCP connections). Since I am using the Windows XP operating system in this example, I can add "-o" option to display the process ID number or "PID" of the program using that port. (The "-n" option instructs netstat to use raw IP addresses in its results rather than attempting to resolve the IP addresses to their respective domain and host names.)
Generally, it is the remote (foreign) connection information that we want to inspect. Let's assume we decide that having two connections to Internet servers at (the remote) destination port 5190 somewhat suspicious. The process ID associated with that port 2864. Now, we need to find out what process matches this process ID. For that, we can use the windows Task Manager. To bring up the Task Manager, you can either hit Ctrl-Alt-Del (Windows XP only) or right-click (not left-click) on an empty spot in the toolbar at the bottom of the screen as shown here. From the popup menu, choose the Task Manager.

The task manager is shown below. Click on the Processes tab to bring that tab to the front as shown. This lists all the active processes on your system by name, PID, user name (of who started the program), percentage of CPU that task is using, and the amount of memory that task is using. Clicking on the title of any column will sort the entries in ascending order. (Clicking a second time will reverse the sort to descending order.) Click on the title of the PID column to sort the entries in PID order and look for the PID of the suspicious entry (2864).
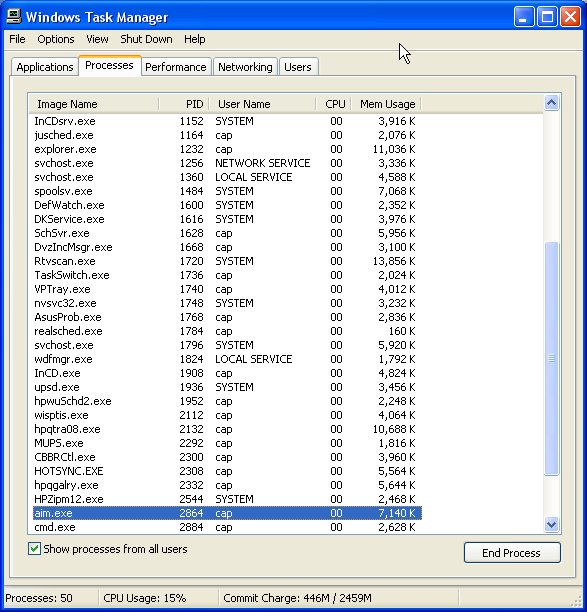
From the Task Manager window above, I find that the application's name is aim.exe, which is the name of AOL Instant Messenger application. If I didn't know what aim.exe was, I would Google that name along with the either the source or destination port and protocol (e.g., "aim.exe tcp 5190"). If a search using the source port doesn't turn up anything conclusive, try the destination port (or both). If you do find a application listening on a port that turns out to be a known virus or Trojan horse, your fun is just beginning, but at least you're aware of its presence. (Eradicating the problem is left as an exercise for the reader.) In this case, what I've found is AOL's AIM communicating on its default port of 5190. There's nothing to see here. Move along.
The netstat command is a fine tool, but it is command line driven as opposed to having a standard graphical user interface (GUI). It also just runs once unless the command is issued repeatedly. Therefore, it can't show changes in connections as they occur. The upside it that it comes installed on Windows 2000 and above though, so it's pretty much guaranteed to be there. (Although the -o option is only available in Windows XP and above.) However, there are some nice GUI-based tools out there for investigating the traffic on specific computers and on your LAN. We'll start with TCPView from Microsoft's own TechNet site.
TCPView displays a list of the current TCP and UDP connections established with the computer upon which it is run. It's very much the same information that netstat had, but in a nicer viewing format. Additionally, TCPView can be set to recheck the connections at 1, 2 or 5 second intervals and displays the differences from the previous check. Connections that change state from one update to the next are highlighted in yellow; those that are deleted are shown in red, and new connections are shown in green. (TCPView calls the connections to other IPs, "endpoints.") The owning processes name and PID are also shown, which saves looking them up via other means.
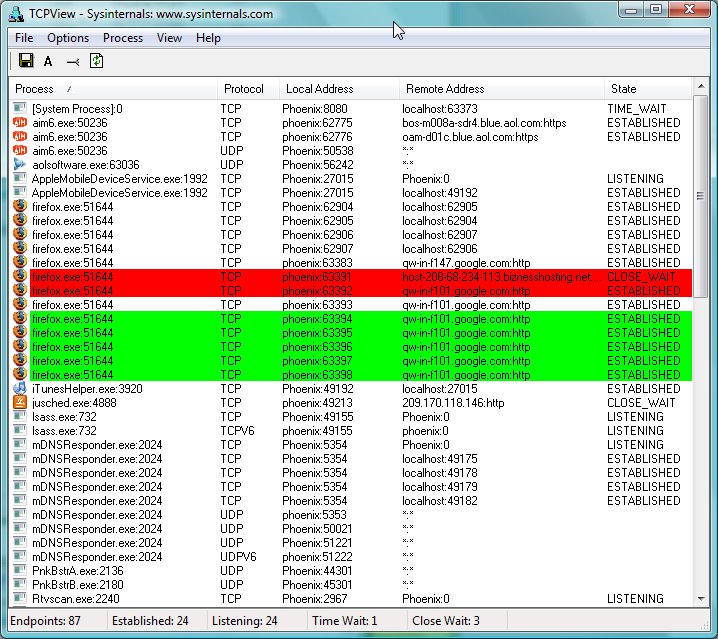
Using TCPView, you can look for unexpected connections as before. However, with TCPView, you can immediately see what processes those connections are from/to. Additionally, if any of those connections look questionable, you can close them by right clicking on the connection and choosing "Close Connection" from the popup menu.
Useful Tools for Network Troubleshooting
Useful Tools for Network TroubleshootingUseful Tools for Network Troubleshooting
In this section, I'd like to list the tools mentioned previously, and add a few others that I use. At some point, I plan to expand this section with examples for the tools not already used elsewhere. For now, this is just a list of those tools with a short explanation of each. It's a work in progress.
ipconfig - The command used in a command prompt window on Windows-based systems to display the current IP settings of the Ethernet adapters.
netstat - A command used in a command prompt window that will return various sorts of network status and configuration information. It can be used to find out how your computer is routing data and what ports are listening for connections or using outgoing connections.
nslookup - A command used in a command prompt window that queries a domain name server (DNS) with a command network name (e.g., www.google.com) and returns an IP address associated with that name.
ping - The command used in a command prompt window that can be used to send a test message to another device which will reply with the same message.
Ping Plotter - A Windows program available in free, standard and professional versions that does the same thing as tracert and ping, but with a graphical display that makes it easy to see where network slowdowns are occurring. The free version includes a 14-day trial to the other versions. The professional version is pricey, but the standard version is $40. The main differences are the ability to trace two targets at once (e.g., one known to be reliable or close and one that is under test) and keep the trace history for an indefinite period rather than only 10 minutes.
Process Explorer - A Windows program from Microsoft that can ferret out what services are running with every option imaginable. Works on every Windows OS since Windows XP. Windows' Task Manager has a Services tab that provides some of the functions, but not at as fine of level of granularity.
Speed tests - Web sites that will allow you to perform a speed test over the Internet to see if you are getting the speed you are paying for. Good speed tests can be found at www.dslreports.com, www.speedtest.net, myspeed.visualware.com, and www.speakeasy.net.
tracert - A command used in a command prompt window on Windows-based systems to trace the route taken by a packet send from your computer to another computer or device. (Linux/Unix users will recognize this as a version of traceroute - with differences.) The IP addresses of the intermediate nodes are given along with the time it took for the response. The information is the same as that returned by Ping Plotter, but is included with the Windows OS like ipconfig, ping, nslookup, and netstat.
WinIPconfig - A Windows GUI version of the ipconfig command.
Wireshark - (Formerly known as Ethereal) A program for Windows, OS X & Linux that can be configured to capture data traffic based on a set of criteria like source IP address, port number used, etc. Gathers statistics on what it captures.