Arctic Cooling Freezer 7 Pro CPU Cooler
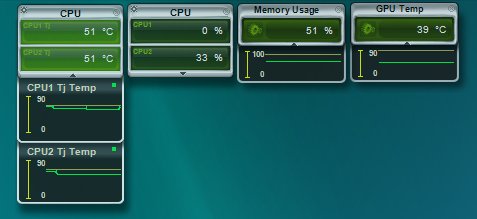
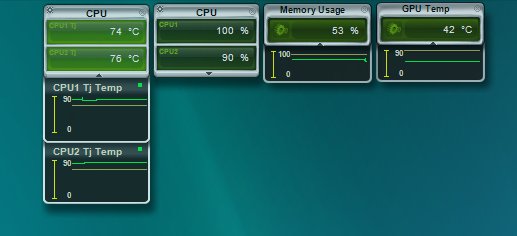
Arctic Cooling Freezer 7 Pro CPU CoolerWith my success and happiness with the Arctic Cooling Accelero S1 Rev 2 VGA cooler, I decided that I should look into a CPU cooler as well. While my CPU temperatures at 51°C during idle weren't too bad, they were still higher than I would like during gaming at 74-76°C. That's a rise of about 23°C under load. My method for testing was to run the first CPU test of Futuremark's 3DMark06, stop it and take a screenshot as quick as possible. Not completely accurate, but close enough.

The CPU (and other) temperatures & utilization with stock cooling @ idle.

The CPU and other temperatures & utilization with stock cooling while testing.
The Solution
Since I had such a dramatic result with the Arctic Cooling VGA cooler, I thought I would try their Freezer 7 Pro CPU cooler. The first thing that's noticeable about the Freezer 7 Pro is that it is a monster. I didn't have any problems, but I could bet there might be with some motherboards where the memory is very close to the CPU. That said, I have the OCZ Reaper HPC 4GB DDR2 1066 (PC2 8500) memory kit that has the heat pipes above the memory. I didn't have an issue, but it was close. First, a gratuitous box shot of the product, which shows its basic design.
As you can see from the pictures, this is a large heatsink and fan combo with three heat pipes through the fins. It has a good-sized 92mm fan that pushes air toward the back of the case. In my case, that air goes right into a 120mm exhaust fan. Because it's 92mm, it can run slower and still move a good volume of air. Slower generally means quieter. (You could also orient the cooler to put the air toward the top of the case as well, for those cases where the power supply is on the bottom and there is clear air flow out the top.) The lowest three fins are curved downward on the front. Their purpose is to blow air down on the voltage regulator/converters .. assuming that's where yours are located.
The first step is to remove the original stock cooler. Mine is the cooler that comes with the retail version of the Intel Core 2 Duo E8500. First, we disconnect the wire that connects the fan to the motherboard. This heatsink fastens to the motherboard like most LGA775 heatsinks. That is with four plastic posts positioned equilaterally around the base. Note that when the posts are locked, the "straight line" indication on the top points toward the CPU core as in the first close-up picture. Use a large flat-blade screwdriver inserted into the slot and unlock the post by turning it 90° in the direction of the arrow as in the second close-up. (This is actually a picture of the post on the new heatsink before it was locked in place, but the position of the top of the post is the same.) The "straight line" should be perpendicular to a line going to the CPU core. It can be pulled straight up out of the motherboard. Repeat for all four posts.
Rant warning: After years of both Intel and AMD coming up with simpler, more fool-proof designs for connecting heatsinks to motherboards, Intel took a decade-wide step backwards with the LGA775 socket. We want a heatsink that can be attached to the motherboard with a simple lever or something similar to lock it in place. Intel, you had it right with the Socket 478 design. AMD is still getting it right with their AM2/AM2+/AM3 motherboard sockets. Please, please, please beg, borrow or steal a better design. It's extremely hard and sometimes nearly impossible to push the post down and turn it at the same time. It's very hard when the motherboard is attached to a case to see if the post is through the motherboard and locked correctly. In this day and age shouldn't have to flip the motherboard over to look. I push one post in and the one on the opposite side pops out. Then I have to resort to pushing both posts down as hard as possible while locking one into place. That the LGA1366 socket still has the same crappy design as the LGA775 saddens me. I'm quite surprised that there hasn't been a cottage industry of just selling better posts for these heatsinks.
I was really disappointed at what I found upon removing the heatsink, flipping it over, and looking at the surface that contacts the CPU. As you can tell from the picture, the thermal transfer compound - in this case, the Intel supplied thermal tape - has pock marks and one edge isn't even covered. It appears that the thermal compound has boiled away to some extent or at least dried out. Looking at the top of the CPU, we see the same thing. The edge that isn't covered is probably due to the heatsink not contacting the surface of the CPU package squarely, and that, I blame squarely on the crappy heatsink attachment design.
The next step is to clean off all the thermal paste from the top of the CPU. This is done using a soft wipe and isopropyl alcohol with a purity of at least 90% (It's available in most drug stores, but often not found in most groceries.) Handi Wipes® are very good for this, but decent paper towels will do. Put the alcohol on the cloth - not on the CPU directly. Clean with a circular motion until as much paste can be removed is gone. An Xacto knife with a sharp point can (gently) be used to remove any remaining paste. When it's clean, it should be easy to read the specs on the CPU.
The next step is to put new thermal compound on top of the CPU. There are many good choices out there, but I like Arctic Silver 5. There are a couple good Youtube videos on applying Arctic Silver 5 and a set of PDFs from Arctic Silver as well. I won't go into detail here as this isn't a tutorial on replacing a heatsink. The freshman mistake most people make is putting (way, way) too much compound on the CPU. As the instructions say, a glob the size of a grain of rice or a grain and a half is sufficient for most CPUs. I myself like spreading the compound with a straight razor blade, but the way recommended by Arctic Silver is to just put the glob in the center - as a line with the proper orientation for dual and quad core CPUs - and to press and twist the heatsink down on the CPU as flatly as possible. The twisting will spread the compound around. (I believe it will spread further and evenly once the CPU heats up as well.)
Now, it's time to fasten the new CPU heatsink to the motherboard. (Picture 1) Position the heatsink over the motherboard and align the four posts with the four holes in the motherboard. The Freezer 7 Pro is installed with the fan off the unit, so be sure to orient the heatsink so the airflow will be in the direction desired. In my case, the airflow is toward the back of the case. This is what most people will want, however, if you have a case with the power supply on the bottom and a fan at the top of the case, you may want to orient the heatsink to push the air to the top of the case. (This may defeat the purpose of the bottom curved fins in cooling off the voltage converters, however.) (Picture 2) Initially all four posts should be oriented with the "straight line" perpendicular to a line going to the CPU core. (Picture 3) Use a large flat-blade screwdriver inserted into the slot and while pressing down - harder than you would like in order to extend the post though to the bottom of the motherboard - turn the post 90° clockwise opposite of the direction of the curved arrow on the post. I've seen a lot of instructions have this backwards. The arrows are there to show how to remove the heatsink, not install it. You may need a pair of screw drivers, one on the post you are locking and one on the post opposite of that one (or use your thumb on the opposite post), to keep from popping out or moving the heatsink while fastening down the post. Repeat for all four posts. If you happen to have the motherboard outside the case (as when building a new PC), look under the board to see if the pins on the post are completely through the motherboard.
Now, it's time to attach the fan to the heatsink. The Freezer 7 Pro makes this easy in that it's just a couple clips that hold the fan mounting to the heatsink. The fan itself is attached to the mount with rubber fasteners to dampen down the noise from fan vibration. All that's left is connect the 4-pin fan power connector to the motherboard. Now, it's time to see if the effort pays off.
It's time to take the same temperature settings and see what we've gained. The differences aren't as dramatic as with the Arctic Cooling Accelero S1 Rev 2 VGA cooler, but then the situation wasn't as bad to begin with either. A 10°C reduction in idle temperatures and a 12-15°C reduction in temperatures under load is very respectable. I've since overclocked my CPU from 3.16GHz to 3.6GHz with no appreciable difference in either the idle or load temperatures. The Arctic Cooling Freezer 7 Pro CPU Cooler definitely gets a thumbs up from me.

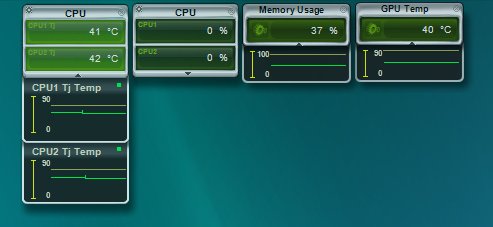
The temperatures just after installing the Freezer 7 Pro. 41 & 42°C @ idle. A full 10°C reduction in idle temperatures.

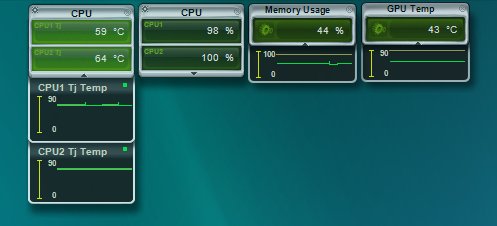
The temperatures under load of the 3DMark06 CPU test 1. 59 & 64°C. A 15°C & 12°C reduction in temperatures under load.


