Configuring Wireless
Configuring the Wireless Access Point and Wireless Ethernet Adapters
Once you have decided on the wireless equipment you will use, the next hurdle to overcome is configuring equipment to work together. With a wired network, there is no configuration of this sort. We can plug almost any cable into any hub, switch, router, or Ethernet adapter and be fairly certain a link will be established between the two devices. With wireless networking, this is not (yet) true. The radio medium must be configured before the equipment will exchange any data with each other, and this must be completed correctly before the network configuration can be completed (which was discussed in Configuring Your Network).
The specific WAP used as an example here is a NetGear WGT624-V2 combination router (with firewall), 4-port 10/100 switch, and 802.11g (54 Mbps) wireless access point. Is also features Netgear's proprietary 108 Mbps Super G technology, which supports data rates at up to twice the standard 802.11g (according to Netgear) when used with Netgear wireless Ethernet adapters with Super G technology. The wireless Ethernet adapter used is Netgear's WG511T wireless 802.11g Ethernet adapter with Super G technology. While there will be similarities, other manufacturer's installation and setup will differ somewhat from what is shown here. However, the goals of these operations are the same. Different models of wireless equipment from the same manufacturer have also different installation programs and procedures. The user's guide for the devices you purchase should have the specific information you need. For the rest of this section, the term "WAP" will be used to describe both dedicated WAP devices and combination devices unless we need to distinguish between the two. Before we go into how to set the items, let's take a look at the items we will need to set.
There are a large number of variables that can be set, but only a few of them must be set when establishing the radio connection. The first is to decide on the channel to be used. In 802.11b and g networks, the network transmits in the 2.4 GHz frequency band. However, there are multiple specific frequencies (channels) in that band that are available. The number and exact frequencies used vary depending on the country you live in. In the U.S., there are 11 channels numbered 1 through 11. This is one way that several discrete wireless LANs can be established in the same physical location. If you live in a dorm or townhouse environment and someone else purchases wireless equipment from the same manufacturer, the two radio transmissions will interfere with each other if they are both left at the defaults. If the default channel number for the WLAN is 6, you could decide to use channel 3 instead. That way, you can both have WLANs with overlapping operational ranges, but they won't interfere with each other. (If your neighbor has left his WLAN at the manufacturer's defaults and doesn't want to touch anything in case they "break it," you may have to get them to shut their WAP off until you get yours configured to not interfere.)
The second variable is the Server Set-Identification or SSID. This is the name of the WLAN assigned by the WAP. It is fairly arbitrary and you should feel free to give it a name you find easy to remember. Linksys WAPs like to use "linksys" or "wireless" as the default SSID. Netgear seems to use "NETGEAR." This isn't guaranteed by any means, and the manual that comes with the WAP will identify what the default channel and SSID is. (It is sometimes printed somewhere on the WAP itself as well.) Technically, two (or more) WLANs operating on the same channel, but using different SSIDs can also to co-exist, but the transceivers on all the WAPs and wireless Ethernet adapters will see all the WLAN traffic. They will ignore the traffic without the proper SSID. However, if the WAPs are operating on different frequencies, they will have less radio traffic to inspect, and the throughput will be higher. If you know you have a neighbor operating a wireless LAN, you should find out what channel they are using and pick a different one if possible. (One caveat: if you decide to use Netgear's proprietary Super G 108 Mbps speed, only channel 6 can be selected. Therefore, a different SSID would have to be use to differentiate two Netgear WAPs if both are using the Super G mode.)
A third variable is the encryption settings, which we will leave for later. Using a secret key you choose for your network, all traffic will be encrypted at a level that will make it unreadable by others with a wireless Ethernet adapter if they happen to come in the transmission range of your WAP. Most WAPs come with the encryption disabled (although some come with it enabled and with a initial, random secret key printed on the WAP). While this aids in the initial setup of the WLAN (by removing one of the variables to contend with), it's not how you want to operate normally. We'll leave it disabled for now until we get the basic network up and going. In practice, you do not want to operate your WLAN without some form of encryption.
Most WAPs can be (or must be) configured using a web browser like Internet Explorer. The WAP has a built-in, specialized web server used for configuration. Rather than browsing to a well-known URL like www.google.com, you instead browse to the internal LAN address of the WAP. For the Linksys WRT54G and most other Linksys combination devices, that address is 192.168.1.1 by default, so http://192.168.1.1 is the address of the main configuration page. For the Linksys WAP54G, on the other hand, the default IP address is 192.168.1.245. The user's guide for your WAP will give the default IP address.

Here, we find ourselves in another chicken and egg situation. We would like to change the default settings of the WAP's channel and SSID. However, in order to do that with a wireless Ethernet adapter, we have to first talk to the WAP's configuration web pages using its default configuration. We will also need to configure the Ethernet adapter to have an IP address on the WAP's default LAN, which is a topic we really don't formally tackle until after the wireless radio medium configuration is completed. We have to do this in order to be able to contact the WAP, so that we can tell it what changes we want to make. (Note: If we are setting up a combination router/firewall/switch/WAP, this can also be done using a wired Ethernet adapter connected to one of the LAN ports on the switch portion of the box. However, this section will go over the general case that works for both standalone WAPs and combination router/WAPs.)
Set the Wireless Ethernet Adapter's Channel and SSID to the WAP's Defaults
First, we need to set the default SSID in the wireless Ethernet adapter to match the default SSID of the WAP in order for the Ethernet adapter to be able to communicate with the WAP for the rest of the configuration. If you purchased your WAP and Ethernet adapter from the same manufacturer and they are complimentary models, the SSID of the adapter may already be set to match the WAP's SSID. If this is so, you can skip to the next section.
We change the SSID used by the wireless Ethernet adapter using the software supplied by the adapter's manufacturer. (Windows XP [at least since service pack 1 or 2] and Vista also come with the Wireless Network Setup Wizard. However, I've always had better luck with the manufacturer's programs written for their hardware.) With the wireless Ethernet adapter installed and powered up, we launch the configuration utility. Every wireless adapter I've had seems to come with a radically different looking configuration utility - even for different wireless models from the same manufacturer. For this example, I'm using a Netgear WG511T 802.11G wireless Ethernet adapter. I also have the Linksys WPC54GS wireless Ethernet adapter, which has a very different looking utility, but with more or less, the same functionality. If the utility for your wireless adapter doesn't look like the screens shown here, don't fret about it. Just try to understand the purpose of what's being done, and you should be able to translate it to your configuration utility. Our goal here is just to make sure that the adapter is using the same SSID as the WAP.
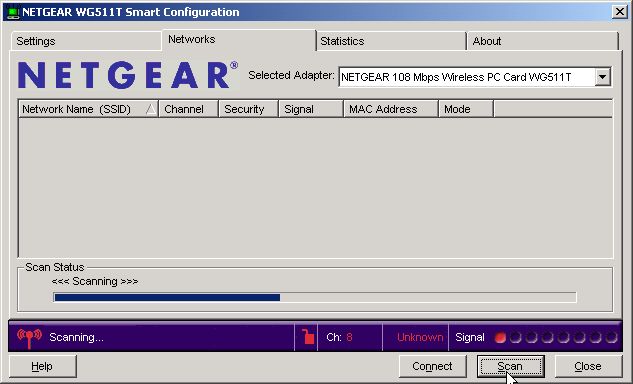
The Netgear wireless utility for its wireless adapter - NETGEAR WGS511T Smart Configuration - has the ability to scan for wireless networks that are within range. If we didn't know (or forgot) the default SSID of the wireless access point, we could use this utility to find out. (However, our home WAP can be set to not broadcast its SSID, so this may not work.) In order to do that with the Smart Configuration utility, we open it and pick the Networks tab. Clicking on the Scan button starts a scan.
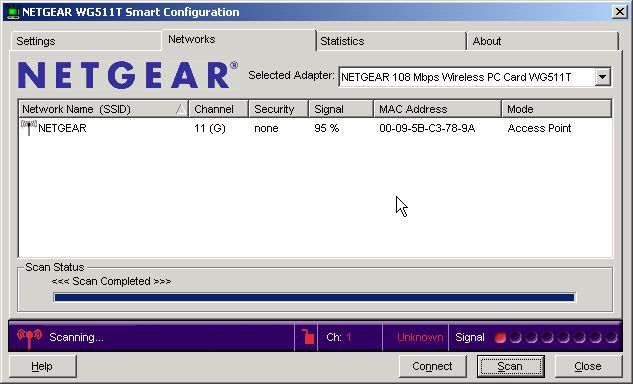
When the scan has completed, any networks found are displayed as shown below. This WAP is still set to its default values, namely an SSID of "NETGEAR" and no security. (The user's manual said the same thing, so this isn't much of a surprise.)
Now, we need to set our adapter to match the SSID of the WAP (if it's not already set to that value). The SSID setting for the WAP is the name of the network that it controls and needs to be the same for both the WAP and (all of) the wireless adapter(s). Once set for the Ethernet adapter, that SSID is the only network that it will pay attention to. If other wireless traffic from another SSID is broadcasting in the same area and on the same channel, both the WAP and wireless Ethernet adapters will ignore it. For the Netgear WGS511T, that SSID is changed on the Settings tab.
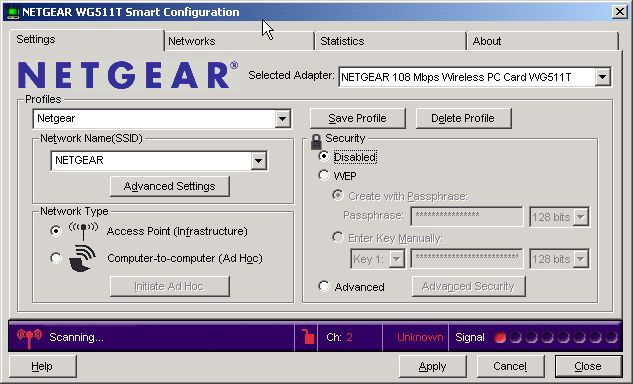
Above, I have set the name of the SSID to "NETGEAR" and I will save it in a profile named "Netgear." (Apparently, I wasn't feeling too inventive when I captured these screens.) Leave the security setting to "Disabled" (or change if to disabled if it isn't already) and hit the Apply button. (We will enable the security settings once we have established the basic wireless network. "Baby steps, Ellie, baby steps.") The result should be the screen picture below. That is, the Ethernet adapter should change from "Scanning" to displaying the new connection.
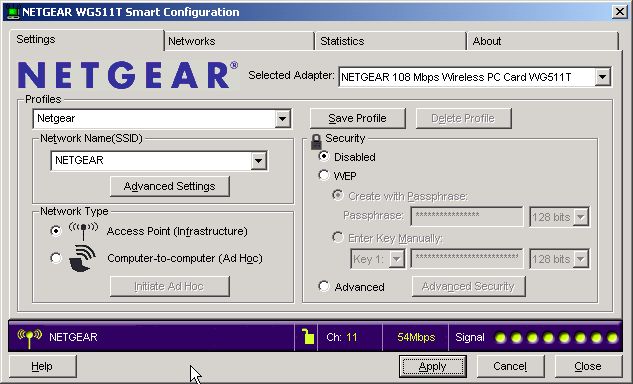
The status indicator line at the bottom of the screen now shows the wireless network we are connected to (NETGEAR), the channel being used (11), the current connection speed (54 Mbps at the moment, although this WAP and adapter card can go up to 108 Mbps), and the signal strength (8 of 8 dots or 100%; the WAP is just across the room from my laptop). I also clicked on the Save Profile button so I can recall this setup later if I need to. Using profiles comes in handy when we have a laptop that travels between wireless networks at home and work.
Note that we set the SSID, but we didn't set the channel. Most wireless Ethernet adapters will scan through the available channels and find the one your WAP is transmitting on. It will stop when it finds a WLAN that matches the SSID it is set to. If this does not happen, most cards will let you can set the channel manually. (This is left as an exercise for the reader.)
Now that the radio medium is established - the wireless equivalent of connecting the cable between the PC and the switch - we need to configure the Ethernet adapter to be on the same logical network as the WAP. That is, the adapter needs to have an IP address on the same network that the WAP operates its LAN and WLAN on. (However, it cannot be the exact IP address of the WAP; no two devices on the same network can share the same IP address.) Exactly what that IP address should be depends on the manufacturer (and possibly model) of your WAP. Assuming there is a router somewhere on your network - as will be the case if this is a combination router/switch/WAP - you may find that your newly-connected machine got a valid IP address using DHCP.
To make things simple and remove as many variables as possible, you may find it easier to set the address of the Ethernet adapter you are using (wired or wireless) manually to start with. It must be valid with respect to the WAP's default settings. For example, if the WAP uses 192.168.0.1 as its default LAN address, the manual setting for the adapter should be 192.168.0.xxx, where "xxx" can be any number between 2 and 254, inclusive. (You can't use 1 because the WAP has reserved that address for itself.) The manual that came with the WAP will tell you what the WAP's default LAN (a.k.a., inside, internal, local) IP address is by default. You will need to jump to section Fixed/Static IP (Manual) IP Assignment in order to find out how to set the IP address manually, and then return here.
- Printer-friendly version
- Log in to post comments