Using DHCP
Using DHCP IP Address Assignment for Automatic Configuration
If your network is connected together by a combination router/switch/WAP, the simplest way to set the IP addresses for the other devices on the network is to have them get their IP addresses using DHCP. The term "DHCP" stands for Dynamic Host Configuration Protocol. It is a network protocol that does pretty much just what it sounds like - it dynamically configures hosts (i.e., devices) on the network. Most routers include a built-in DHCP server, and it's usually turned on by default. If you are configuring a standalone network using only a switch, you probably don't have a DHCP server available and should skip to the section titled Fixed/Static IP (Manual) IP Assignment.
When a device wants to connect to a network and wants to get its network settings dynamically using DHCP, it will broadcast a network-wide message (with its MAC address included, since that is the only unique number it has at that moment) asking for a DHCP server to lease it an IP address and other settings. If your WAP/router has a DHCP server and it is enabled, it will respond to the request with an IP address and other network settings like the network mask, network gateway IP address (which is usually the LAN IP address of the router itself since it is the gateway to the Internet) and the IP addresses of one or more DNS servers. It also includes the length of time that the DHCP server will reserve that IP address for that device. That is called the "lease" time of the DHCP request. Devices that are configured using DHCP are called "DHCP clients." If you have no DHCP server for your LAN or it is not turned on initially, you will have to set the IP addresses manually. A DHCP server is never required, but almost all home routers do have a DHCP server and they are quite convenient. If you are setting up a LAN without a shared broadband conenction, you may still want to consider including a router with a DHCP server just for this convenience. (There are cases, however when you want a particular computer to always have the same address. See the section Fixed/Static IP (Manual) IP Assignment for the discussion on that topic.)
I'd like to offer one word of caution here (because it's been done a number of times based on what I see on the networking forums). If you first buy a router without a WAP (or your ISP supplies you a router without one) and later wish to add a second router with a WAP (because the combo router/switch/WAP boxes are often cheaper than standalone WAPs), you will need to turn off the DHCP server on the new router (or at the very least configure it to serve a different range of IP addresses). If that is not done, which of the DHCP servers will answer a request for an IP address will be potentially random. This will result in machines on the network getting duplicate IP assignments if the two DHCP servers on the network assign an overlapping range of IP addresses.

Setting an Ethernet adapter to use DHCP is very straightforward. The following example uses the Windows 2000 operating system, but the other Windows OSes are similar. First, right-click on the "My Network Neighborhood" icon on your PC's desktop. Choose the Properties menu item from the pop-up menu as shown here. In Vista, go to the Start menu and choose the Control Panel. In the Control Panel, choose Network and Sharing Center. From the Network and Sharing Center, choose Manage network connections from the list of tasks on the left.
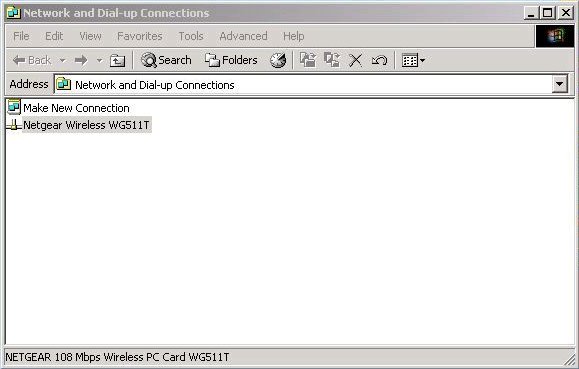
This will bring up the Network and Dial-up Connections window as shown below. In Vista, this is called just "Network Connections." (Since I sometimes use my laptop with a wired network card and with a wireless card at other times, I renamed the wireless Ethernet adapter to "Netgear Wireless WG511T" so I know at a glance, which one I have plugged in. If you would like to rename your network adapter, left-click on its icon and choose "Rename" from the pop-up menu.)
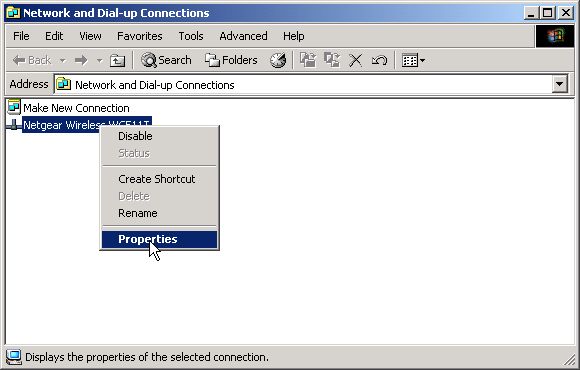
Left-click on the network adapter, which will usually be named something like "Local Area Connection" by default. This will bring up a pop-up menu. Choose Properties from that menu as shown here.
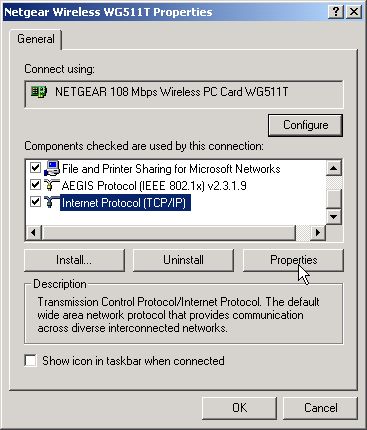
This will bring up the Properties dialog for your Ethernet adapter. Select the Internet Protocol (TCP/IP) from the components list (you may have to scroll it to the bottom) and click on the Properties button. (Double-clicking the Internet Protocol (TCP/IP) line will have the same effect.)
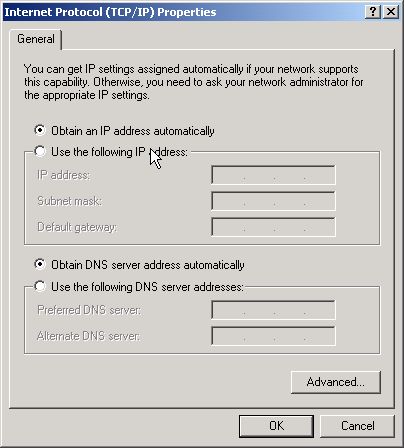
The Internet Protocol (TCP/IP) Properties dialog box will appear as shown below. On that dialog and under the General tab (which is the only tab), choose the radio buttons to Obtain an IP address automatically (i.e., get an IP address from a DHCP server) and Obtain DNS server address automatically (i.e., also get those IP addresses from the DHCP server).
Click on the OK button. With Windows 2000, you sometimes have to reboot after making such a change. With Windows XP and Vista, you almost never need to reboot after changing the IP address. Repeat the above steps for your other wireless devices.
Repeat the above steps for your other networked devices.
Welcome back (if you had to reboot, that is). Now, it's time to see if we got what we expected. We should now have basic connectivity between all the connected devices and the WAP. We can check this using Test 4: Checking for Valid IP Address and Test 5: The Handy-Dandy LAN Ping Test. Try those tests now and then move on to the next section.
- Printer-friendly version
- Log in to post comments