PCWeenie's Guide to Home Networking
PCWeenie's Guide to Home Networking
Surviving a Home Network
This section of the site has a couple of goals. The first goal is to be a useful and straight-to-the-point guide for the average person thinking about (or in the process of) setting up a network in the average home (apartment, dorm, etc.). If that is your goal as well, you may want to skip directly to the section entitled "How Do I Create a Home Network?" below. The second goal is to be a more comprehensive explanation about what this whole networking thing is about, how it works, why it works, what it's good for, and to give an explanation of common terms. A sort of "Idiots Guide to Home Networking" if you will. Of course, if idiots could set up a home network, there wouldn't be a need for a guide. There are some networking guides on the Internet already, but most seem to assume that the reader is a computer or networking professional. Others lacked detail in some places. If your goal is to try to get a handle on the whole enchilada, you probably want to read most of the pages and visit most of the links as well.
Introduction
Introduction
Do I need a home network?
 If you're reading this guide, you've probably already decided you need a home network, or thanks to getting high-speed Internet access, a network has been thrust upon you by your Internet Service Provider (ISP). Others of you may have just heard some buzz about home networks and want to know what the benefits are. That's what this section is about. Even if you've already decided to install a home network, you might want to skim this section for more ideas on how to use it (especially the section on File Backup).
Two or More Computers Sharing an Internet Connection
Based on my experience, the reason that most people want to set up a home network is to share a high-speed connection to the Internet and/or to protect themselves from the Internet. Perhaps you've just gotten a new cable or DSL broadband connection and one of your computer-savvy friends told you that you should get a firewall to protect your computer(s). Most ISPs will provide their own firewall and router, but some provide a single, unprotected connection. In that case, figuring out how to share that connection safely is up to you. A single thing connected to the Internet was fine when you only had a computer. Then someone bought an Xbox .. a TiVo DVR .. an iPod Touch .. a laptop .. an iPad .. and now, a single device using the Internet connection exclusively just won't do. All of these are legitimate reasons for installing a home network. In the next few paragraphs, I'll briefly mention some of the other advantages of having a home network.
Sharing Resources
In addition to sharing a broadband connection, a home network makes it possible to share devices like a printer or scanner and to share files between two or more computers within the home. You don't even need to have an Internet connection to do this.
Share a Printer (Scanner, Fax)
If you own two or more PCs, but only one printer, you may have noticed that the machine with the printer attached becomes important to everyone in your house. The same is true for the machine with the scanner attached (which is often the same machine since combined printer, scanner and copier [and fax] devices have become popular). And why is it the kids always need to print off their homework assignment just when you're about to eagle the seventh hole on Unamed Deposed Celebrity Golf? Installing a home network is one answer to this problem. Buying a faster, more expensive laser or inkjet printer (or printer/scanner/copier/fax combo) with built-in networking starts to make sense if two or three computers are going to share it. At the very least, the printer can be shared over the network so that all computers in the house can use it.

Now, I'm going to make an odd suggestion for an admitted computer geek. If the only reason you want to set up a home network is to share your lone inkjet printer, maybe you don't need a home network. With inkjet printer prices as cheap as they are today, the costs of what you will need for a home network are probably about equal to just buying a second printer. When you do the math, the costs may even favor just buying another printer. If the two computers are physically close together (on the order of 20 ft or so) you might want to consider a printer sharing switch. Both USB and parallel printer switches can be purchased for around $25. (You made need to add another cable as well.) On the other hand, if you have other reasons in addition to sharing a printer or you own a more expensive laser printer or a laser printer and an inkjet printer and a scanner, etc. you'd like to share, the investment in a home network makes more sense. Besides, it is rather cool, geek-wise.
Share Files
If sharing resources was the initial goal, it was often to share a printer. However, sharing files is an even better reason to have a home network. As this moment, I'm typing this on a laptop, but the file I'm saving this in is on my desktop. I'm using a wireless connection (more about that later) so that I can be somewhere other than my home office all of the time. I don't want to shuttle the files back and forth on a floppy, so the network makes this easy. That's just one example of how sharing files can be useful.
File Sharing Server
File sharing is more or less what I was just talking about in the last paragraph. You have files on one or more of the computers in your home that you'd like to be available to the others. They might be recipes, music files, or pictures from your last vacation. For example, I have used my laptop, to show pictures that I keep on my desktop computer. With a reasonably fast home network, that can be as fast as or faster (given the relatively slow speeds of a laptop's hard drive) than having a second copy on the laptop.
File Backup
There is another advantage of having a home network that many people don't make use of, but should. The fact is almost nobody makes backups of their personal files as often as they should. Let's face it - it's a pain. It's tedious to copy files to DVD-RWs/CD-RWs (or DVD-Rs/CD-Rs) even if all your personal files fit onto one. You also have to remember to do it (although there are programs that will help remind you). However, once you have a home network and you can share files and folders, it becomes trivial to copy all your personal files from one machine to the other. It's also pretty darn fast, so it doesn't seem like a chore.

You don't need to (and really don't want to) copy everything either. Operating systems can be reinstalled or restored from the CDs that came with your system. Applications can be reloaded. (In fact, because of the way the registry works on a Microsoft windows system, if you are recovering from a disk crash, you pretty much have to reinstall all of the OS and applications.) However, the stuff you type with your own hands, the pictures you take with your digital camera, and those saved game files are yours alone. If they are lost and you have no backup, they're history. Programs like Norton Ghost or Novastor can even be automated to do it on a scheduled time. If you're handy with scripting, you can probably do it for nothing with something like xxcopy. At the very least, backing up your data to another machine is easy to do by hand. Please do it. You'll thank me when the hard drive fails on one of your computers if you've backed it up. Once the new hard drive is in, it's going to take only minutes to get back your personal data.
Offsite File Backup
Even if you faithfully make backups of your important files (to DVD-RWs or another computer or an external drive), it may not be enough. If the original files and all the backups are in the same house, a major loss due to theft, fire or flood may end up meaning all the copies are gone. This can be done using an external drive that you store in the desk drawer at work. (Although, it's best to use a pair of drives and rotate them.) Another good use of a home network connected to the Internet is to backup your truly important files using an online backup service. A number of these sites have sprung up in the past few years. You might want to consider signing up for services such as Amazon's S3 Service, Mozy and Carbonite just to name a few. There are many such services available now. Some ISPs include space for you to use on their servers (for a personal web site, for example). You can use that as well generally for no additional cost.
Introduction (continued)
Introduction (continued)
Streaming Video

One of my more recent uses for my own home network is streaming video. I used to have a DirectTV DVR in my home theater room and several simpler set-top boxes (STBs) attached to computers with video capture cards and DVR software. This still didn't give me a way to play video I had recorded on the DVR to any of the other equipment. Later, I replaced DirectTV with Verizon's FiOS TV service. They offered a multi-room DVR which could play recorded video over my home network to certain STBs they offered. It was a good idea, but it didn't support HD video, it only worked with certain STBs (from Verizon) and the killer -- the DVR crashed often. It crashed both while recording video and while playing it back. It especially crashed if I was both recording and playing video. When it crashed and rebooted twice during a superbowl, I vowed to replace it or go back to DirectTV.
A little research revealed the answer. I replaced the Verizon (Motorola-built) DVR with a TiVo Series 3 DVR I purchased outright and a dual-channel cable card (rented from Verizon). Using the free TiVo Desktop software (which is no longer available - only the $16 Desktop Plus is available), I was able to stream and watch videos from the DVR on any of the PCs in my house over the home network. I gave up the STBs on the PCs in favor of this solution. I was able stream any of the recordings on the TiVo DVR. My only gripe is it took forever for the TiVo to completely transfer a file from the DVR to the PC. I can start watching the stream almost immediately, however. The TiVo has been upgraded recently to stream Netflix movies as well. I was never interested in the whole DVD-in-the-mail thing, but once Netflix has more of their selection available for streaming (the list is pretty limited at this time), I may have to cave.
There are many other ways to stream video to your PC or TiVo from the Internet. Most people already know about YouTube, but an up-and-coming website is Hulu. Hulu has full versions of current (and some past) TV shows that can be streamed directly to your PC. I hope they expand more of their past offerings, but that depends mostly on the networks agreeing to let them do so. In addition to streaming to TiVo DVRs, Netflix also offers the Roku box for streaming Netflix videos. Additionally, Netflix allows streaming of video to Xbox 360 game consoles.
Online Gaming

I've learned to stop denying my inner child - which is bad, because the toys have gotten so much more expensive. I can't deny that one of my primary uses for having an Internet connection is to play online games, research games, buy games, download updates and patches to games, .... You see my problem. If you have kids, the problem eventually becomes that they want to play online, too. Either with you, against you, or in a totally different game (because you are so lame they started regularly trouncing you when they turned 11). As more households hand down computers that weren't too shabby to begin with or as junior/juniorette gets his/her hot new gaming PC, the "necessity" of having a home network to allow multiple computers to play games becomes clear. If he/she is has friends over for a nice LAN party, you'll have already have a home network that they can all just plug into and start playing. This makes your kid look cool and scores you serious parent-points. (Which, as far as I can tell, aren't redeemable for anything - especially not for getting them to pick up their clothes off of the floor.) Gaming consoles like the Xbox 360 support online gaming over the Internet, too, so this online network is not just for computers. You'll find yourself with some sort of perverse pride watching your prodigy (virtually) beat the tar out of little Johnny down the street in a multiplayer game of Halo VII (once you're no longer a challenge).
Want to Host an Internet Game Server? Check First
A lot of newer games allow themselves to be run in "host" or "server" mode. That is, that instance of the game is the master copy that other people with the same game can connect to in order to play a shared, online game over the Internet. This can be done temporarily just for a few hours so that you and a couple friends can play or the game can be set up to run indefinitely and open to anyone else with the game. If you have a spare computer, you may even want to start a copy of the game on it, and use it as an always available "dedicated" server. Some of these dedicated servers are running versions of the game with special modifiers that change certain features of the game. A few of these put together can make the game play totally different from the original and fresh. User-created game maps and visuals are often as good as or better than the ones that came with the game and make servers unique as well. (Low-gravity, quadruple-jump, insta-gib, double-speed Unreal Tournament anyone?)
Some Internet Service Providers, called ISPs for short, have very specific rules about running any sort of server program over their network. This is especially true of cable ISPs. Most of these rules begin with the word "NO." This isn't because they are nasty people - well OK, maybe they are, but this isn't only because of that. It's not even a question of whether or not you are serving things you are legally entitled to share. Your ISP may not want you to run a file server even if all you want to share is family photos with your relatives. It is because they have done some extensive modeling and planning on how the overall bandwidth on their network is going to be allocated and used. They assume that most people will make small requests (e.g., request to browse to a web page) and get back a larger response (e.g., a web page showing pictures of vacation resorts in Italy, that 10-minute youtube video or that 200 MB patch for the game that was just released today). Because of this assumption, cable ISPs tend to "cap" or put a capacity limit on "uploads" - that is, data sent from your computer to the Internet. A typical cap is under one megabit per second (1 Mbps). Typical cable ISP download speeds are 3 - 20 Mbps. It's not unusual for download speeds to be 20 times faster than the upload speed. That's what the cable Internet provider expected, and that's how they have provisioned their network. Servers running on the customer's computers, on the other hand, upset this network traffic pattern as they try to send large amounts of data upstream. ISPs are also concerned that any service you offer will be used to distribute illegal (i.e., copyrighted) files, send spam email, or may be compromised by a virus to do some illegal task (completely unbeknownst to you). Finally, any kind of service has some risk of being compromised by a hacker or allowing a virus onto your machine. Many ISPs see these risks as too great, so they just say "no" and plan their network usage accordingly.

Before you host your first online game, check the Terms of Service and/or Acceptable Use Policy of your ISP. They can vary dramatically. Some are reasonably short and basically say don't do stuff that is illegal or prevents others from using the Internet. They might not even mention using servers. On the other end of the spectrum, the Terms of Service and/or Acceptable Use Policy might span twenty printed pages. Somewhere you might find something phrased like "You agree not to use, or allow Users to use, the XXX Internet Service to run a server of any type in connection with the XXX Broadband Service, or to provide network or host services to others via the XXX Network. Prohibited uses include, without limitation, running servers for PPP, FTP, HTTP, DNS, POP, SMTP, NNTP, Proxy (any variety), DHCP, IRC, TELNET, TFTP, SNMP and multi-user interactive forums, multi-user interactive games, and remapping of ports for the purpose of operating a server on the XXX Network." In case you are wondering, that's pretty much a "No!" to just about everything.
Onward, Once More into the Breech
This section has been a very quick introduction to some of the tasks for which a home network can prove useful. This certainly wasn't a thorough discussion of any of them, but many of these topics will be revisited in more detail later. The focus of this guide is more to helping those who've already made the decision to take the plunge. To that end, we continue on with the next section which covers topics on how to decide what kind of network you want, planning the physical layout of the network, purchasing the (right) equipment, installing it, configuring your network, and troubleshooting network problems.
Planning
Planning
Planning - How Do I Create a Home Network?
This section will attempt to help you figure out what equipment you need to set up your home network and how and where to install it. Determining this depends on several factors including what's supplied by your ISP (if you have one), the tasks for which you'd like to use your network, and on the physical layout of the room(s) in which a network is to operate. I'm always surprised by the number of people who think step one of putting in a home network is buying the equipment. If you are putting a new addition onto your house, step one isn't buying the lumber. Step one is figuring out what you want the new addition to be used for. Step two is deciding on the way it will be constructed. Step three might then be buying the lumber. Your home network should be approached in the same manner. First, decide what you want you want to get out of your network. Next, figure out how you are going to wire and connect your network (or wireless your network as the case may be) to get it to all the devices that need network access. Don't forget that many digital DVRs and many gaming consoles like the Xbox 360 also can take advantage of a network connection. Then go out and buy the equipment. This section covers the first two topics, network purpose and planning. The topics of purchasing and installing the equipment are handled in the next chapter.
Determining the Purpose of Your Network

Determining the purpose of your network is not rocket science, and it won't take you long to do. It's important that you do know what it is you want your network to do. The two main goals that I usually hear about are to share something like a printer or files between two computers and to share a high-speed Internet connection. I like to separate the first from the second because the first only requires a Local Area Network or LAN and can be installed and configure even if there is no Internet connection in the plan. The second type, the Broadband Connection Sharing home network is where some type of connection to the Internet is shared. Typically, this will be a high-speed cable, DSL or FiOS connection, but even a modem connection can be shared. (I avoided using the name "Internet Connection Sharing" for the second type in order to avoid confusion with Microsoft's Internet Connection Sharing service, which is a way of using one computer to share the internet with others.)
Note that a Local Area Network is really a degenerate case of the Broadband Connection Sharing (BCS) network because the latter is part LAN as well. In addition, as the name implies, it shares a broadband connection, which brings the Internet to every computer and device on the network. I believe the best approach to getting a BCS network up in running is to first get the LAN portion established and then add the broadband connection to the mix. Analogous to the term "LAN," the Internet side of the network is called the "Wide Area Network" or "WAN." We will start by talking about the LAN and then proceed on to the broadband connection portion. From experience, the majority of readers are interested in the BCS network. Still, it's important to realize that there are two major pieces to get working: the LAN portion and the WAN portion.
Given the purpose of your home network - either a simple LAN or BCS - the next consideration is the physical layout of the network itself. Keep in mind that to this point, we've not purchased any equipment yet. This is a good. It's a good idea to know what we want the network to do and how we are going to lay it out before buying anything. Don't fret if you already went out and bought some things or had some equipment included with the Internet service you got from your ISP. We'll likely make good use of it.

We've reached a chicken-and-egg situation here. It's hard to describe the physical layout of a network without using terms like "router" and "cable modem," but those terms aren't discussed in detail until the different types of equipment needed for a particular type of network is discussed. On the other hand, until you know your physical layout, it's hard to know exactly what equipment you'll need for your network. Back and forth, it goes. More complicated networks that need to cover larger areas like several floors of a house or a small to medium-sized business usually require more equipment than your average dorm room. Exactly what equipment may well depend on your network's purpose. Try to bear with me here, but you may need to re-read these sections on planning the network and buying & configuring the equipment a couple times to get the full picture. The equipment can be (and often is) different for the LAN versus broadband sharing types of networks. (I'll attempt to point out the differences as we go along.) What I will have to do is introduce some equipment in this section with a brief explanation of its purpose in terms of planning your network. Later, we will discuss that equipment in detail.
Planning 2
Planning 2
Planning Your Physical Network Layout
Before purchasing networking equipment, you need a plan as to how the network will be run through your house. If everything to be networked is in one room, you may only need a very simple sketch. Such a sketch can still be very worthwhile. For example, it may make you realize that even though two of the computers are only seven feet apart physically, that doorway between them means that you'll need to run the cable to opposite way around the edge of the room, and therefore, you need a 25 foot cable for the job. If your network is going to be more complex - for example, you have some devices in a home office, one or two in bedrooms, and yet another in the den - you might want to get a copy of or draw a floor plan that is reasonably to scale and pencil in your network on that. The physical portion of running a wired network consists of running cables from the various devices to one or more central locations where the cables will be connected together. If there are walls (floors, ceilings) and long distances involved, you'll need to plan more carefully so that you can buy or make cables of the proper length. If a cable would be particularly difficult to run, using wireless networking for part of the network may make sense. In this section, we'll look at a few typical layouts in order to show the types of decisions you may have to make.
In order to discuss the physical layout, we need to know a couple terms that will be discussed in greater detail in the next couple chapters. Here, we need only a brief introduction so that the discussion makes sense. Once you have read the following sections discussing the equipment needed for networks, you may find yourself needing to revisit this section for this all to be clear. The first terms are "router," "switch" and even "router/switch." For this discussion, all of these terms refer to a family of devices that allow network cables coming from devices like PCs and Xboxes to be connected together. Think of it as a fancy version of the 2-to-1 phone jack splitter that allows you to connect a phone and fax answering machine to the same phone jack. In the case of a switch, however, we may be connecting four, five, eight or more network cables together. (Also, I often use the term "device" or "network device" rather than just saying computer, because we are increasingly hooking up things like DVRs, streaming media boxes like a Roku, Xboxes and Playstations, which aren't computers, but do use network connections.) I also refer to a "Wireless Access Point" in one example, which is a device that allows wireless network connections between devices using radio signals rather than physical cables. Again, these will be discussed in greater detail in the following pages.
Example 1: DSL modem in home office and all devices are in the same room.
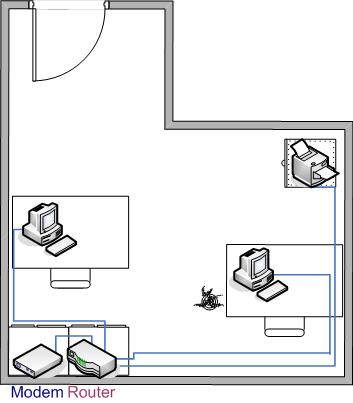
This example happens to be how many home networks get started. In it, you have a new computer and an older computer (or two) that you would like to network in order to share files and the printer. I show the printer as being network capable in this example, but oftern the printer is connected to one of the computers and shared that way instead.
Additionally, maybe you've got some form of internet connection (cable or DSL) that you would like to share. (If that is not the case, the difference is that you would not have a modem and the router could be replaced with a simple switch, but we are getting ahead of ourselves.) Note that the "modem" referred to is a high-speed Internet modem (generally supplied by your a cable or DSL provider), not the traditional telephone modem found in computers.
For this example, setting up the network is pretty simple. Cables are run around the edge of the room from each device to a common point where the router/switch is to be located. It's a good idea to use staples or some other means to semi-permanently affix the cable to a baseboard or the like. The cables are concentrated to the one spot where a router or switch will be used to connect them all. Sounds pretty simple, and it is.
Example 2: Cable modem in living room, most of the devices in the home office, one in the kids' room.
In this example, the scenario is that you have signed up for high-speed digital cable service. Your cable company's installer arrives and starts to put your cable modem right next to your TV. You explain that you really need the cable modem in your home office where your computer is, but your installer insists he can only install the cable modem within 6 ft of your TV cable box or he must charge you an additional exorbitant amount per linear foot. You decide to keep the money in your pension plan and run a single longer cable from the cable modem to a combination router/switch in your home office. You can then branch off to the other networked devices from there. The advantage is there is only one long cable run to make.
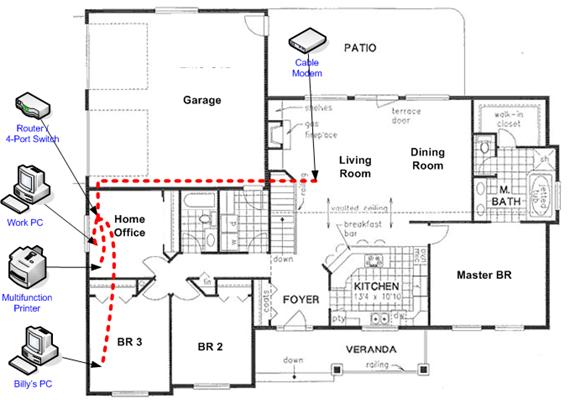
Once you have run the Ethernet cable from the cable modem to the home office, connecting the devices is more or less the same as in example 1. However, the difference in this example is that you also want to run a cable to "Billy's PC" in the adjacent room. There are several ways to do this. You can run a cable through the wall into the attic and then drop it down the wall into Billy's room. You can drill a hole directly into the adjacent room (the closet in Billy's room in this case) and shove the cable - connector and all - into the next room (and then patch as necessary). You can also cut two slightly offset rectangles into the drywall and install drop-in network boxes on either side. (You would connect the two boxes together with a short cable hidden in the wall. Then you connect the PC on one side and the router on the other side to their respective drop-in box you just installed in the wall. It all depends on how clean of a job you want and how much time you're willing to put into it.
Planning 3
Planning 3
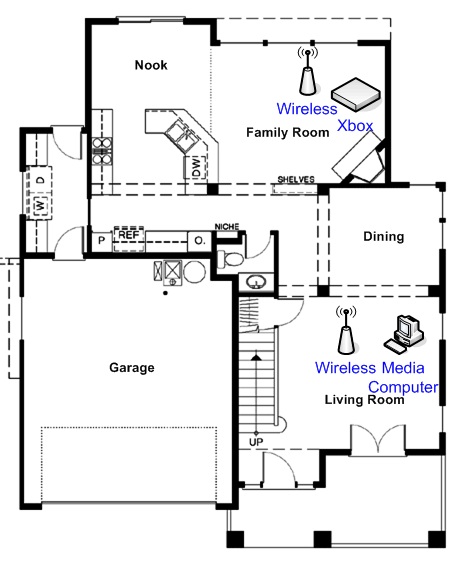
Example 3: DSL modem in home office, majority of the devices in the home office, one computer in each kid's room, spare computer, multimedia PC in the living room and Xbox in the den.
This is my everything-plus-the-kitchen-sink example. Still, it comes up quite commonly, especially in houses and townhouses where the devices to be connected are on more than one story. The network starts with a DSL modem in the home office on the second floor. In that room, a PC and printer are networked. On the same floor, there are computers in each of the kids' rooms and one to the "old" PC in the spare bedroom. Also, in different rooms downstairs are an Xbox 360 and a multimedia (home theater) PC we'd like to have connected.
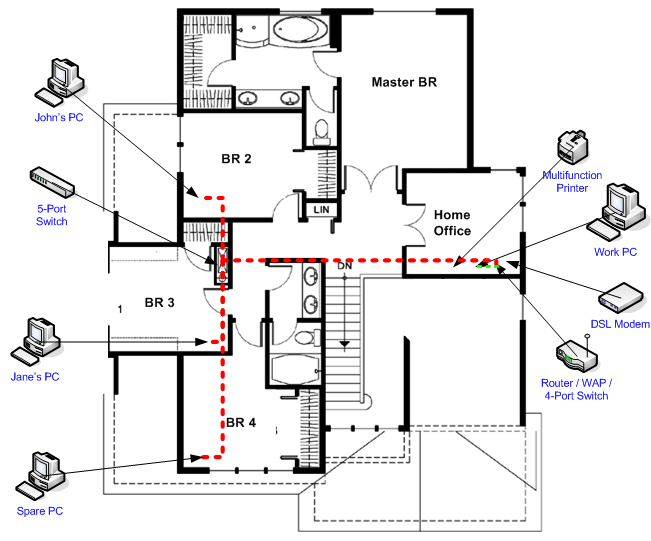
Second Floor
First Floor
The physical network tentatively penned in for this network is to put the router/switch in the home office and connect up the devices there. However, rather than run three long cables to each of the bedrooms, run one long cable through the attic and drop it down into a utility closet near the bedrooms. In that closet, place a 5-port switch (a switch capable accepting up to five Ethernet cables) and connect the cable from the home office to the switch. Then, we run three shorter cables from the switch, through the attic and drop them down into each of the bedrooms. We could also put nice drop-in network boxes in the walls of each of the bedrooms and run a short cable from the wall boxes to the respective computers. The top floor is now taken care of. In a larger house or a small office, you may have networked devices in three or four clustered areas. It may make sense to put a switch in all of those areas if the cable runs from one area to another are long. That also allows for easy future expansion.
The router I'm proposing for this example also contains a wireless access point (WAP), which is capable of letting devices connect wirelessly to the home network. Many ISPs will provide a router with a WAP built-in. I use this in my example because while running cables in the attic is certainly some work, running them through adjacent floors can be much more difficult or nearly impossible. Instead, the two devices downstairs will be connected wirelessly.
Here's sort of the synopsis of what we looked at above. How many switches & cables you'll need and where to physically place them is one question you'll have to answer in your planning. If most of the devices to be connected to the network are in one area of the house, that's a logical place for the switch. If there are only one or two other devices to be connected, long cables to them will finish the job, but a good goal is to minimize the number of long cable runs.
Another variation is that the network needs to run from where the Cable or DSL modem is (e.g. living room) to a different part of the house (e.g., the home office on the other end) where most or all of the networked devices reside. In that case, you may want to make a single longer cable run from the modem to the router. Then, from that router, you can run shorter cables to separate devices near that end of the house. The advantage is that you run only one long cable from the router to the modem and then shorter cables from the switch to the devices presumably nearby instead of several separate, long cables from the router to each device.
For particularly long runs on different sides of the house, using multiple switches and running one cable from one router/switch to the other switch is a good solution. Then from the nearby switches, run the final shorter cables to the nearby devices. Lastly, if running a cable is difficult, wireless networking may be a good alternative. With these examples in mind, we need to finalize a specific set of equipment needed based on the type of network we are installing. This is the topic of the section, The Local Area Network. If part of your network is going to include wireless networking, there are a few more things to consider, which is the topic of the next section. If the router supplied by your ISP includes wireless networking, but you don't plan to use it, you should also read the next section topic on disabling your wireless network capability. (By default, it is usually on.)
Planning 4
Planning 4
Special Considerations When Planning a Wireless Network
A Wireless Access Point or WAP (pronounced "whap") is wireless equivalent of a wired Ethernet switch. (Technically, it's closer in operation to a hub, but since we haven't talked about either of those two in detail yet, you really probably don't care.) It receives data from one wireless device and retransmits it for all the other wireless devices to hear, so it effectively ties them together. However, it uses radio waves to send and receive data rather than electrical signals on wires. The strength of the radio signal diminishes with the distance traveled - at an almost alarming rate. With wired networks, the placement of the switch can be fairly arbitrary. The goal is to keep the length of the cable runs as short as possible, but if it makes life convenient, you can put the switch on the other side of the room and add 10 or 15 feet to the cables without causing any problems in most cases. This isn't true with wireless networking. Putting the WAP across the room may make that bedroom at the opposite end of the house just out of range. Putting a wired switch next to a big metal filing cabinet has no effect on its functionality. Putting the WAP next to the same filing cabinet (or steel computer case or any other large metal object) may kill the radio signals to a whole section of your house. Having a WAP isn't a requirement for a home network, but it may be beneficial. WAPs are often included in the router supplied by your ISP, so you may have it regardless if you plan to use it.
Mentally survey the rooms are areas you are likely to use wireless connected devices in. If you're thinking of roaming your around your home with a laptop using a wireless connection, will you want to use it on the deck? The bedroom? Garage? How about in the living room? Once you have the area of coverage in mind, place the WAP accordingly. If the area of coverage is fairly small - such as a 30 or 40 foot diameter - you can usually place your WAP where is it convenient. If the area is any greater than that, try to pick a location roughly in the center of that area. On the first floor of a two story home, placing the WAP up high such as on top of a tall bookcase where is above the influence of metal desks, chairs and filing cabinets can often help get a good signal to the second floor. However, if the WAP is on the second floor and the majority of the wireless devices are on the first floor, you may want to place the WAP on the floor instead. As already mentioned, try to avoid placing the WAP near large metal objects like (metal) computer cases, filing cabinets and refrigerators. Metal objects in your walls that you can't see will also affect the signal. This includes things like steel I-beams, electrical wiring, copper plumbing, and duct work. Since it may be hard to tell where these items are, you should experiment by moving the WAP to different spots to maximize its signal to the areas you want covered. If you're using a combination router/switch/wireless access point, you should place it with the largest consideration given to its function as a WAP.
Distance is the enemy of wireless networks. Manufacturers of wireless networking equipment state operating ranges for their equipment in hundreds of feet. The only scenario I can think of where that might work is if they test their equipment outdoors on a very flat wide-open field without a single metal object within 100 miles. My experience is that the maximum practical usable distance from a typical WAP to a wireless device is more on the order of 50-75 feet. If you are planning on a bigger wireless network, you may need to use a wireless range extender or more than one WAP.
A range extender is a device that acts as a signal repeater. Whatever signals it receives, it retransmits (and in the process, amplifies). The upside is that the range is extended as desired. The downside is that is sends the signal in all directions including back at the source, so it increases the traffic that the WAP sees and also the traffic to wireless Ethernet adapters within range of both the WAP and repeater. Also, the extra "hop" from the WAP to the extender and then on to the destination wireless device adds a delay or lag. Still, a delayed signal is better than no signal or a signal too weak to use. Finally, repeaters aren't standardized among manufacturers. That means, if you have a Linksys WAP, get a Linksys range extender (repeater) and so on. (I personally have not used a range extender, so this is only my "working knowledge" on the subject.) The section on networking equipment includes an example of a wireless range extender.
Another WAP (in addition to the one built in to the router) can sometimes help. If, for example, you have a wired network on one floor, but can't easily get that to the second floor then wireless networking is one solution. However, if the second floor is long or parts of it are too far away from the router/WAP, the signal may be too weak to be usuable. In this case, buying a dedicated WAP and placing it on the first floor on the opposite end of the house from the original WAP may fix the problem. (The WAP will be set up to look identical to the one built into the router.) The wireless devices will tend to connect to whichever WAP signal is the strongest. The section on networking equipment includes an example of a dedicated WAP.
Wireless networks can operate in two modes named "infrastructure" and "ad-hoc." When a WAP is used, the wireless network operates in infrastructure mode. The WAP acts as a controller for the wireless traffic. In ad-hoc mode, there is no WAP. Instead, every card transmits as needed and all cards within range get the data. Therefore, every wireless Ethernet adapter needs to be within range of all the other adapters it needs to talk to, so the effective range of the entire network is roughly a 50-100 foot diameter circle. Since a WAP retransmits the signals it receives, it effectively doubles that range to having a 50-100 foot radius or 100-200 foot diameter. This is another reason why having a WAP can be beneficial.
If you would like to use wireless connections with a broadband connection sharing type of network, a WAP is more-or-less required. The WAP functions to bridge the wired network (where the Internet connection is) to the wireless devices. (This bridging can also be done using a PC that has both a wired and a wireless Ethernet adapter. Windows 98 and beyond supports sharing an Internet connection through a PC. However, we're not going to cover that just yet. See Windows Internet Connection Sharing.) It may be that the only wired portion of your network is from the cable/DSL modem to your router/switch/WAP device. Everything else can then be wireless if that's what works best. Some combination of wired and wireless devices is more typical.
Local Area Network
Local Area Network
The Local Area Network

Even if you don't plan on letting the big, bad Internet anywhere near your PCs, a home network still has many uses. Many of the basics of setting up the two types of networks are the same. In fact, even if you are planning on sharing a broadband connection, the place to start is right here. Don't skip to the next section without getting the items in here working first. The best approach I've found for creating a broadband connection sharing network is to start with a working LAN and then add the Internet connection.
A typical Internet Service Provider (ISP) will supply the connection to the Internet through some device that converts their wiring coming into your home (be it cable, copper telephone wires for DSL, fiber optics cable or something else) into a standard network drop. They often also include - either separately or as part of the same device - a router & firewall with one or more ports for your LAN to connect to. That's generally where their work and responsiblity stops. If you have more than one computer to connect to their equipment, that part is left as an exercise for you. That's the viewpoint from which these pages were written, and if you're trying to create a working home network using them, your journey will be more blissful if you proceed in the same manner.
Wired Network
Wired Network
Wired Networking Equipment
This was probably the part of the home network that you suspected you needed. The hardware. The stuff that connects it all together. To create a home network you need a couple of things. If you're planning on installing a traditional wired network, you need 1.) a port (jack, connector) in each PC that you want to connect (or in every other device like an Xbox or DSL router), 2.) an Ethernet cable to connect each device to the network, and 3.) a router or switch (or combination router/switch) that lets you connect all the cables together. If you're thinking of installing a wireless network either instead of or in addition to a wired network you will want to make sure to read the section on.
This section discusses in detail the basic equipment needed for a wired network for both the LAN and Broadband Sharing networks, and outlines the differences where appropriate. If you are planning to have a wireless network, you will have somewhat different equipment needs. You'll still have to deal with a couple Ethernet ports and at least one cable, most likely, but much of what in this section won't be as applicable. You should skim the beginning of this section and then proceed on to the section on Wireless Networking Equipment. If your network is going to have some wired devices and some wireless devices, you get the fun of getting both to work, but start with the wired portion of your network first.
Wired Ethernet Adapter
Whether it's a card that you install yourself, it came built in on your desktop or laptop, or it's some other type of Ethernet adapter, you need a physical Ethernet port for every device you plan to connect to your home network. These are analogous to the jack on the back of a telephone. Originally, a Network Interface Card or NIC (pronounced "nick") was a hardware card that was purchased separately and installed inside the computer to provide a physical Ethernet port outside of the case. However, it's now very common for new desktops and virtually all new laptops to come with an Ethernet port built in.
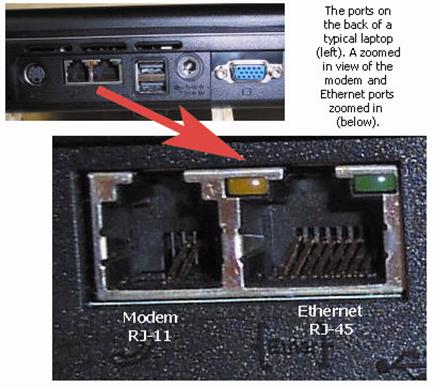
If you're hooking up fairly new equipment on your home network, you should first determine which, if any, devices are going to need to have an Ethernet NIC (a.k.a. Ethernet adapter) added. Look at the ports on the back of your desktop, laptop, or gaming console. The Ethernet port looks like a RJ-11 modem jack, but it's physically wider and has eight copper/gold connections inside instead of the two or four that a modem jack has. On newer desktops, a built-in Ethernet port is usually found near the USB or keyboard ports. The following table lists several different kinds of Ethernet adapters along with their features and uses.
| If your desktop computer doesn't have an Ethernet adapter already, you can install a NIC (like the one shown to the right), the Linksys LNE100TX. (Unless the computer in question is older, it's very likely it has a built in Ethernet port. Check along the back for an RJ-45 jack similar to the one in the picture.) | 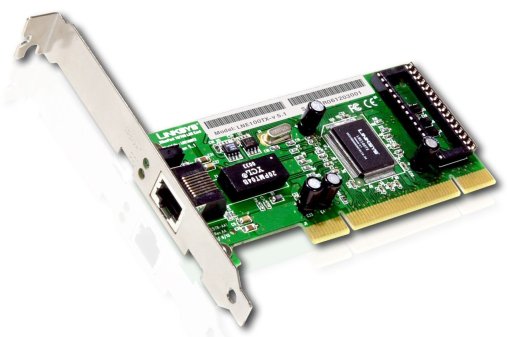
Copyright 2010 Linksys Corporation |
| For those of you who have computers without built-in Ethernet ports (especially laptops) and don't feel up to mucking around inside your computer to add one, there are also USB to Ethernet adapters like this one shown at the right. The USB end of this adapter includes a USB cable that plugs into any available USB (2.0) port on your desktop or laptop computer. The other end has of the adapter has a standard Ethernet port. (It's very unusual for any late model laptop to not have a built in Ethernet port. A number of netbooks do not have such a port, so this type of adapter is useful for those.) | 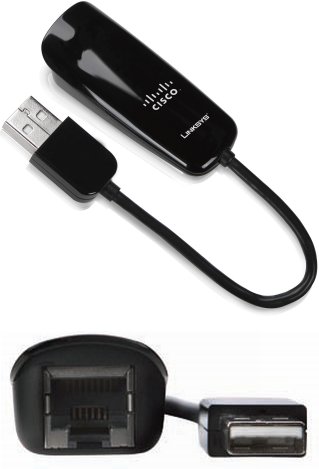
Copyright 2010 Linksys Corporation |
| Another alternative for laptops without built-in Ethernet ports is a PCMCIA Ethernet card like the one shown to the right can be also used. This card slides into a PCMCIA slot on the side of your laptop. If this is an option on your laptop, this adapter is preferred as it is faster than a USB connection. Unfortunately, PCMCIA (and Cardbus) slots have fallen out of favor as of late, so such ports are becoming rare. That said, laptops without the PCMCIA/Cardbus slot most often do have an Ethernet adapter port built in. | 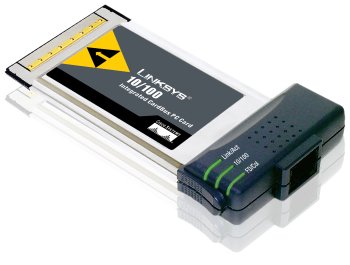
Copyright 2010 Linksys Corporation |
Some terms you will often hear mentioned in regard to telephone and Ethernet ports (jacks) are RJ-11 and RJ-45, respectively. RJ-11 is the 4-wire (or 2-wire) jack used with telephone (modem) connections and RJ-45 is the 8-wire jack/cable used with Ethernet connections.
Once you have installed the Ethernet adapter and loaded any drivers to support it (if necessary), it's a good idea to check to make sure that the operating system has recognized the adapter, and all appears to be in working order. Do that by performing Testing the Ethernet Adapter section.
Cables
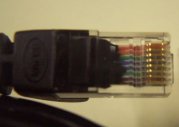
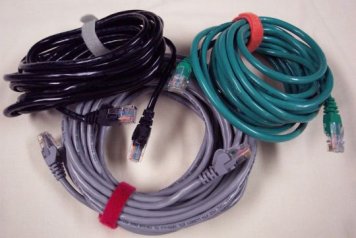
If the Ethernet ports are the equivalent of the phone jacks on a telephone, the cables are analogous to the telephone wires that connect the telephone to the wall jack. Like telephone cables, they come in a variety of lengths and colors. Also, like telephone cords, Ethernet cables are almost always male-to-male plugs in terms of the connectors on the end like the picture to the left. For this discussion, we are going to assume that you are using pre-made cables for your home network (or that your home network was professionally wired and the only cables you need to be concerned with are those from the wall jacks to the devices attached to the network). You will need one cable running from each computers, game console, printer, etc. that you plan to connect together. Even if your network is going to be "totally wireless," you'll may still need a cable or two for your Internet connection (if you have one)
Like telephone cords, if you wish to have cables that are exactly the right length, you can make your own. Even if you are planning on wiring your home as part of installing a home network, it's probably best to start with pre-made cables. That tends to eliminate one variable in the event you have problems getting your network up and running. (You can start with pre-made cables running from room to room and replace them later with custom made cables. You can even cut one end off of the pre-made cable, run it to the new location through a wall, ceiling, etc., and then attach a new Ethernet plug.)
The good news is that practically any Ethernet cable you would find to buy today is going to be the right type. As long the cables you purchase are rated at CAT-5, CAT-5e, CAT-6, or CAT-6e, you should be fine. If at all possible, get cables with a CAT-5e rating or higher, where the 'e' stands for "enhanced." CAT-5 would support most home networks (except those of you planning on having gigabit networking speeds [1000 Mbps] where CAT-6 and CAT-6e are more appropriate). CAT-5e cables (and above) also tend to be better made, so they put up with more abuse and last longer. Additionally, they are better shielded from electrical interference. Generally the rating will be prominently displayed somewhere on the package. Nowadays, it's pretty hard not to get at least CAT-5e rated cables. (There is a CAT-7 specification in the works as well.) You may also see the terms "Patch Cable" and "Straight Through." Those describe the same type of cable and are the type of cable we need to hook computers and other devices up to switches and routers (to be discussed in the next section).
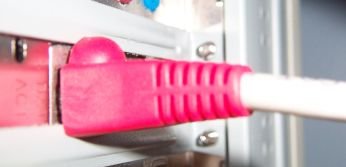
One cable to watch out for will (hopefully) be labeled as a "crossover" cable. A crossover cable is made with the transmit and receive wires reversed on one end (hence, crossed over). That allows the cable to be used directly between two network devices without an intervening hub or switch. This means you can connect two computers together using only a crossover cable. (This cable is popular for hooking two Xboxes together, for example.) For most home networks, you will only need straight through cables. The exception I have seen to that is that sometimes a crossover cable is necessary to connect the DSL or Cable modem your ISP supplies to the DSL/Cable router that you buy. Many crossover cables are labeled or stamped with the word "Crossover" on the cable itself. Another way to tell - that I wish had be made a standard - is that crossover cables have red "boots" or red covers over the plugs on the end of the cable. (See the picture to the right.) Unfortunately, that's not standard and if you buy red cables they will probably have red boots and still be straight through cables. Ah, 'tis not a perfect world. Probably the easiest way to tell you've accidentally gotten a crossover cable is that when you use it to connect a computer to a router (or switch) none of the lights come on as if it wasn't connected. (Unfortunately, that's also the sign of a bad cable.)
Cable length is also another consideration. Pre-made cables come in lengths from 1 foot to 150 feet with typical numbers in between of 2, 3, 5, 7, 10, 12, 14, 15, 20, 25, 35, 50, 75 and 100 feet. The technical specification for Ethernet cablings cites a maximum of 100 meters or about 328 feet. In practice, you should try to have cables no longer than 150 feet if possible. If you must run a cable longer than 150 feet, you may need to put in an extra switch or hub (or repeater, but we won't get into what that is here) in order to maintain and amplify the quality of the signals.
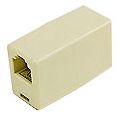
If you need a cable that's 40 feet long, you can buy the next size up (50 ft) and just roll up the extra cable into a spool. If that seems a bit sloppy, one trick is to instead buy a 15 ft and 25 ft cable and join them with an inline RJ-45 connector like the one shown at the left. This connector has two female RJ-45 ports on either end. You connect two standard male to male cables into the jacks and end up with an extended Ethernet cable. Just make sure the coupler you use is made for Ethernet cables, is rated for at least as high of a transmission rate as the cables you are connecting to it (e.g., CAT-5e), and has all eight pins. (Just so you are aware, there are also crossover couplers, which turn two straight through cables into a joined crossover cable.)
Armed with this knowledge, (buy and) install the Ethernet cables running from each device to a centralized location. A good goal is to try to keep all the cable runs as short as possible. If you are planning a LAN, just pick a convenient point near the center. If you are planning on sharing a broadband connection, you would generally run all cables to wherever your broadband connection enters the house as it's logical to install your router next to the cable/DSL modem. That becomes your location from which to branch off your network. In either type of network you will run the cables to wherever your network hub or switch is. If you have decided to use multiple switches (or a combo router/switch and one or more other switches) route you cables from the device to the nearest and/or easiest switch possible. (See the next section.)
As a final bit of advice, if you are process of getting a new home built, strongly consider having most of the rooms pre-wired for Ethernet. Get the highest quality cable you can afford (e.g., CAT-6e) because it's much harder to run once the walls are finished. Have the wires originate (or terminate depending on your point of view) in a closet that is reasonably central to the house and that you will have easy access to. Mind the lengths of the longest cable and try to stay under 100 feet.
Switches + Network Wiring
Switches + Network Wiring
The Network Hub/Switch
At this point, you've got Ethernet ports in some number of computers, gaming consoles, printers, etc. and a matching number of cables all coming from them to one location (or a few concentrating locations if you planned more than one switch). You now need a device (or two) that lets you connect all these cables together. For a LAN, that device is usually a stand alone Ethernet hub or Ethernet switch. For the broadband connection sharing network, that device is usually the cable/DSL router because most routers have a built-in switch (typically with three or four ports). If your cable/DSL router has only one port or you need to connect more devices than the number of ports on the back of the cable/DSL router, you will also need to attach a hub or switch to connect all your devices together.
The difference between a hub and a switch is analogous in the telephone world to the difference between a 3-to-1 telephone jack (the type of jack let's you connect a computer modem, a fax and a telephone to single telephone jack) and a full blown PBX. With a 3-to-1 telephone jack, only one of the telephone devices can use the phone line at a time (e.g., the phone, the computer modem or the fax machine, but not more than one). Similarly, a hub lets you connect all the devices together, but at any one time only one device can be talking to the other devices (e.g., another computer, network printer and the broadband connection) at a time. The hub blindly repeats the data sent from the device doing the sending to all the other ports on the hub in parallel. All other devices wanting to send data must wait until the network is free before they can transmit. This is just like having to hang up the phone in order to send a fax.
A switch, on the other hand, acts more like a telephone PBX. With a PBX, some of the telephones inside a business may be sharing some number of outgoing lines while other phones inside the business call each other at the same time. An Ethernet switch allows parallel connections between any two ports while leaving the other ports free to connect to each other if needed. For example, you might have one computer backing up files to another computer one two of the ports while at the same time the Xbox is playing a game online using the Internet connection through the router on two completely different ports. When it's first powered on, the switch doesn't know which devices (or other switches) are connected to which of it's ports. Initially, the switch acts like a hub. Let's say is gets a packet on port 1 with a source IP of 192.168.1.4. The destination/target IP indicated in the message is 192.168.1.7. The switch presents the packet it gets from port 1 to all the other ports. Let's say the response comes from port 3 (with the source IP address of the response being 192.168.1.7) The switch will remember that IP address 192.168.1.4 is on port 1 and 192.168.1.7 is on port 3. As more devices start communicating to each other, the switch learns which ports have access to one or more IP addresses on the LAN. After a while, it creates a map of which ports are associated with which IPs. Note that a single port may have multiple IP addresses mapped to it. We can connect one switch to another switch in order to expand the number of ports on the network. We talk about this topic in detail later in the section, Growing Your Network.
Perhaps thinking of a switch as a very fast, automated switchboard operator is a better analogy. The operator can connect any two phone lines together while the other lines remain free for other connections. Likewise, a switch allows any two devices on the network that connected to different ports on the switch to talk exclusively to each other while the other devices are free to use other pairs of ports to talk to each other at the same time. That's highly simplified and I haven't explained how the switch knows which two ports to connect at any given moment. I also haven't mentioned the limitations on the number of connections/hubs between devices that hubs have and switches do not. (Google the term "5-4-3-2-1 rule" if you are curious.) I won't go into more details because hubs are becoming rare in networks. The cost savings between a hub and a switch in the 5-port or 8-port versions is negligible. In some cases, hubs cost more than their switching counterparts because they have become rare.
As a side note: switches do not solve all networking woes. When you start downloading a big file from the Internet, little Billy playing an online game on his Xbox in the next room will become cannon fodder. This happens because even though your computer and Billy's may be attached to different ports on the switch, you are both trying to send and receive data via the same other switch port - namely the one that your router (and therefore, your Internet connection) is using. There is contention for that port. Downloading a file often takes a considerable portion of the bandwidth you have available, so there's nothing left for little Billy's game to use. Depending on the speeds of the network coming into your home, you might have to establish etiquette that requires checking to see what others are doing before downloading OS patches, game demos, news videos, or other large files.
In the shared broadband type of network, your cable/DSL router is probably also your switch. Therefore, your cables run to wherever your cable/DSL router is. The cable/DSL router is, in turn, typically near the cable/DSL modem. As was discussed in Example 2 of Planning Your Physical Network Layout, you don't have to locate your cable/DSL router next to your cable/DSL modem if that isn't a good place to concentrate the cables to. That said, ISPs are increasingly using an all-in-one combination cable modem, router, switch, and wireless access point in one device. In that case, you may not have a choice where the router's built-in switch is located. You can, however, buy your own switch and run a line from the ISP's device to that.
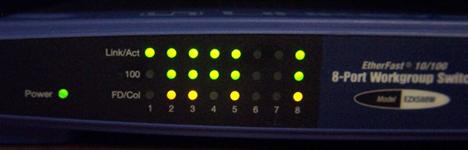
With the switch (or hub) powered on, begin plugging the cables into the ports. The devices you are connecting to the switch should also be powered up and their end of the cable plugged in to their respective Ethernet adapter's port. I find it's easier to understand this part by talking about a real-life device, so I am going to use a Linksys EZXS88W 8-port 10/100 Switch as an example. For each of the eight Ethernet ports that this switch has, there is a corresponding column of three lights. The link lights are the top row of green lights on this particular switch. At this time, that's really the only light we are worried about. Later, when we have the network set up and there is traffic flowing on it, the lights on the top row will flicker to indicate activity (data flowing to and/or from a device). As you connect each cable from a device to the switch, make sure the corresponding "link" indicator lights on the switch.
The second row of lights on the EZXS88W, labeled "100," indicates if the link speed is 100 Mbps (light on) or 10 Mbps (light off). The last row of amber lights, labeled FD/Col, indicate if the devices connected are capable of full duplex (light on) or half duplex communication (light off). In full duplex communication, the switch and the devices talking to it can both send and receive at 100 Mbps simultaneously. (The "FD" part of the label is an abbreviation for "Full-Duplex." The "Col" part is an abbreviation for "collision" and will turn red if and excessive number of collisions begins to be encountered at that port. Collisions are a topic for later discussion.)
You'll notice that not all columns have all have all three lights lit. The device connected to first port above (to the right of the green power light) is an older 10 Mbps half-duplex networked printer. Port 4, the device with only two green lights in its column, is going to the uplink port on an older 100 Mbps hub. The hub is capable of 100 Mbps transfers, but only in half-duplex mode (i.e., one direction at a time), which is why the FD/Col light is not on. Ports 6 and 7 have no devices connected to them at all.
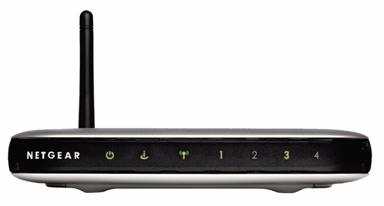
Keep in mind that the Linksys switch above is only one example. Different switches and routers will have different lights and use them differently. For example, on the Netgear combination router/switch (& wireless access point) shown here, there is only one numbered light for each of the four Ethernet ports. If the number is not lit at all, nothing is connected to that port. A 100 Mbps-capable device on port 1 makes the light glow green. A 10 Mbps-capable device would be indicated as such with an amber light. The number flickers to show network activity. Again, at this point, the goal is just to get the link lights to turn on for every device you hook to your switch. The cables all plug into the Ethernet ports, which in the case of the Linksys EZXS88W, are on the back as in the picture below.
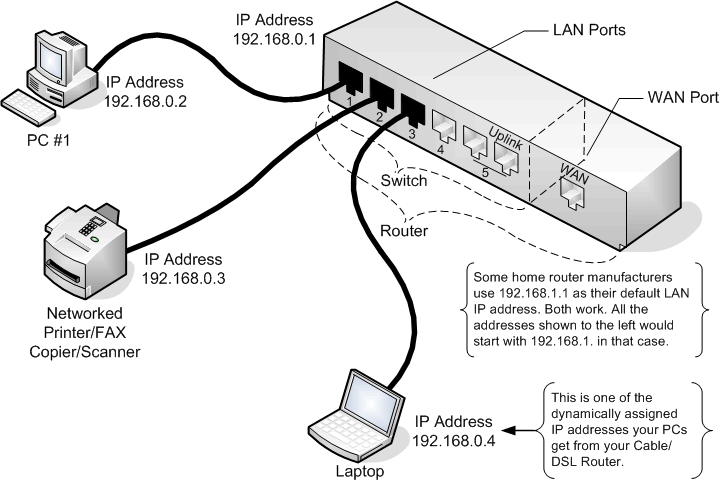
When all is finished, you should have made the basic connections needed for a Local Area Network. As mentioned previously, even if you are planning on only having a LAN now, you may wish to go ahead and buy a combination network router/switch. That way, if you later decide to add a broadband connection, you won't need to replace a switch with a router. Also, as we'll find out in the section on Configuring Your Network, the router provides some services that can make setting up a home network simpler. Either way, at this point we should have a network similar to the one represented in the diagram below. (Some of the concepts mentioned in the diagram, especially IP addresses, haven't been discussed yet. Just concern yourself with the wiring aspects now.)
The switch/router in the picture above is completely fictional, but is representative of common switches and routers. For one thing, switches often have a separate uplink port, but I've yet to see a router that has a one (on the switch portion, that is). The dashed rectangle signifies where the switch (or the switch portion of a combination router/switch) ends. From a physical perspective, the router only differs from a switch by the addition of a WAN port. The WAN port is almost always physically separated from the LAN ports, but that distance may only be a ½ inch or less. From a networking perspective, the differences between a switch and router are much greater (as we'll find out later).
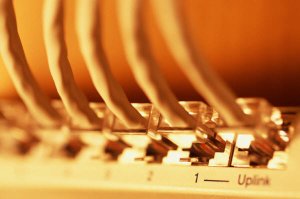
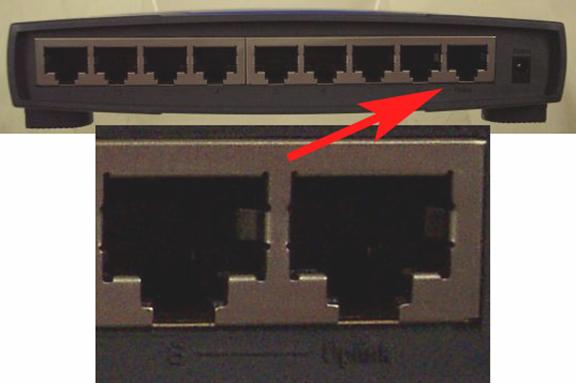
Uplink Ports
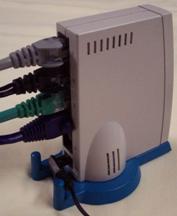
You should pay special attention to ports like port number 8 shown on the Linksys switch below, which is actually a pair of ports - one for uplink connections and one for normal connections. Uplink connections are used when connecting two hubs/switches or a router and a hub/switch together. Uplink ports are used when you are adding an additional hub or switch because you have run out of free ports. You plug one end of a straight-through cable into the new switch's uplink port and the other end into any normal port on the original router, hub, or switch (not the uplink port, if it has one). The special uplink port is just a jack with the transmit and receive wires crossed over, thus freeing you from having to purchase a crossover cable. Don't make the mistake of thinking that because the switch in the pictures has nine ports, it is a 9-port switch. Only one of the two ports at position 8 - either the normal or the uplink port - can be used at any given moment. If you do happen to plug cables into both ports, most routers will make one of the two operational and shut the other down. (Extra points given here for anyone that noticed a problem with the picture of the hub shown in the section Two or More Computers Sharing an Internet Connection found in the introduction. It shows cables plugged into every port including the clearly labeled uplink & normal port pair [port 1 on this one]. This will never work, but I guess it makes for a neater looking picture. The clip art was free, so I forgive them.)
Some switches don't use a separate port for uplink, but instead have a push in-push out toggle button that toggles one of the ports between normal and uplink modes. Switches with dedicated uplink ports or manually switched uplink ports are increasingly rare. Most recent switches don't have either, but instead have a "Medium Dependent Interface (Crossover)" (MDI [MDIX]) or "auto-switching" ports that automatically sense if they need to reverse the transmit and receive lines. A couple examples of one of these are the US Robotics USR7908 8 Port 10/100 Ethernet Switching Hub (A "switching hub" is the same thing as a switch.) and the Netgear Model FS605 5-Port 10/100 Desktop Switch. Netgear calls this feature "Auto Uplink." Don't get MDIX (or auto-switching) confused with "auto-sensing" (a.k.a. "auto-speed") ports. Auto-sensing refers to the ability to sense and adjust to the communications speed - usually either 10 or 100 Mbps. Almost all switches, hubs, and routers have the auto-sensing feature. There are also cable/DSL routers that are auto-switching only on the Wide Area Network (WAN) port (I.E., The port that connects to the cable/DSL modem. This same combination router/switch may or may not have auto-switching LAN ports
Typical Switches
The table below lists some typical wired Ethernet switches and hubs along with descriptions of some of their features. This section is becoming rather unnecessary as the switch has pretty much taken over for hubs at the same price point, and switching equipment has become even more ubiquitous than Ethernet adapters.
One question you need to ask yourself when buying a switch is how much you think your network will grow. If you already have three or four devices to hook up to a switch, an 8-port switch might make more sense than a 5-port one. (Don't forget things like a router, WAP and XBox in addition to laptops and desktop PCs when counting up the total.) On the other hand, there's only a little penalty for daisy-chaining another switch to your current one. Almost anywhere you can connect a PC or laptop, you can connect a switch and grow your network. (There are limits to this, but you're not likely to reach them in a home network.) See Growing Your Network.
| The Linksys EZXS55W is a 5-port 10/100 Ethernet switch. It uses a dual port configuration in the back for its uplink port. This switch has separate lights for link/activity, 10/100 connection speed indication, and full/duplex/collision indication. Linksys also makes 8-port (shown above) and 16-port versions of this switch. |
|
| The Linksys EG005 is a newer Linksys offering. It is a 10/100/1000 (Gigabit) Ethernet switch and functions much like the EZXS55W above, but at higher speeds. Rather than one (dual) port for uplink, all ports have MDIX sensing, so any port can serve as an uplink port without the need for crossover cables. Gone, however, are the individual lights for link, speed, and duplex mode. It has a single green LED for each port that lights steady when there is a link and flashes with activity. Linksys also makes an 8-port version of this switch, the EG008W. Both Netgear and Linksys make home (and small office) versions of their smaller routers with Gigabit Ethernet speeds. |
|
 Copyright 2010 Linksys Corporation
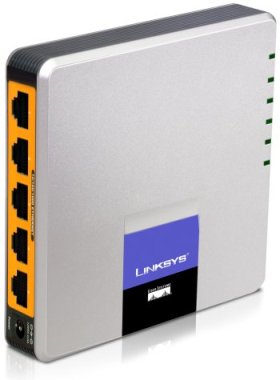
Gigabit Networking?
I've been asked often whether it's worth the extra cost to have gigabit Ethernet. Until recently, my response was that if you're talking about pulling/running cable in walls then yes, put in gigabit Ethernet capable wire (Cat 6e or better). However, as far as the equipment, it could be swapped out at any time with minimal effort. So basically, I've been saying run the best cable you can afford, but if you have existing 10/100 Mbps equipment, just stick with that. My thinking here is that the cost of installing cable is a hefty portion of the cost and effort of getting a house wired for networking. It's much more difficult (and often practically impossible) to do after the walls are up. If you're going to run wire, run the best you can afford; it's not something you want to do again. You should also consider Cat 7e and fiber.
I don't constantly backup huge files over my home network and the difference between waiting 5 minutes or 1 minute to copy that big file doesn't mean that much to me. LAN and Internet games over our home network are plenty fast. There's been no "killer app" to drive me to gigabit Ethernet, yet. Technically, there still isn't a killer app, but I can now see a couple in the wings. Interestingly, it's not online gaming, which is what I thought it would be. Instead, it's streaming video and other variations of video on demand. Already, I can stream video to my TiVo DVR from Netflix and Youtube. I can buy movies from Amazon and download them. Most of these are not HD quality .. yet. What is needed is a higher-speed network from the ISP to the home than is typically available. We're not there yet, but it's coming.
My neighborhood has 16 Mbps downstream (incoming) cable Internet service available from Comcast and Verizon FiOS is available at speeds up to 50 Mbps downstream by 20 Mbps upstream. At those speeds, standard definition and DVD quality video on demand are quite doable. Rather than running to WalMart to purchase a DVD, we can just download it to a family "media & file server." Then we could either burn a DVD or just stream it to one or more network enabled HDTVs, DVRs, or PCs. When this becomes common and video quality goes to the High Definition (HD) level, I'm going to want/need to move & stream files the size of DVD movies from one device to another. In that scenario, gigabit Ethernet makes sense.
Most motherboards and desktop computers are now coming with built-in gigabit Ethernet, so hooking them up is essentially "free." The cost of the gigabit switches is now only negligibly more than the cost of 10/100 Mbps switches. In fact, 10/100 switches are on getting harder to find. My advice now is if you are putting in a new network, go with gigabit Ethernet equipment. If you start doing a lot of HD video streaming on a 10/100 network, now is probably the time to upgrade.
Wireless Equipment
Wireless Equipment
Wireless Networking Equipment
At first blush, the wireless network would seem to be the holy grail of setting up a small office or home network. There are no cables to run through walls, attics and crawl spaces. Second, the current (advertised) wireless networking speeds are rated at or near the typical wired network speeds. (The draft 802.11n specification has a theoretical maximum around 600 Mbps. Early wireless solutions were also more expensive, but today's wireless equipment is fairly inexpensive - often coming close to the price of wired equipment. In fact, it's becoming difficult to find a router that does not include wireless capability.
So, why hasn't everyone thrown their cables away and gone wireless? That's really a large topic in its own right, but we'll just touch on a few issues for now. For one thing, the theoretical maximum and the typical maximum have a vast gap. Wireless data is usually encrypted (except in public wireless "hot spots") which adds overhead. The wireless protocol itself is not the most efficient. Also, since every wireless device can "hear" every other wireless device in range, there tends to be more contention for and collisions on the network. That reduces the effective throughput of the network if more than a few wireless devices are present. That said, there's something to be said about working on a laptop on the deck on a sunny spring morning. In the next sections, we look at special considerations for planning a wireless network and the initial configuration of the radio wave medium.
For a wireless LAN, there will need to be some form of a Wireless Access Point (WAP) as part of the network. (See the section, Special Considerations When Planning a Wireless Network.) The most common version is in a combination switch/router/wireless access point. However, standalone WAPs can be used in place of or in addition to one in the router. As part of the planning stage discussed earlier, the decision whether to buy a single, combination router, switch and WAP device or instead purchase separate router/switch and WAP devices should have been reached. If you're planning a purely wireless LAN, a WAP is all that is needed because it will serve as the "switch" for the network. You will need a wireless Ethernet adapter for every device to be connected wirelessly of course. Most new laptops come with a wireless Ethernet adapter built-in, but few desktops come with wireless. Fortunately, it's as easy to add as any PCI card or USB device. The table below has a few pictures and descriptions of some typical wireless local area network (WLAN) equipment.
| To the right is the Linksys WRT54GL, a combination DSL/cable router/firewall, Wireless Access Point (802.11g - 54 Mbps), and 4-port 10/100 switch. Its front has LEDs for the WAN (Internet) connection, the WLAN (Wireless LAN), and each port of the built-in 4-port 10/100 Ethernet switch (LAN ports). The two wireless Ethernet radio antennas can be seen from the rear. This version of this router is most notable for the fact it is built on a Linux kernel. Several alternate kernels such as DD-WRT and Tomato have been developed for this router that adds features such as the ability to use the router as a wireless bridge (see below) and set Quality of Service (QoS) settings for different types of network traffic. | 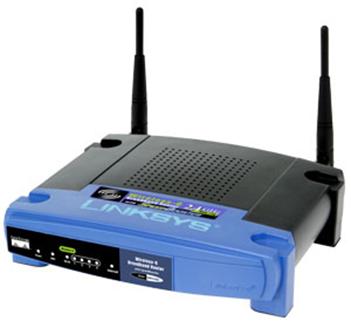 Copyright 2010 Linksys Corporation |
| The back of the WRT54GL shows the connection for the WAN (i.e., the Internet connection from your cable/DSL router), a reset button, four 10/100 MDIX ports that make up the switch, and the power jack. This is a pretty typical setup for a combination router/switch/WAP device. | 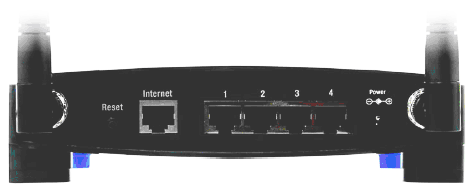 Copyright 2010 Linksys Corporation |
| The WNR834B is one Netgear offering of a combination router, four-port 10/100 switch, and an 802.11n (draft version 2) WAP. The 802.11n specification has yet to be formally ratified, but units such as this one built on the version (1 and) 2 draft specification are available. For the best chance of obtaining compatibility and function with wireless N devices, I recommend sticking with equipment from one manufacturer. That is, if you buy a Netgear 802.11n router, try to buy Netgear 802.11n wireless adapters for any laptops and desktops that need them. |  Copyright 2010 Netgear Corporation |
 The back of the WNR834B router looks much like that of Linksys' WRT54GL if not a bit more colorful. However, there is one thing to note the absence of, and that is, any antennas. The new 802.11n compatible routers are using internal antennas. This is both good and bad. Good in the sense that the antenna won't get caught on anything. Bad in the sense that the antenna can't be removed and replaced with a directional antenna (like the "Cantenna") for boosting the signal range.
| The WAP54G is a WAP-only device used to add or extend wireless networking to a LAN. The front of the WAP54G looks much like the front of the WRT54GS, but with fewer lights. Since it has no router or switch capabilities, it has no indicator lights for the WAN or the switch ports. One interesting feature of the WAP54G is that it can be made to operate in "client" mode, which turns it into a wireless bridge (for a lot less money than the specialized WET54G wireless bridge shown below). Not all WAPs have this feature. For a LAN network, a WAP-like this is sufficient. |  Copyright 2010 Linksys Corporation |
| The back of the WAP54G looks very different than the WRT54GS. There is only a jack for the power adapter and a single Ethernet port for attaching the WAP to the wired network. The WAP54G is intended to be an add-on device to an existing wired network. | 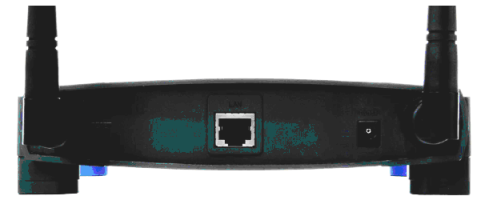 Copyright 2010 Linksys Corporation |
The paragraphs above showed some wireless access point (WAP) devices either as a standalone device or in combination with a router/switch. The next several paragraphs show the other side - wireless Ethernet adapters. Note that most laptops now ship with some sort of built-in wireless Ethernet adapter, so you may not need to purchase anything at all for those. On the other hand, almost no desktops ship with wireless capabilities, so a PCI or PCI-e add-in card like those shown below will be necessary.
| The Netgear WN511B is the 802.11n counterpart WNR834B router shown on the previous page. It is backward compliant with 802.11b and 802.11g as well. Even if you have a laptop with a built-in wireless network adapter, it may only be 802.11g compatible. If so, this card can be used in a laptop's PCMCIA/Cardbus slot to add true wireless N speeds. | 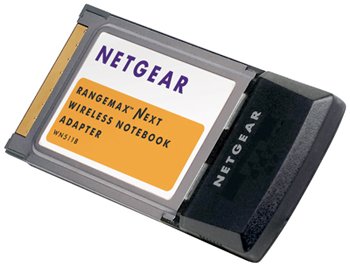 Copyright 2010 Netgear Corporation |
| The Linksys WMP54G is a PCI wireless Ethernet adapter for desktop PCs. It installs into a PCI slot just like wired PCI Ethernet adapters. This particular adapter supports a 54Mbps 802.11g transfer rate as well as well as Linksys' proprietary SpeedBooster technology. | 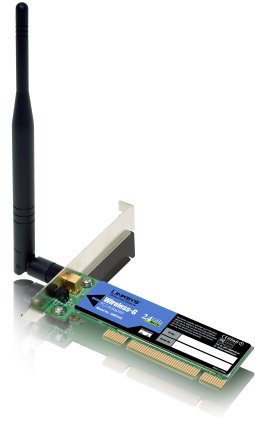 Copyright 2010 Linksys Corporation |
| The Netgear WN311B shown here is the PCI card version of the WN511B shown above. It supports 802.11b, 802.11g, and 802.11n. One thing that is notable about this card is the separate antenna case. This allows the antennas to be mounted away from the signal-killing, metal PC case that most desktop computers have. | 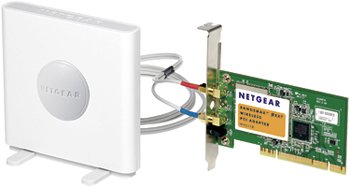 Copyright 2010 Netgear Corporation |
| The WUSB54G is a USB adapter version of Linksys 54Mbps wireless technology (802.11g). Wireless adapters like this one can be used to connect USB-capable devices to the network without the need to insert or install a network card like the previous two examples. It's a solution for those who don't wish install a card like the WMP54G in their desktop PCs and for other devices that have USB ports but no PCI slots. However, make sure that your USB ports are version 2.0, not 1.1. The throughput of these adapters on USB 1.1 ports is disappointing. | 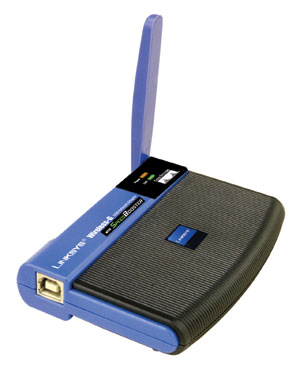 WUSB54G USB Wireless Ethernet adapter Copyright 2010 Linksys Corporation |
| The WUSB54GC is a compact version of a USB wireless Ethernet adapter. These work fairly well with notebooks, but I've found them to be disappointing with desktops. This is probably due to the small antenna size and the fact there is a relatively large metal case right next to them, which may be between the adapter and the wireless access point. | 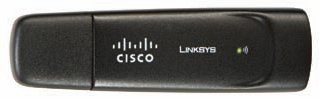 WUSB54GC Compact USB Wireless Ethernet adapter Copyright 2010 Linksys Corporation |
In addition to the standard wireless access points (WAP) and wireless adapters, there are a number of special purpose wireless devices. Several of these are shown in the next few paragraphs, but this is by no means an exhaustive list.
|
The Linksys WRE54G wireless range extender does what it sounds like. It extends the range of your wireless network by retransmitting the wireless packets it receives. The retransmitted network traffic is sent at full power. If some of your wireless devices are getting a poor or no signal in some areas you would like to use them, a range extender can be placed at a point between the WAP and the receiving wireless device to boost the range of your wireless network into that area. One note, however, is that devices like wireless range extenders and wireless bridges (shown below) work best with (and sometimes only with) other equipment from the same manufacturer.
|
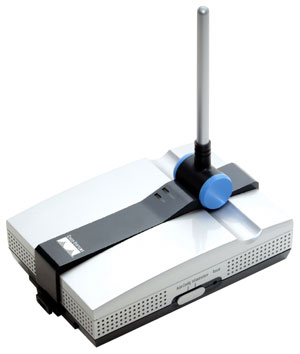 Copyright 2010 Linksys Corporation |
| The Linksys WET54G shown to the right is a wireless bridge. This device allows the connection of two wired networks over a wireless connection. This device is useful in the situation where there are groups of wired devices in two locations, but running a wire between them would be difficult. One end of the bridged network is the standard WAP or combination router WAP discussed before, and the other end would be a wireless bridge like this WET54G. A bridge like this also useful for connecting devices that have wired networking capability like a TiVo DVR or PlayStation 3, but don't have a wireless adapter available. It can be used with any device that has a standard Ethernet port. Earlier versions of this bridge included a 5-port switch, but this version includes only a single Ethernet port. If there is more than one device on the bridged end, a separate switch can be attached to the bridge. In the wild, however, this box is pretty pricey. It may be cheaper to buy the dedicated WAP like the WAP54G, which can be run in bridge ("client") mode. (It also only has a single Ethernet port.) | 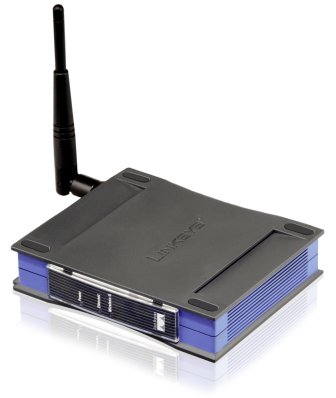 Copyright 2010 Linksys Corporation |
| The Linksys WET610N shown to the right (front and back) is an 802.11n version of a wireless bridge. This bridge has the advantage of using the faster wireless N networking, but the disadvantage of only offering internal antennas. In general, the range of wireless N devices is superior to wireless G (802.11g) ones. However, it's sometimes necessary to employ a unidirectional antenna of some sort to extend the range. (See the discussion in the Linksys WRE54G description above.) That's not possible with this model unless the user opens and modifies the unit (thus voiding the warranty). | 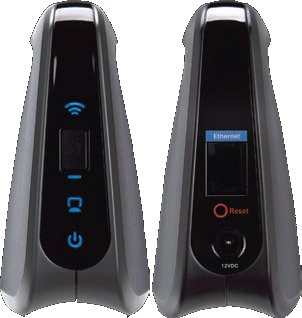 Copyright 2010 Linksys Corporation |
| Another device for wirelessly connecting game consoles like the PlayStation 2 and the Xbox 360 is the Linksys WGA600N. This is a specialized version of a wireless bridge of the WET610N above. If you have friends over with their consoles, you will need to plug a separate switch into the WGA600N (or the WET54G) and then plug the consoles into the switch. The advantage of this box over the WET54G is that it runs at 802.11n speeds if your router/WAP is also running at that speed. |  Copyright 2010 Linksys Corporation |
Here are a few hints for choosing your wireless networking equipment. If the location you've chosen for the router also happens to be reasonably close to the area you wish to serve wirelessly (where "reasonably close" is in the area of a 40 foot radius from the router in all directions [including up and down]), a combination switch/router/WAP device should work well. This is what most people will probably choose. On the other hand, if the wireless devices are going to be far from the router/switch (assuming you have a router/switch), you may want to invest in a separate router/switch and WAP. In this scenario, the router/switch is placed in a location near to your ISP's equipment (e.g., cable or DSL modem). Then a cable can be run from there to the WAP in another part of the house as necessary. If you can't cover the area you wish with a single WAP (or a combination router/switch/WAP), consider purchasing a second WAP or Wireless Range Extender. If you already have a router/switch for a pre-existing wired network and you are just adding a wireless LAN, a new, separate WAP makes sense if it lets you get the WAP closer to the area to be served wirelessly. Otherwise, you may want to purchase a new combination router/switch/WAP to replace your existing wired router/switch.
I recommend buying all the wireless equipment from one manufacturer. I've had reasonable luck mixing equipment from different manufacturers, but I still prefer to be homogeneous when it comes to wireless networks. Even though 802.11b, g, and n wireless networks are standards, they haven't been in existence nearly as long as wired networks and not all the kinks have been worked out. This is especially true with 802.11n equipment. The standard for 802.11n has been finalized but is still somewhat new. Some manufacturers' equipment just won't play nicely with other manufacturers' equipment. Additionally, if you plan on using a manufacturer's "enhanced," "turbo" or "boosted" mode to go beyond the rated wireless spec, you must purchase the equipment from the same manufacturer. Those speed enhancements are proprietary to the manufacturer. In addition, some manufacturers' shut off their proprietary speed enhancements if any equipment without the speed enhancement capability is detected in the range of the WLAN. This is because the manufacturer wants their equipment to be compatible with the standard wireless speeds, and may not be able to support both the standard speeds and the proprietary-enhanced speeds simultaneously.
Setting Up the Network
Setting Up the Network
Configuring Your Network
Now, we get to the fun part! Up to this point, we've run the wires (and/or configured your wireless connections) and hooked the underlying network together to your switch, router and/or WAP. We have link lights (or the equivalent) on every wired and wireless device. (Right?) Even with all that, we so far have only provided a stable medium - for the wired network anyway - upon which the network can communicate. We (may) still need to configure each device on the network in order for them to listen to each other.
A wireless network has an additional step that a wired network does not. To connect to devices on a wired network, only the proper cable is required. A wireless network uses radio wave rather than a cable as the transmission medium. The wireless transceivers used in both the WAP and Wireless Ethernet Adapters must be configured before the standard configuration can be done. That's the topic of this and the next several sections.If you are trying to configure wireless network equipment - especially if the equipment is not from the same manufacturer - you may need to skip ahead to the section on the configuration of the wireless equipment.
Using DHCP
Using DHCP
Using DHCP IP Address Assignment for Automatic Configuration
If your network is connected together by a combination router/switch/WAP, the simplest way to set the IP addresses for the other devices on the network is to have them get their IP addresses using DHCP. The term "DHCP" stands for Dynamic Host Configuration Protocol. It is a network protocol that does pretty much just what it sounds like - it dynamically configures hosts (i.e., devices) on the network. Most routers include a built-in DHCP server, and it's usually turned on by default. If you are configuring a standalone network using only a switch, you probably don't have a DHCP server available and should skip to the section titled Fixed/Static IP (Manual) IP Assignment.
When a device wants to connect to a network and wants to get its network settings dynamically using DHCP, it will broadcast a network-wide message (with its MAC address included, since that is the only unique number it has at that moment) asking for a DHCP server to lease it an IP address and other settings. If your WAP/router has a DHCP server and it is enabled, it will respond to the request with an IP address and other network settings like the network mask, network gateway IP address (which is usually the LAN IP address of the router itself since it is the gateway to the Internet) and the IP addresses of one or more DNS servers. It also includes the length of time that the DHCP server will reserve that IP address for that device. That is called the "lease" time of the DHCP request. Devices that are configured using DHCP are called "DHCP clients." If you have no DHCP server for your LAN or it is not turned on initially, you will have to set the IP addresses manually. A DHCP server is never required, but almost all home routers do have a DHCP server and they are quite convenient. If you are setting up a LAN without a shared broadband conenction, you may still want to consider including a router with a DHCP server just for this convenience. (There are cases, however when you want a particular computer to always have the same address. See the section Fixed/Static IP (Manual) IP Assignment for the discussion on that topic.)
I'd like to offer one word of caution here (because it's been done a number of times based on what I see on the networking forums). If you first buy a router without a WAP (or your ISP supplies you a router without one) and later wish to add a second router with a WAP (because the combo router/switch/WAP boxes are often cheaper than standalone WAPs), you will need to turn off the DHCP server on the new router (or at the very least configure it to serve a different range of IP addresses). If that is not done, which of the DHCP servers will answer a request for an IP address will be potentially random. This will result in machines on the network getting duplicate IP assignments if the two DHCP servers on the network assign an overlapping range of IP addresses.

Setting an Ethernet adapter to use DHCP is very straightforward. The following example uses the Windows 2000 operating system, but the other Windows OSes are similar. First, right-click on the "My Network Neighborhood" icon on your PC's desktop. Choose the Properties menu item from the pop-up menu as shown here. In Vista, go to the Start menu and choose the Control Panel. In the Control Panel, choose Network and Sharing Center. From the Network and Sharing Center, choose Manage network connections from the list of tasks on the left.
This will bring up the Network and Dial-up Connections window as shown below. In Vista, this is called just "Network Connections." (Since I sometimes use my laptop with a wired network card and with a wireless card at other times, I renamed the wireless Ethernet adapter to "Netgear Wireless WG511T" so I know at a glance, which one I have plugged in. If you would like to rename your network adapter, left-click on its icon and choose "Rename" from the pop-up menu.)
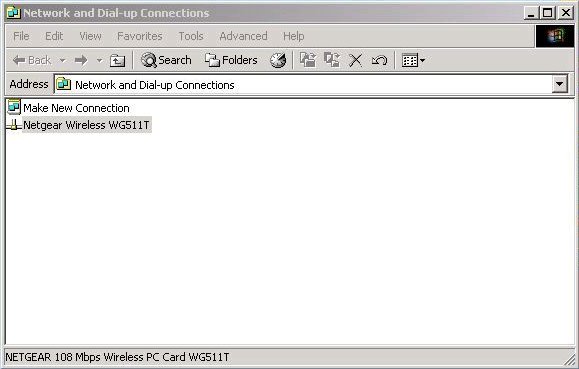
Left-click on the network adapter, which will usually be named something like "Local Area Connection" by default. This will bring up a pop-up menu. Choose Properties from that menu as shown here.
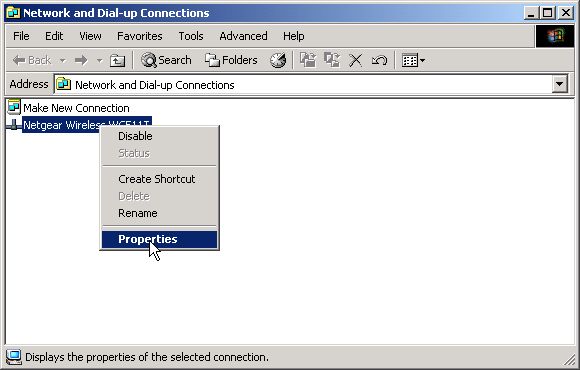
This will bring up the Properties dialog for your Ethernet adapter. Select the Internet Protocol (TCP/IP) from the components list (you may have to scroll it to the bottom) and click on the Properties button. (Double-clicking the Internet Protocol (TCP/IP) line will have the same effect.)
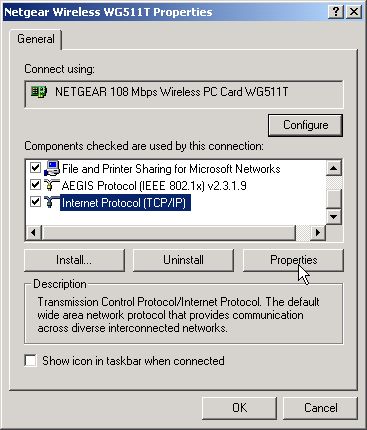
The Internet Protocol (TCP/IP) Properties dialog box will appear as shown below. On that dialog and under the General tab (which is the only tab), choose the radio buttons to Obtain an IP address automatically (i.e., get an IP address from a DHCP server) and Obtain DNS server address automatically (i.e., also get those IP addresses from the DHCP server).
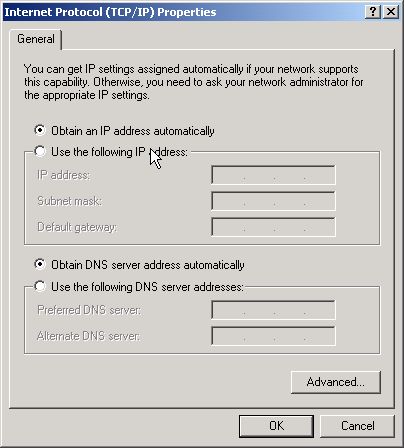
Click on the OK button. With Windows 2000, you sometimes have to reboot after making such a change. With Windows XP and Vista, you almost never need to reboot after changing the IP address. Repeat the above steps for your other wireless devices.
Repeat the above steps for your other networked devices.
Welcome back (if you had to reboot, that is). Now, it's time to see if we got what we expected. We should now have basic connectivity between all the connected devices and the WAP. We can check this using Test 4: Checking for Valid IP Address and Test 5: The Handy-Dandy LAN Ping Test. Try those tests now and then move on to the next section.
Changing DHCP Server IP Assignment
Changing DHCP Server IP Assignment
Changing the DHCP Server's IP Assignment Range
By default (at least in the case of the Netgear WGT624), the full range of LAN IP addresses is given to the control of the DHCP server. That is, all the addresses from 192.169.0.2 through 192.168.0.254 (where 192.168.0.1 is reserved by the router for its LAN IP address) are handed out by the DHCP to clients as they are requested. If we need to reserve some addresses for fixed IP assignment, we need to wrest a few of those away from the DHCP server's control. In order to do that, we need to change the configuration of the DHCP server in our router. As with anything dealing with changing the configuration of the router, first we log in.
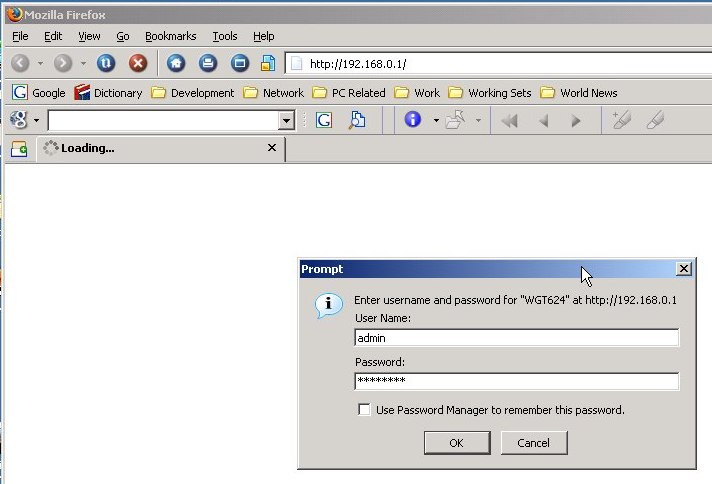
That will bring us to the first (Basic Settings) page. We need to go to the page where the DHCP settings are. On the Netgear WGT624, that is found on the LAN IP Setup page, so we click on that.
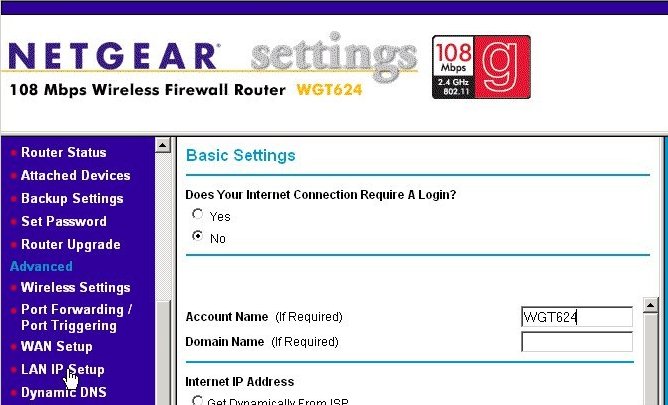
The LAN IP Setup page is shown below. We click on the last text box on the Ending IP Address under the Use Router as DHCP Server section, so that we can change the value from 254.
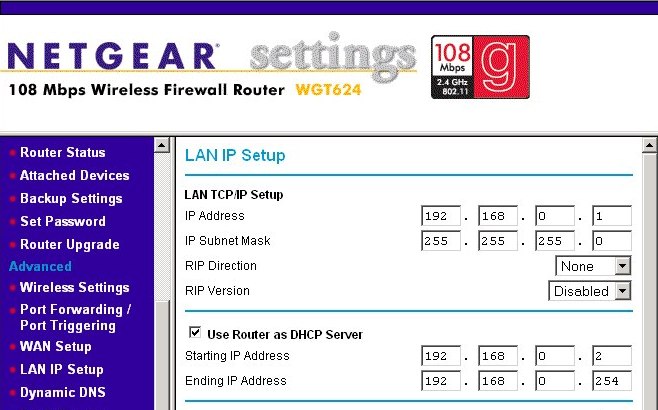
For the example shown below, we change the Ending IP Address to 49. That means your DHCP server will hand out IP addresses from 192.168.0.2 through 192.168.0.49, inclusive or 48 addresses in total. That should be enough for most home networks, but you can always bump it up later. These IP addresses are only given to devices attached that ask for automatic configuration - that is, devices that act as DHCP clients. You'll also notice a setting for the IP Subnet Mask on the page below. That will also be given to your client as well as the Domain Name Server (DNS) Addresses (if any), which on this router are found near the bottom of the Basic Settings page.
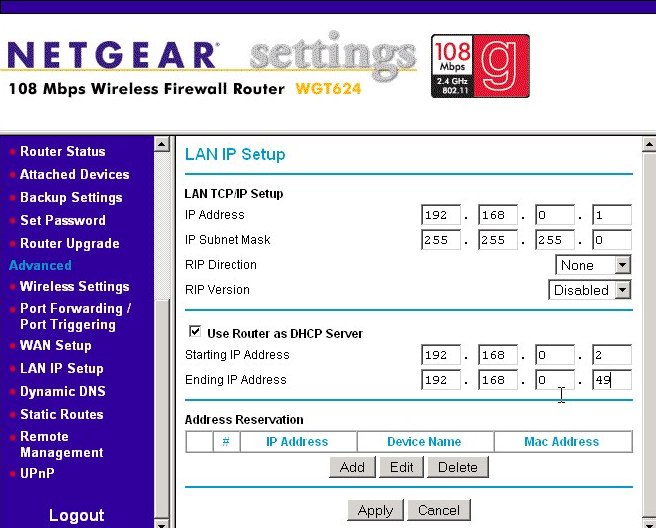
When you have the configuration numbers set the way you want, press the Apply button. If the machine you configured the router from happens to also be one of those DHCP clients, an interesting thing may or may not occur at this point. You may loose your connectivity to the network. The basic troubleshooting from Test 4: Checking for a Valid IP Address is to check to see if you have a valid IP address. Sometimes when you are fooling around with the DHCP Server settings and you are a DHCP client, you'll find yourself with no IP address after you apply the change. This state is shown in the first ipconfig command's results below. The situation is (usually) easily recoverable. Just as the DHCP server for a new IP address. Just type in the command ipconfig /renew as shown in the bottom half of the screen below and the DHCP server should give you a new IP address. The renew option will make your machine send out a DHCP request for a new IP.

I haven't determined what causes the loss of the IP address you already had, and it doesn't happen every time the DHCP server's settings are changed. (At least, not in my experience.) It's a mystery. Oooh!
Changing the Router's Internal Network
Changing the Router's Internal Network
Changing the Router's LAN (Internal) Network Number
This section is totally optional and used for fixed (static) as well as when DHCP is being used for IP assignment. If you're brand new to home networking, I suggest skimming it for now, but not actually performing the changes. You may want to come back to it later when you are more comfortable with your home network. Also, if you add a second (or third) router to your network, you will likely have to perform the changes given here.
You can also change the LAN's network number - which is the beginning portion of all the devices on your LAN. We're going to stick with 192.168 as the beginning two "octets" of the IP address. There are other valid values for that part, but we'll leave that discussion as an exercise for the reader. To change the network number of your LAN, first login to the router, and then click on the LAN IP menu. (This will be different for a different brand of router.)
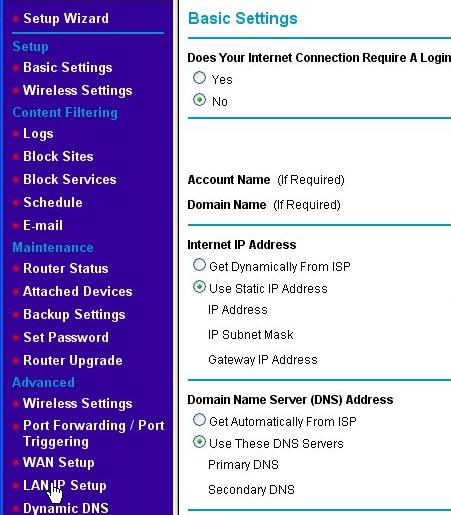
The original settings on the Netgear WGT624, as shown below, have the LAN IP address set to 192.168.0.1. (Linksys uses 192.168.1.1 as their default.)
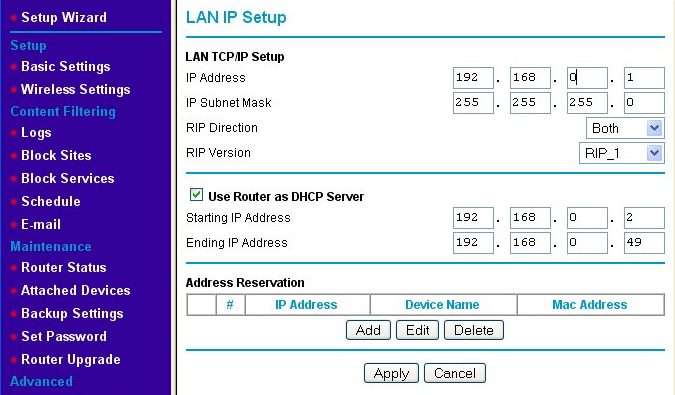
In our example, we'll change the network number from 192.168.0 to 192.168.4. Change the third field of the LAN TCP/IP Setup, IP Address from 0 to 4. The new gateway address for the devices inside your LAN will be 192.168.4.1. You also need to change the IP addresses that the DHCP server is lending out to be in the same network - namely, the 192.168.4 network. To do this, change the third fields in both Starting IP Address and Ending IP Address to match the setting for the LAN IP Address, which in our example is 4. When you've set those three fields, the result should look like the screen below.
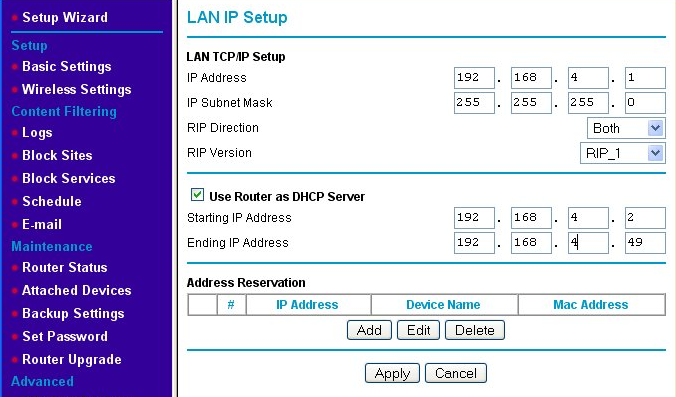
Once you press the Apply button, your network number will be changed. You many need to issue an ipconfig /renew command in a Command Prompt window (See the example in the section Changing the DHCP Server's IP Assignment Range.) so that the devices that are DHCP clients get a new address in the new network number's range. (For devices like an Xbox 360, you may have to cycle power to get them to lease a new IP address on the new network.) If you have set any IP addresses manually (i.e., Fixed or Static IP addresses as explained in the next section), you also get the pleasure of resetting them manually. (The same is true if you've set any firewall rules for machines at a fixed IP address.) We talk about fixed (or static or manual) IP address assignment in the next section.
Fixed/Static IP (Manual IP) Assignment
Fixed/Static IP (Manual IP) Assignment
Fixed/Static IP (Manual IP) Assignment

Technically, you don't need a DHCP server anywhere on your network; it's just a convenience. You can manually assign the addresses of all the devices on the network. In the beginning of TCP/IP networking, there were no DHCP servers and no DHCP protocol. All device addresses were set manually. There's a bit of comfort in having complete, manual control over your network's configuration. Still, using fixed IP addresses can be a bit of a chore if you change your network very often. While that's less typical in most home networks (excluding at least my own home network), it's very typical in offices as employees move, projects add/remove hardware, etc.
If you are setting up a Local Area Network using only a switch (and no router) to connect the network together, your only option (short of installing a DHCP server on one of the networked computers) is using fixed IP addresses. It's also very typical, even if you are using DHCP, to reserve some portion of the IP address space on your network for devices that need a fixed IP address that will be reserved for that device "permanently." A very common reason you'll need this is to be able to set up firewall rules necessary to let some online games work. That is, you will set up a rule in your router's firewall to allow certain types of network traffic to pass through to a particular machine by specifying the IP address of that machine. It's desirable that the machine's IP address doesn't change over time so that you don't have to periodically edit the rule(s) to match. However, when a machine uses DHCP, there's no way to guarantee its IP address won't change; in fact, it's pretty certain that it will at some point. In this case, giving that machine a fixed IP address is the way to go. (I'll use the terms "static," "fixed," and "manual" interchangeably in this section.) Another common device to give a fixed IP address is a networked printer. Many of the printer drivers installed on computers will have trouble locating a printer if it's IP address changes. It's best to assign a fixed IP address to a networked printer.
In the section Changing the DHCP Server's IP Assignment Range, we configured the router to use only part of our internal LAN IP address space. In that example, 192.168.0.1 is reserved for the router itself to use, so that we have a fixed gateway address. The DHCP server hands out addresses from 192.168.0.2 through 192.168.0.49, inclusive. What happens to the rest of the network addresses - those from 192.168.0.50 through 192.168.0.254? (192.168.0.255 is reserved for network broadcast messages.) The answer is "Anything we want." Those addresses have been made available for fixed IP address assignment for those devices that need such a thing. All we need to do is make sure we don't reuse an IP address more than once and that the ones we choose to be fixed are outside of range of DHCP server, but still on the same network.
Setting a static IP address for an Ethernet adapter is a variation on setting up the DHCP configuration. On the machine that we wish to give a fixed address, we start by opening up the network properties by right-clicking on My Network Places (or Network Neighborhood) and choosing Properties from the pop-up menu.
Next, we pick our Ethernet adapter from the list. (Here, I've renamed my wireless adapter to "Netgear Wireless WG511T." By default, yours will probably be named "Local Area Connection.") Right-click on the adapter name and pick Properties from the pop-up menu. (Alternatively, you can double-click on the adapter's name and press the Properties button from the Local Area Connection Status dialog. [Not shown here.])
From the Properties dialog for your Ethernet adapter (as shown below), pick the Internet Protocol (TCP/IP) entry from the components list and click on the Properties button. (Double-clicking on the Internet Protocol (TCP/IP) component name yields the same result.)
If you have been using DHCP prior to this or the Ethernet adapter is still set at the default settings, your Internet Protocol (TCP/IP) Properties dialog will probably look like the one below.
What we want is to specify a particular IP address for our adapter. To do this, click on the Use the following IP address radio button. That will enable the IP address, Subnet mask, and Default gateway text fields. It will also enable the Preferred DNS server and Alternate DNS server text fields and disable the Obtain DNS server address automatically radio button. (See the following screen.)
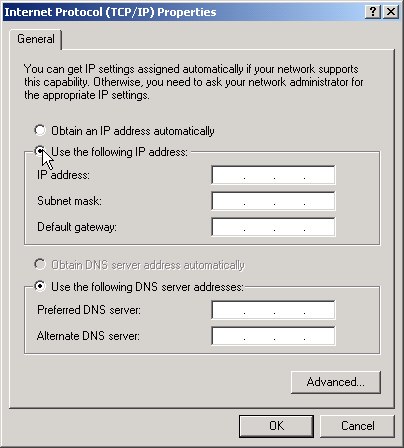
Enter the IP address you've chosen for this Ethernet adapter into the IP address text area. In the example below, 192.168.0.100 was chosen. Place your cursor before the first period and type "192" into the first text area of the IP address. Because 192 fills up the area, the cursor automatically advances to the second text area. Type "168" into that text area and the cursor will automatically advance again. Next, type "0" into the third text area. This time, the cursor does not automatically advance because 0 does not fill the (three character) area. Press either the right arrow or press the period key to advance to the next and final IP address field. Finally, type "100" into the fourth IP address field.
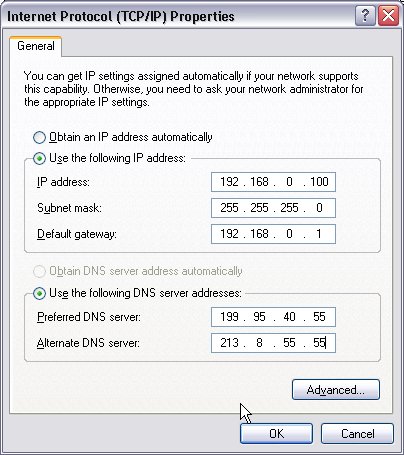
Press the tab key to move to the Subnet mask text area. Without explanation, I'm just going to tell you to type "255," "255," "255" and "0" into the text fields. (The cursor will automatically advance on the first three.) Exactly what the subnet mask does is beyond the scope needed for setting up a small network. Search for subnet mask if you wish to know more.)
The Default gateway is set to the IP address that is reserved for the router on the network. The example below assumes we have not changed the default and "192.168.0.1" is entered using the same entry method as for the IP address.
The values for the Preferred DNS server and Alternate DNS server are generally given to you by your ISP provider if you are setting up a Broadband Connection Sharing network. These will be the IP addresses of the DNS servers they provide for your use. If your router uses DHCP to get an IP address from your ISP (in the same way that your DHCP clients get IP addresses on the internal LAN from your router), the DHCP response will include the preferred DNS servers. Therefore, you should be able to look at the basic network settings screen of your router to see what addresses to copy to the fields below. If you are setting up a LAN, you can leave these entries blank.
Once these entries are completed in a manner similar to the one above, click on the OK button. The typical response is that the Window takes a few several seconds or a minute to close. (On older Windows operating systems prior to XP, you will be asked to reboot. Do so if asked and continue from this spot.) If you see a warning message similar to the one below, it means you have accidentally assigned the same fixed address to two (or more) networked devices. Change one of the IP addresses so that each machine has a unique one. Typically, the other machine at that IP address will display a message that some other device is attempting to use its IP address.

That's it for setting a fixed IP address.
Configuring Wireless
Configuring Wireless
Configuring the Wireless Access Point and Wireless Ethernet Adapters
Once you have decided on the wireless equipment you will use, the next hurdle to overcome is configuring equipment to work together. With a wired network, there is no configuration of this sort. We can plug almost any cable into any hub, switch, router, or Ethernet adapter and be fairly certain a link will be established between the two devices. With wireless networking, this is not (yet) true. The radio medium must be configured before the equipment will exchange any data with each other, and this must be completed correctly before the network configuration can be completed (which was discussed in Configuring Your Network).
The specific WAP used as an example here is a NetGear WGT624-V2 combination router (with firewall), 4-port 10/100 switch, and 802.11g (54 Mbps) wireless access point. Is also features Netgear's proprietary 108 Mbps Super G technology, which supports data rates at up to twice the standard 802.11g (according to Netgear) when used with Netgear wireless Ethernet adapters with Super G technology. The wireless Ethernet adapter used is Netgear's WG511T wireless 802.11g Ethernet adapter with Super G technology. While there will be similarities, other manufacturer's installation and setup will differ somewhat from what is shown here. However, the goals of these operations are the same. Different models of wireless equipment from the same manufacturer have also different installation programs and procedures. The user's guide for the devices you purchase should have the specific information you need. For the rest of this section, the term "WAP" will be used to describe both dedicated WAP devices and combination devices unless we need to distinguish between the two. Before we go into how to set the items, let's take a look at the items we will need to set.
There are a large number of variables that can be set, but only a few of them must be set when establishing the radio connection. The first is to decide on the channel to be used. In 802.11b and g networks, the network transmits in the 2.4 GHz frequency band. However, there are multiple specific frequencies (channels) in that band that are available. The number and exact frequencies used vary depending on the country you live in. In the U.S., there are 11 channels numbered 1 through 11. This is one way that several discrete wireless LANs can be established in the same physical location. If you live in a dorm or townhouse environment and someone else purchases wireless equipment from the same manufacturer, the two radio transmissions will interfere with each other if they are both left at the defaults. If the default channel number for the WLAN is 6, you could decide to use channel 3 instead. That way, you can both have WLANs with overlapping operational ranges, but they won't interfere with each other. (If your neighbor has left his WLAN at the manufacturer's defaults and doesn't want to touch anything in case they "break it," you may have to get them to shut their WAP off until you get yours configured to not interfere.)
The second variable is the Server Set-Identification or SSID. This is the name of the WLAN assigned by the WAP. It is fairly arbitrary and you should feel free to give it a name you find easy to remember. Linksys WAPs like to use "linksys" or "wireless" as the default SSID. Netgear seems to use "NETGEAR." This isn't guaranteed by any means, and the manual that comes with the WAP will identify what the default channel and SSID is. (It is sometimes printed somewhere on the WAP itself as well.) Technically, two (or more) WLANs operating on the same channel, but using different SSIDs can also to co-exist, but the transceivers on all the WAPs and wireless Ethernet adapters will see all the WLAN traffic. They will ignore the traffic without the proper SSID. However, if the WAPs are operating on different frequencies, they will have less radio traffic to inspect, and the throughput will be higher. If you know you have a neighbor operating a wireless LAN, you should find out what channel they are using and pick a different one if possible. (One caveat: if you decide to use Netgear's proprietary Super G 108 Mbps speed, only channel 6 can be selected. Therefore, a different SSID would have to be use to differentiate two Netgear WAPs if both are using the Super G mode.)
A third variable is the encryption settings, which we will leave for later. Using a secret key you choose for your network, all traffic will be encrypted at a level that will make it unreadable by others with a wireless Ethernet adapter if they happen to come in the transmission range of your WAP. Most WAPs come with the encryption disabled (although some come with it enabled and with a initial, random secret key printed on the WAP). While this aids in the initial setup of the WLAN (by removing one of the variables to contend with), it's not how you want to operate normally. We'll leave it disabled for now until we get the basic network up and going. In practice, you do not want to operate your WLAN without some form of encryption.
Most WAPs can be (or must be) configured using a web browser like Internet Explorer. The WAP has a built-in, specialized web server used for configuration. Rather than browsing to a well-known URL like www.google.com, you instead browse to the internal LAN address of the WAP. For the Linksys WRT54G and most other Linksys combination devices, that address is 192.168.1.1 by default, so http://192.168.1.1 is the address of the main configuration page. For the Linksys WAP54G, on the other hand, the default IP address is 192.168.1.245. The user's guide for your WAP will give the default IP address.
Here, we find ourselves in another chicken and egg situation. We would like to change the default settings of the WAP's channel and SSID. However, in order to do that with a wireless Ethernet adapter, we have to first talk to the WAP's configuration web pages using its default configuration. We will also need to configure the Ethernet adapter to have an IP address on the WAP's default LAN, which is a topic we really don't formally tackle until after the wireless radio medium configuration is completed. We have to do this in order to be able to contact the WAP, so that we can tell it what changes we want to make. (Note: If we are setting up a combination router/firewall/switch/WAP, this can also be done using a wired Ethernet adapter connected to one of the LAN ports on the switch portion of the box. However, this section will go over the general case that works for both standalone WAPs and combination router/WAPs.)
Set the Wireless Ethernet Adapter's Channel and SSID to the WAP's Defaults
First, we need to set the default SSID in the wireless Ethernet adapter to match the default SSID of the WAP in order for the Ethernet adapter to be able to communicate with the WAP for the rest of the configuration. If you purchased your WAP and Ethernet adapter from the same manufacturer and they are complimentary models, the SSID of the adapter may already be set to match the WAP's SSID. If this is so, you can skip to the next section.
We change the SSID used by the wireless Ethernet adapter using the software supplied by the adapter's manufacturer. (Windows XP [at least since service pack 1 or 2] and Vista also come with the Wireless Network Setup Wizard. However, I've always had better luck with the manufacturer's programs written for their hardware.) With the wireless Ethernet adapter installed and powered up, we launch the configuration utility. Every wireless adapter I've had seems to come with a radically different looking configuration utility - even for different wireless models from the same manufacturer. For this example, I'm using a Netgear WG511T 802.11G wireless Ethernet adapter. I also have the Linksys WPC54GS wireless Ethernet adapter, which has a very different looking utility, but with more or less, the same functionality. If the utility for your wireless adapter doesn't look like the screens shown here, don't fret about it. Just try to understand the purpose of what's being done, and you should be able to translate it to your configuration utility. Our goal here is just to make sure that the adapter is using the same SSID as the WAP.
The Netgear wireless utility for its wireless adapter - NETGEAR WGS511T Smart Configuration - has the ability to scan for wireless networks that are within range. If we didn't know (or forgot) the default SSID of the wireless access point, we could use this utility to find out. (However, our home WAP can be set to not broadcast its SSID, so this may not work.) In order to do that with the Smart Configuration utility, we open it and pick the Networks tab. Clicking on the Scan button starts a scan.
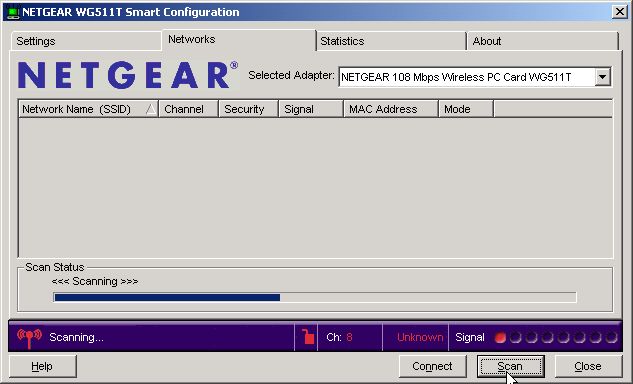
When the scan has completed, any networks found are displayed as shown below. This WAP is still set to its default values, namely an SSID of "NETGEAR" and no security. (The user's manual said the same thing, so this isn't much of a surprise.)
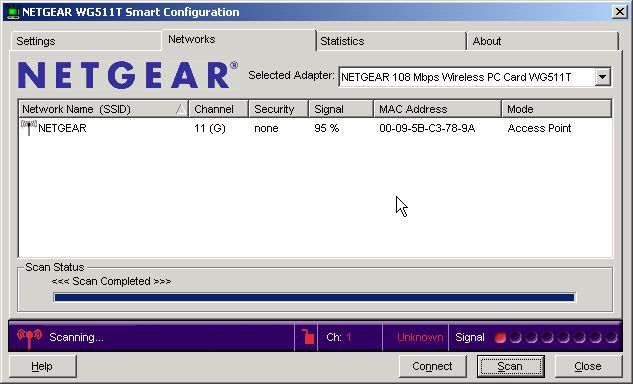
Now, we need to set our adapter to match the SSID of the WAP (if it's not already set to that value). The SSID setting for the WAP is the name of the network that it controls and needs to be the same for both the WAP and (all of) the wireless adapter(s). Once set for the Ethernet adapter, that SSID is the only network that it will pay attention to. If other wireless traffic from another SSID is broadcasting in the same area and on the same channel, both the WAP and wireless Ethernet adapters will ignore it. For the Netgear WGS511T, that SSID is changed on the Settings tab.
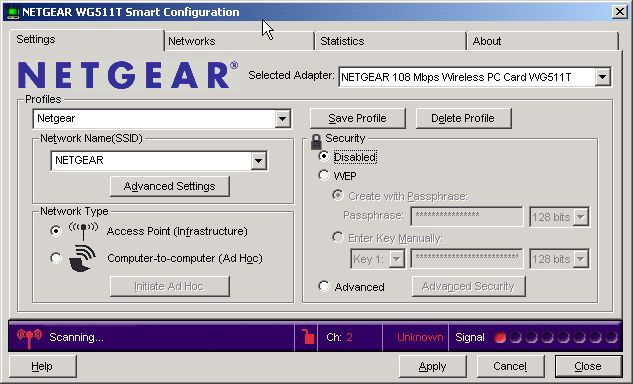
Above, I have set the name of the SSID to "NETGEAR" and I will save it in a profile named "Netgear." (Apparently, I wasn't feeling too inventive when I captured these screens.) Leave the security setting to "Disabled" (or change if to disabled if it isn't already) and hit the Apply button. (We will enable the security settings once we have established the basic wireless network. "Baby steps, Ellie, baby steps.") The result should be the screen picture below. That is, the Ethernet adapter should change from "Scanning" to displaying the new connection.
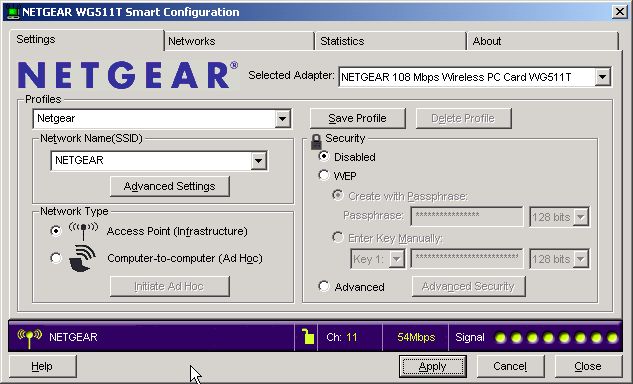
The status indicator line at the bottom of the screen now shows the wireless network we are connected to (NETGEAR), the channel being used (11), the current connection speed (54 Mbps at the moment, although this WAP and adapter card can go up to 108 Mbps), and the signal strength (8 of 8 dots or 100%; the WAP is just across the room from my laptop). I also clicked on the Save Profile button so I can recall this setup later if I need to. Using profiles comes in handy when we have a laptop that travels between wireless networks at home and work.
Note that we set the SSID, but we didn't set the channel. Most wireless Ethernet adapters will scan through the available channels and find the one your WAP is transmitting on. It will stop when it finds a WLAN that matches the SSID it is set to. If this does not happen, most cards will let you can set the channel manually. (This is left as an exercise for the reader.)
Now that the radio medium is established - the wireless equivalent of connecting the cable between the PC and the switch - we need to configure the Ethernet adapter to be on the same logical network as the WAP. That is, the adapter needs to have an IP address on the same network that the WAP operates its LAN and WLAN on. (However, it cannot be the exact IP address of the WAP; no two devices on the same network can share the same IP address.) Exactly what that IP address should be depends on the manufacturer (and possibly model) of your WAP. Assuming there is a router somewhere on your network - as will be the case if this is a combination router/switch/WAP - you may find that your newly-connected machine got a valid IP address using DHCP.
To make things simple and remove as many variables as possible, you may find it easier to set the address of the Ethernet adapter you are using (wired or wireless) manually to start with. It must be valid with respect to the WAP's default settings. For example, if the WAP uses 192.168.0.1 as its default LAN address, the manual setting for the adapter should be 192.168.0.xxx, where "xxx" can be any number between 2 and 254, inclusive. (You can't use 1 because the WAP has reserved that address for itself.) The manual that came with the WAP will tell you what the WAP's default LAN (a.k.a., inside, internal, local) IP address is by default. You will need to jump to section Fixed/Static IP (Manual) IP Assignment in order to find out how to set the IP address manually, and then return here.
Configuring the Wireless Router
Configuring the Wireless Router
Connect to the Router/WAP's Configuration Pages
Now that your Ethernet adapter has the SSID of the WAP and an IP address on the WAP's network, we need to configure it to the settings we want for our wireless network. First, we just need to see if we can contact it at all. To test to see if we have our Ethernet adapter configured to talk with the WAP, let's bring up the WAP's administration pages. Most WAPs and Routers have a built-in mini web site that can be used to check their status and to change their configuration. So to view the WAP's settings, we use a web browser like Internet Explorer or Firefox just like we would use to visit any other web site. The user's guide that came with your WAP will tell you for sure, but typically you get to the WAP's configuration pages by browsing to 192.168.0.1 or 192.168.1.1 into the address bar. Linksys equipment, for example tends to use the "1.1" address. Netgear WAPs, typically use the ".0.1" address instead.
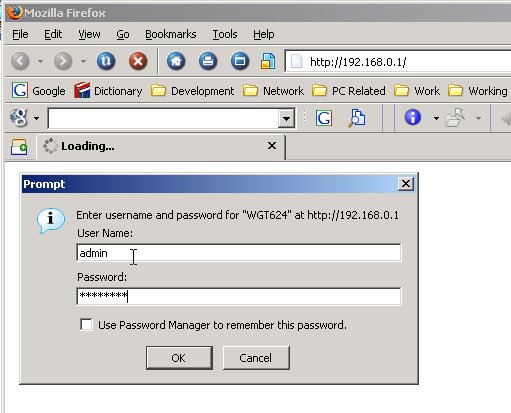
Above is an example of logging in to the Netgear WGT624 router. Note the IP address typed into the address bar as the URL. We can change the LAN IP address of the router if we wish. Notice that a dialog box popped up for us to enter the username and password for the router. By default, the Netgear WGT624's password is "password." (Sometimes, they aren't too imaginative either, so I don't feel so bad.) The default user name is "admin," and I have yet to find a way to change it. On the Linksys WRT54GS router, you get the same dialog box, but Linksys doesn't care what you type into the user name field (including nothing at all). The Netgear router does care. Once we have entered the administration password for the router, you should see the main page of the router configuration like the one below. (The very first time you logon to the router, you may be prompted with a page asking if you want to automatically detect your settings or get an offer to check for upgraded firmware. Decline such pages for now.)
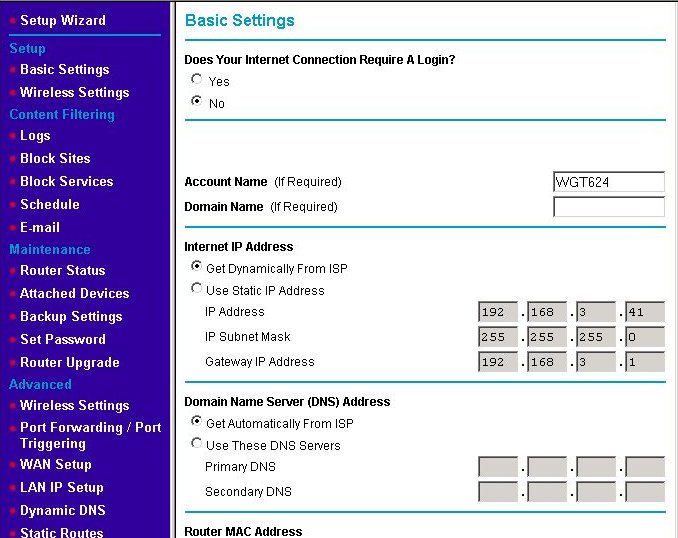
Every router's main page is different, and right now, we're concerned with changing the wireless settings. Therefore, we'll put discussing this page off until later and just click on the Wireless Settings link on the left menubar under the heading Setup. That brings up the basic wireless settings page as discussed in the next section. (Note there is a Wireless Settings Page under the Advanced heading, too.)
Set the WAP's Channel and SSID to Your Desired Choices
If you purchased your WAP and wireless Ethernet adapter from the same manufacturer, the wireless Ethernet adapter will probably be configured with the same defaults for the channel and SSID as the WAP. This means that your laptop or desktop will probably be able to talk to the WAP as soon as you install the software and drivers for the adapter. Even so, you will want to change the defaults.
If your wireless Ethernet adapters don't initially have the same channel and SSID as the WAP, you will need to change (at least one of) the adapter(s) to match the WAP at least long enough to change its settings. (See the section Set the Wireless Ethernet Adapter's Channel and SSID to the WAP's Defaults if you haven't done this already.) If you have a combination router/switch/WAP, you can also use a wired connection to the switch to configure the WAP's channel and SSID. Every router's wireless settings screen is different, but they will have a page for setting the SSID. The basic wireless configuration page for the WGT624 is shown below.
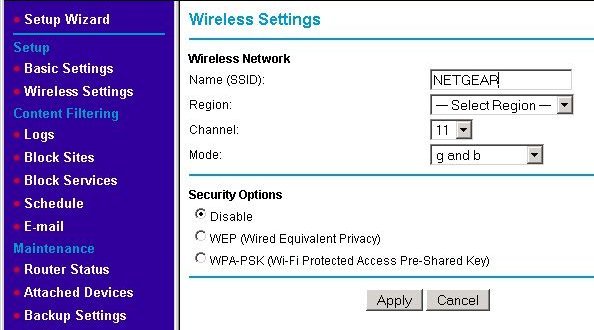
In the next screen, I've changed the default SSID from the default ("NETGEAR") to my desired name - Hard2Guess. Please don't use that name. Make up your own. Just make it something you'll easily remember and others aren't likely to use themselves.
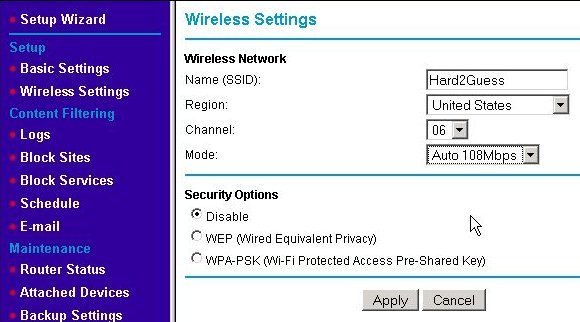
You should also set the region at this time if it is not already set. Setting it to United States defines how many and which exact channels (frequencies) the WAP's radio transceiver can use. (In the case of the US, it's 11 channels.) If you want, you can also pick a specific channel to use. If you aren't getting the range you want or you have a 2.4 GHz cordless phone (or wireless mouse/keyboard or RF remote control or wireless speakers for your home theater or ....) that's interfering with your wireless LAN, changing the channel may help. With this particular router, I changed the mode to "Auto 108Mbps" in order to take advantage of Netgear's proprietary "Super G" 108 Mbps speed. Doing so locks the channel at 6, so I have no choice in this case. We'll leave the security options set to "Disable" for now. Hit the Apply button to make the changes and continue on to the next section.
Reset the Wireless Ethernet Adapter
Reset the Wireless Ethernet Adapter
Reset the Wireless Ethernet Adapter's Channel and SSID to the WAP's New Settings
Most of the time when you make a change on the router and hit Apply, the router will go to a special page or pop-up a dialog box to let you know the changes were made successfully or at the very least return you back to the same page with the changes showing. However, when you apply this change, the Netgear router doesn't come back at all. Why not? Because you've just changed the WAP to only talk to cards on the newly-named WLAN (i.e., "Hard2Guess"). Your wireless Ethernet adapter is not on that WLAN; it's still using the old SSID named "NETGEAR." If you open your wireless adapter's configuration utility and again scan for networks, you'll see the new Network Name (SSID) you chose listed as shown below.
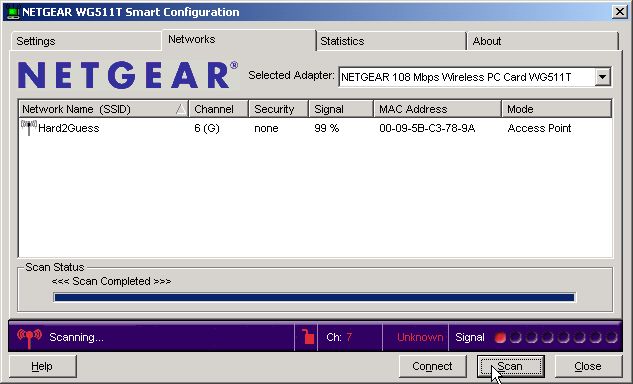
For the Netgear WG511T, we fix this problem by going back to the Settings tab just like you did in the Set the Wireless Ethernet Adapter's Channel and SSID to the WAP's Defaults section. However, this time we set the SSID to match the new one as shown below. (You may have to close and reopen your browser before you'll be able to browse to any other configuration pages for the WAP. If so, do that now.)
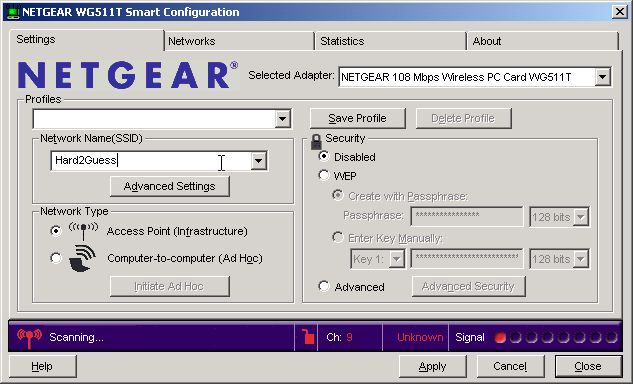
Hit the Apply button and your adapter should connect using the new SSID (as it did originally using the WAP's default SSID). Continue on to the next section.
Change the Router/WAP's Default Password
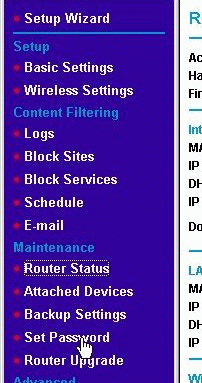 When choosing a password, pick something you will remember, but make it hard to guess. In general when picking a password, include numbers, letters and special characters like "!@#%^&" if your router will allow it. Also, passwords are case sensitive, so use both upper and lower case.
On the Netgear WGT624, the router's default password is found on the page accessed by clicking on the Set Password menu found under the heading of Maintenance as shown here.
This will bring up the password change page as shown below. On this page, type in the default password and the new password you have chosen (twice to verify you've set it correctly since the dialog does not display what you type). Press the Apply button when you are finished. Most routers, the WGT624 included, will make you login with the new password in order to continue.
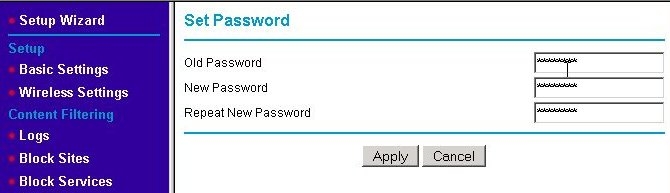
Additional Wireless Security Measures
Additional Wireless Security Measures
Turn Off SSID Broadcasting?
I used to be a big proponent of turning off the broadcasting of your WAP's SSID in order to hide it from would be hackers. The theory was turning off SSID broadcast makes it harder for outsiders to use your network since they would first have to guess your SSID. Since then, it was demonstrated to me just how simple and effective it is to use a wireless hacking program that can sniff out the SSID of a WLAN even if it is not being broadcast in the usual fashion. The program isn't particularly hard to find, so I've changed my viewpoint to hide it if you want to, but don't expect that will do much. I've also had trouble with some wireless Ethernet adapters (in laptops) reconnecting to the WLAN if the SSID broadcast is off.
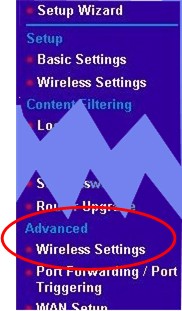
In order to turn off the SSID broadcast, you'll need to find that setting in your router's configuration. For the WRT624, that setting is on the Advanced Wireless Settings page. Click on the Wireless Settings menu entry under the Advanced heading.
On the Advanced Wireless Settings screen, click on the Enable SSID Broadcast checkbox to clear it (so there is no "check" in the box) and hit the Apply button. If you go to the Networks tab of the WG511T wireless Ethernet adapter's configuration utility (as you did in the section Set the Wireless Ethernet Adapter's Channel and SSID to the WAP's New Settings), you will still see the Network name if you scan for networks. This is because that adapter already knew the name.
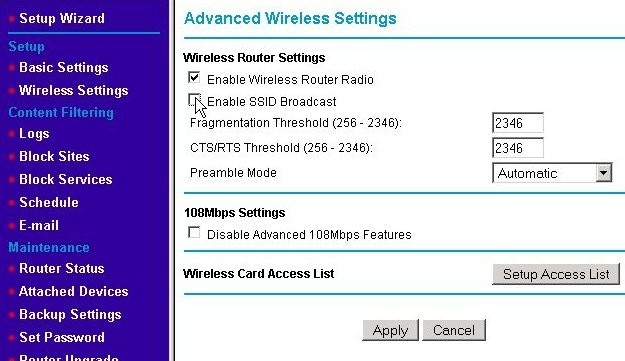
However, any adapter that did not already know the SSID of your network will see the following if they do a scan. The wireless adapter can see that there is a wireless network operating at the "G" speed on channel 6, but it can't determine the Network Name. Thus it is blank.
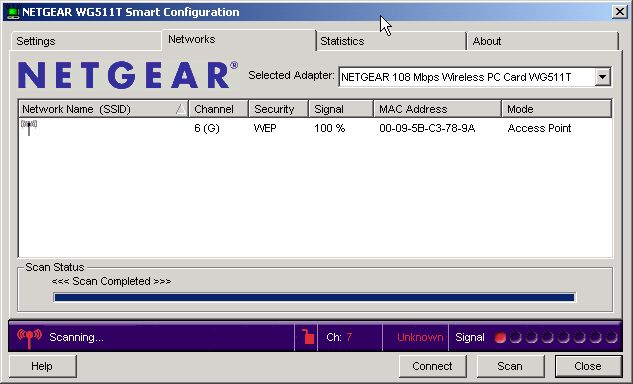
Enable Wireless Encryption
Not all hackers just want to use your wireless LAN; some want to monitor it to learn personal information, passwords, and credit card numbers. If your WLAN is operating in a small office, a hacker may be interested in learning your trade secrets, active court cases, or delivery schedule. Tools exist for hackers to capture and analyze your wireless network traffic without appearing to be connected to your WLAN. For these reasons, encrypting the traffic on your wireless LAN is almost essential. It also just happens to keep freeloading neighbors off your WLAN, too.
Initially, there was no encryption available on 802.11 networks as security was an optional part of the standard. Later, Wired Equivalent Privacy (WEP) encryption became available. However, WEP has some well-documented weaknesses that were found soon after its introduction. (Still, WEP is better than no encryption, and 128-bit WEP is better than 64/40-bit WEP.) Any hacker with enough time within range of your wireless network can capture enough wireless traffic to break WEP's encryption. WEP may keep the 10 year old next door off your WLAN, but nowadays, it won't even slow down anyone that is determined to compromise your wireless network. A decent WEP cracking program on a modest laptop can generally crack a WEP password in under 10 minutes.
Later versions of the 802.11 specification promoted Wi-Fi Protected Access (WPA) Pre-Shared Key (WPA-PSK) as the encryption protocol. WPA-PSK is much stronger than WEP while still based upon it, which let existing routers take advantage of it with only firmware upgrades. The next picture shows setting the WPA-PSK with the Netgear WRT624 using the Basic Wireless Settings page. (Remember to first set the wireless settings on the WAP and then go back and set the wireless Ethernet adapter to match.) Click on the radio button next to "WPA-PSK" and then enter a passphrase.
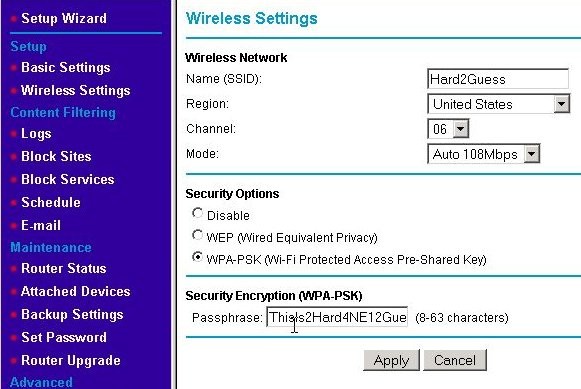
Unfortunately, WPA-PSK can also be compromised and has since been updated to WPA2. The newer WPA2 encryption can be compromised, but has technologies in it to make it much more difficult. If your wireless equipment supports WPA2 using that is more secure than WPA. WPA2 also comes in a couple of flavors: TKIP and AES. Both are good, but AES is better. If given a choice, use AES. Any recently manufactured wireless equipment should support WPA2 and AES. Using a passphrase of 21 characters or more makes it significantly more difficult so long as a strong password (i.e., void of common dictionary words) is used. This is these types of encryption are particularly susceptible to dictionary attacks against passphrases. The passphrase can be to 63 characters in length. Making the phrase longer and more complex and using a mix letters (upper and lower case), numbers and special characters makes the password significantly more difficult to crack. One way to do this is a way that is easier to remember is to substitute numbers for certain letters (that have the effect of spelling those letters backward or look similar to the original letter). For example, use "3" instead of "E" or "e" and "1" instead of "I." As mentioned, using special characters is very good. For example, using '!' as a substitute for the word "not" or '&' for "and". The passphrase "Th1s1s!MyP@55p4r@53UF00l" is a much stronger than "thisisnotmypassphraseyoufool" will ever be. Just be sure to remember what your scheme is.
Once the WAP has been set and the Apply button pressed, you will loose connectivity with your wireless LAN until the wireless Ethernet adapter has been changed to match the WAP's new settings. With the Netgear WG511T, this is done using the Settings tab in the Smart Configuration utility. Click on the Advanced radio button.
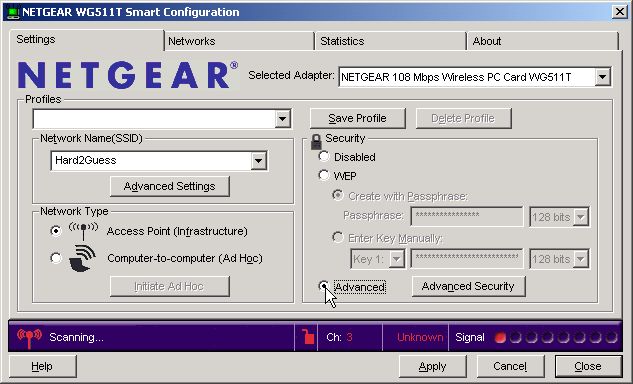
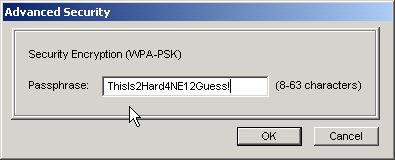
This will cause the Advanced Security dialog to appear. Enter the same passphrase you used for the WAP and press the OK button.
For most types of wireless Ethernet adapters, changing to the Wireless Access Point's SSID and encryption method with the proper passphrase is all this is required. The card should now be able to connect to the WAP and send & receive data as it did when it was set to the defaults. If there is a problem at this point, try re-entering the passphrase on the wireless Ethernet adapter (and check that it matches what was entered for the WAP). It may be necessary to reset the WAP (router) and the wireless adapter back to the defaults and try again.
Configuring MAC Address Filtering
One of the earliest forms of WLAN protection was MAC Address Filtering. The term "MAC" is short for Media Access Control. Every hardware device on an 802 network (wired or wireless) has a unique MAC address. This is not the same as the IP address; the MAC address can be thought of as "stamped" onto that network device. It's much like the VIN number found on an American automobile. To start, open a Command Prompt window as shown below.
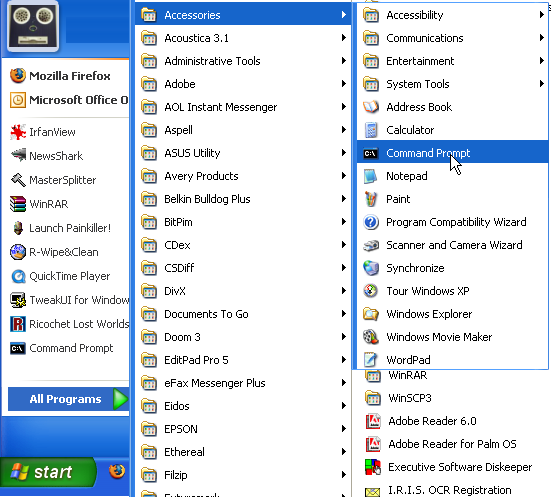
In the Command Prompt window, type in the command ipconfig /all, the "Physical Address" listed is the MAC address for the Ethernet adapter in use.
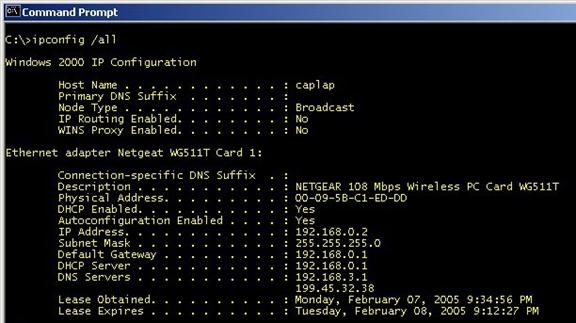
Most WAPs will let you enter a list of MAC addresses of "approved" wireless devices that will be allowed to use the WAP's services and connect via a wireless connection. (Some routers also have a list for wired devices kept either separately or in combination with the wireless list.) Using "MAC address filtering," as it is called, helps to keep people from using your network, but it does nothing to keep them from capturing the traffic generated by it. (Hence, encryption is still needed.) Also, MAC addresses are not secure; programs exist that will allow the MAC address of a wireless card to be temporarily changed to mimic any MAC address - including one in your approved list. This is just one more tool to help keep unwanted wireless devices off your network. To set up MAC Address Filtering on the WRT624, go to the Advanced Wireless Settings page using the left menu. Then click on the Setup Access List button.
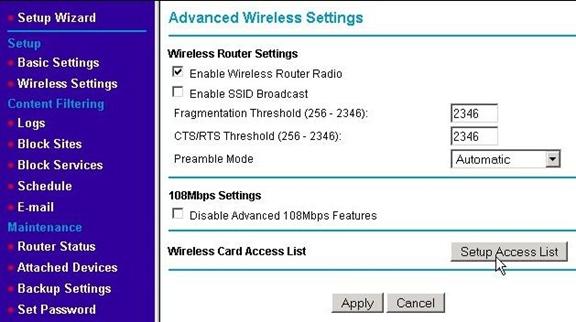
Check the "Turn Access Control On" check box and hit the Apply button.
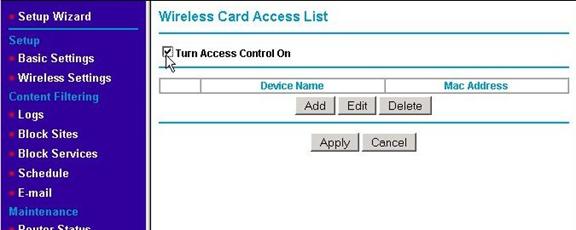
This will refresh the page with a list of wireless adapters currently in range. Most WAPs start with a list of devices currently connected in order to make it easy to set up the initial list.
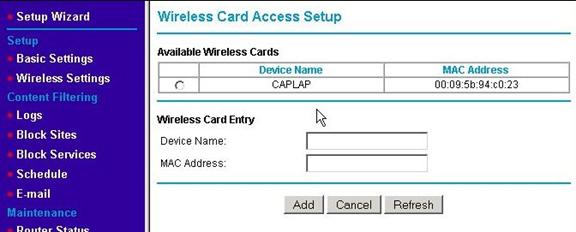
Select the radio button next to the one(s) you wish to include. You can also manually enter the MAC address (found using the ipconfig /all command in the Command Prompt window).
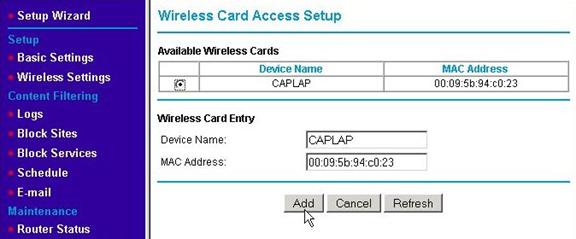
Disabling an Unused Wireless Network
If your ISP supplied your router, it will likely include wireless networking built in. By default, it is usually enabled and either not secured or secured only with the factory default settings. If this is the case, and you aren't going to use the wireless capabilities, you should disable them completely - unless you want to provide free Internet service to your neighbors (which likely violates the Terms of Service with your ISP). If you don't, they can use your wireless connection freely for any purpose they choose such as illegal file downloading and sharing. This is especially prevalent in townhomes and apartment buildings. If the RIAA lodges a complaint about illegal file sharing, it will be traced to the IP in use by your account. Your ISP will generally terminate your service permanently without question upon receipt of the complaint even if you weren't aware of the activities taking place. Even if they aren't doing anything illegal, they may be doing things that use lot's of your network's bandwidth, and it's quite possible they will be able to see and inspect the devices on your network. Let's avoid that.
If you aren't going to use the wireless capabilities, the best thing to do is to shut them off. (If you are going to use wireless networking, you want to configure your network to use wireless encryption and perhaps take other security precautions.) How the wireless is shut off varies between different makes and models of routers. You will need to consult the user's guide for your router. What you are looking for is something that disables wireless networking or disables the wireless radio. In the example below, the check box is simply labeled, "Enable Wireless Router Radio." Take care not to confuse this with a setting to Enable the SSID broadcast. These two settings are not the same and disabling the SSID broadcast does not disable wireless networking.
If you've ventured this far, congratulations! You've reached the end of configuring the wireless network medium. Now it's time to go back to Configuring Your Network. Having gone through this section, you have a leg up on that task because we had to do a good portion of it in order to configure the radio medium. Don't worry if you don't need to do some of the tasks in that section because they were already done when you went through this section.
Growing Your Network
Growing Your Network
Growing Your Network
Given the growth in the number of devices that can be connected to the Internet, don't be surprised if at some time you find yourself without any free ports for the hot new gadget you brought home. (Seriously, do you really need your refrigerator to be on the net?) When you bought that router with its four whole empty LAN ports, you couldn't figure out why it had that many, right? I mean, you only had one computer. A new computer, a networked printer and an Xbox 360 later and there's no vacancy at the Ethernet inn. Not to worry. The solution is to add a standalone switch to your network.
Adding a switch is simple. In general, you can add a switch to your network anywhere you could have plugged in a computer or other networked device. Most switches nowadays have all MDIX ports, so typically you need not worry about using a special Ethernet cable. (There is a lengthy discussion of the variations in uplink ports found in today's switches in the section on Uplink Ports). Start by running the cable from your existing router to the one of the ports on the switch. (The uplink port on the switch, if there is one.) If you have an older model switch that has neither MDIX ports nor a special uplink port, a crossover cable must be used to connect the switch to the existing router. The diagram below shows what we are trying to achieve.
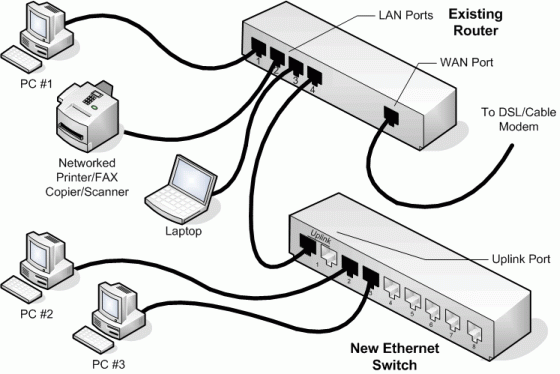
Growing Your Network By Adding A Switch
Needing more ports isn't the only reason to add a switch to a network. As touched on in the section on planning your network, switches are also useful in the case where parts of your network are physically separated. If you have a cluster of networked devices in a couple adjacent rooms (like the bedrooms upstairs or the payroll department down the hall) that need to talk to another set of computers in rooms that are farther away (in the basement den), it's much easier to run one Ethernet cable between the two areas that connects to a switch on both ends (or maybe a router on one end and a switch on the other). However, this is also a case where a wireless network or wirelessly-bridged network may be considered.
Note that you always lose one port on the newly-added switch in order to connect it back to the existing network. Likewise, you also loose a port on the previously-existing router (or switch). Keep that in mind when choosing the number of ports on the new switch. If you need to add three more networked devices to a completely full router or switch, you need at least a five-port switch. You were thinking four ports, right? Remember, one of the ports on the existing switch or router will need to be freed up in ortder to connect to the new switch. That port was presumably being used by something or we wouldn't have been out of ports in the first place. Whatever that device was, it will be moved to the new switch, so that's one port down. As we just said, another port on the new switch is used to connect to the existing switch or router, so the number of empty ports afforded by the new switch is N - 2, where N is the number of ports on the new switch. It never hurts to have extra ports. At this time, an eight port switch costs only a little more than a four or five port switch. A sixteen port switch, on the other hand, is a bit more than an eight port switch. Sixteen port switches aren't as much in demand, so manufacturers don't make as many of them and their prices haven't been driven down. Anything above a 16-port switch can be pretty pricey. Often, 16-port switches and above include some sort of network management capability (that home users would rarely use). It makes the switch more flexible in how the ports are assigned, but at an increased cost. My recommendation right now is to buy an eight-port switch in most cases. Four and five port switches are smaller, so if space is very limited, a four port switch may fit the bill.
Internet Connection Sharing
Internet Connection Sharing
Internet Connection Sharing
Even if your all gung ho about getting to the Internet to meet some new, friendly people, talk about their culture, and then wipe them off the face of the earth in StarBlasters 3D Mega-Expansion Pack IV - Online!!!, you still need to do first things first. And the first thing is to have your Local Area Network (LAN) working. If you haven't done that yet, make like a Monopoly player and go straight back to section The Local Area Network, don't pass "Go," and don't waste your $200. If you don't have your LAN functioning among the computers inside your own house and between the computers and the router, then your chances of getting them all sharing an Internet connection are grim.
OK. Now, you've got your LAN a hummin' and all your computers are chatting like Aunt Patty at your last family reunion after she'd had four glasses of wine. Your kids just used the computer upstairs to print 100 pages of "Hi Daddy!" or "Hi Mommy!" or "Hi Parental Unit!" in great big letters in just the last 10 minutes to the printer in your office. Even the cat just sent a fax to PetsRUs for more catnip. That's great! Now, it's time to move on to the next challenge - getting your Internet connection shared to all the devices on your LAN, while keeping everything as safe as possible. With any luck, this will turn out to be pretty anti-climactic because you've already done a good portion of the work.
Permissions and Rights - Are You Allowed to Connect More Than One Computer?

Now, hold on there, hombre! You did read your Acceptable Use Policy as mentioned in the section Want to Host an Internet Game Server? Check First, right? Yeah, I know you skipped that section. It's OK. However, you really should check your ISP's policy on connecting multiple devices if you haven't already. Most ISPs don't care and many even will sell or rent you the equipment (they recommend) to help. A (wireless) router/firewall may even have been included with your ISP's "connection kit" (or whatever they call the hardware and software supplied with your new service). Other ISPs say it's OK to hook up multiple devices if you pay them extra. Some just say, "No. One computer and one computer only." (Luckily, this position seems to be rapidly disappearing.)
Don't hope that you can clandestinely hook up your desktop PC, your laptop and your Xbox 360 and the ISP will never know. Even if you are going through a router, which masks the devices on the other side, your ISP can tell if they choose to check. That said, most ISPs nowadays understand that a house with multiple computers, gaming consoles and other networked devices is just the way things are. They've learned to embrace it. (As in, they've learned they can make money on it by selling you upgraded packages with faster connections and equipment to support multiple computers and other devices like the Xbox 360, iPad and TiVo DVR.) Assuming this is not a stumbling block, let's move on.
Internet 101
In order to understand some of the things that will be done while setting up your broadband sharing network, it's important to have a basic understanding of how the Internet functions. There are a number of really good web sites with tons of information on the subjects introduced in the next few sections. This is intended to be really brief introduction with just enough information to help make sense of the tasks to be done here.
Introduction to the Domain Name Service
We need to digress a moment and talk briefly about how domain names and IP addresses work on the Internet. First, understand that the Internet operates on IP addresses like 121.22.47.219 rather than (domain) names like www.neatwebsite.com. People, however, have a terrible time remembering numbers, so a way was devised to equate a name to an IP address. When you open a web browser and go to the URL http://www.neatwebsite.com/, something interesting happens. Remember those Domain Name Servers (DNSs) that your router gets from your ISP (or that were explicitly given to you by your ISP)? The purpose of a DNS is to translate names like www.neatwebsite.com into an IP address your browser can use.
It's a lot like the process of looking up someone's name in the phone book; you translate a business' or person's name into a telephone number in order to connect to them by telephone. In DNS parlance, this is called "resolving" the name.
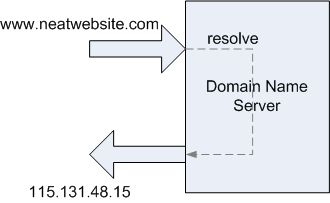
Your browser will consult one of your ISP's DNS servers and ask for the IP address that has been assigned to www.neatwebsite.com. The DNS server will respond with the IP address. Your browser will then make a request for a web page from the web server at that IP address. Every name you type into your browser's address bar must eventually resolve to a single, unique IP address. When the web server sends you back a web page, it sends it to the IP address that was included in the request. Just like the web server at www.neatwebsite.com, your (return) IP address must also be unique. Otherwise, there would be no clear path for the web page to find its way back to you.
Private IP Addresses
So now you might be asking yourself why talking about DNS servers was important when the topic is supposed to be your router. (Go ahead. Ask yourself. We'll wait.) Recall that when we set up our internal network, we used IP addresses starting with 192.168. If you stop and think for a moment, thousands upon thousands of people may have purchased the same router that you did. Many of those people left the internal LAN network at its default settings (e.g., 192.168.0.1). That means that at any given moment there are probably thousands of devices connected to the Internet with their LAN IP address set to 192.168.0.1, 192.168.0.2, etc. Why don't web servers on the Internet get confused when trying to figure out which 192.168.0.2 to return a web page to? The answer is that servers on the public Internet never see or use those addresses.
IP addresses that start with 192.168 are special ones that are called "private" or "non-routable" IP addresses. What this means is that these addresses have been set aside for use by businesses and home users to use internally. You will never find a public web server at the URL http://192.168.0.1 for example. (You could, however, create your own internal "Intranet" web server at that address, and that's fine.) Likewise, the return IP address for the web page you requested would never be 192.168.0.2, for example. It will always be the IP address that your ISP assigned (temporarily or statically) to your router. All Internet data destined for all computers and other devices on your LAN, initially arrive at your router using that public, routable IP address. It's up to the router to figure out which computer or other device attached to your LAN should receive the data (if any).
Introduction to Network Address Translation
How does a request for a web page from one of the machines on your internal LAN to a web server somewhere out on the Internet ever get back to right machine? After all, we purposely assigned one of those private IP addresses to it (either dynamically using DHCP or statically), and those can't be used on the Internet. The answer is that the web server that is out on the Internet never sees that private IP address. Instead, it sees the unique, public, "external" IP address that was given to you by your ISP (again either dynamically or statically). That IP address is guaranteed unique. How this gets done is part of the magic that is your router. The majority of home network routers are "NAT-enabled" routers. That means the router comes out of the box ready to perform what is known as Network Address Translation or "NAT". For this discussion, the simple explanation is that the router will note a request made by a device on the inside LAN that is destined to a device on the Internet (or WAN). This would be something like your web browser requesting a page from 115.138.48.15 to use our http://www.neatwebsite.com/ example above. (Remember, your browser would have already contacted a DNS server to resolve the name www.neatwebsite.com to its unique, public IP address.)
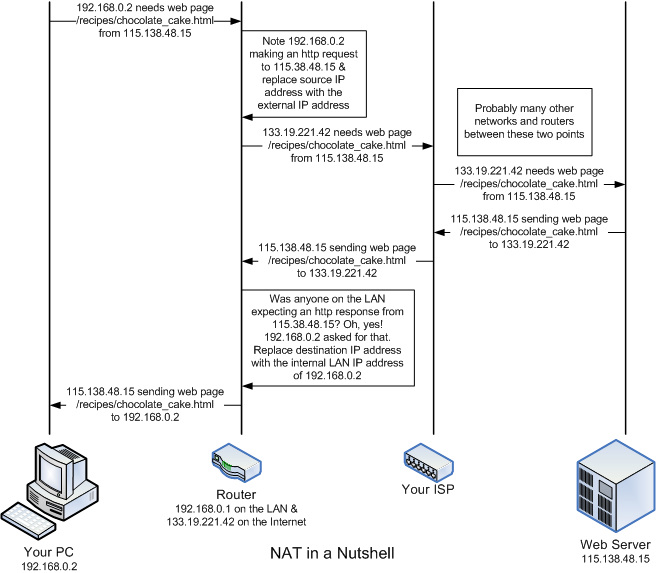
The router will replace the internal, private IP address (e.g., 192.168.0.2) originally found in the request as the source address with the public IP address assigned to your router and send the request on to the web server on the WAN connection. (Let's say it's 133.19.221.42 for this example.) When the web server returns the page you requested, it will send it addressed to the requestor's source IP address (which the router changed to your public IP address). (The source IP address for the request becomes the destination [or target] IP address for the response.) When the web page arrives back at your router, the router will determine which machine on the LAN made the original request for the page. The router then replaces the unique, public IP address given as the destination for the page with the internal, private IP address of the machine that the original request came from. Then is transfers that data onto the LAN-side of the router for the originating device to receive. This is how the router shares your public (WAN) IP address among the devices on your LAN. As far as the world knows, you only have one device on the Internet. Your router knows better. I took about 30 shortcuts in that explanation, so research the topic on the Internet if you want to know more.
I will take a paragraph to note that there are routers that do not use NAT or use NAT only on certain portions of the internal LAN. These routers are most often used by medium to large businesses (and assorted computer geeks that just can't help themselves). This type of network is beyond the scope and goal of what this guide is trying to accomplish. If a router isn't using NAT for a portion of an internal network, then the devices on that portion of the network must be assigned unique, public IP addresses just like the router itself. Larger businesses (like Amazon.com and Google.com just to name a couple) may have dozens of public IP addresses on both internal and external segments of their network. (I don't know the actual network layout of either of those companies, so I'm just making an educated guess.) Most home and small business networks don't have this need. (At least, not yet.)
Using NAT also provides a level of protection for your internal LAN. The enterprise-class routers that make up the major backbone of the Internet will not route private IP addresses in any direction. (Your typical home network router will usually route private IP addresses either way.) Since the IP addresses you are using are private, a hacker from afar cannot pretend to be a machine on your internal LAN by assuming one of your internal addresses. Such traffic would likely be squelched before it could reach you. Additionally, because of NAT function of your router, any packets sent from your Internal LAN appear to be sent by your router. A hacker would have to attack using your external IP address as the target. That's relatively simple to do since hackers tend to attempt to hack a range of addresses they know an ISP allots to clients. They also have to guess you are using NAT. That's also a safe bet. Using your external IP address as the target, a hacker would have to monitor the outgoing traffic from your router and construct a packet with what your router is expecting as a response (to an active request from one of the attached network devices) at a particular moment in time. Since the router's expectations change with every request made from an internal device, a hacker would have to monitor the traffic, find a request worth attacking and then generate and send respond very quickly (before the actual recipient does). This would only work if the attacker is very "near" to your router from a network perspective. In general, this is just not worth the effort. It's far easier to go after targets without firewalls or NAT addressing. Even today, there are ISPs that barring any effort on your part will connect a computer to the Internet with little or no firewall protection. Don't be one of those. If your ISP doesn't supply a firewall router with their service, go buy one of your own.
Introduction to Firewalls and Ports
In addition to the NAT capability, the typical home router will include some sort of "firewall." A firewall is a program built into the router to specifically permit or specifically deny different types of network traffic from passing through. In addition to IP addresses, which we've already discussed, a request for data (an email body, a web page, etc.) is also destined to a particular "port" at that IP address. The port is a delineated by a number from 0 to 65535. Having multiple ports allows a single IP address to be requesting multiple types of services over the Internet (and sending data in response to requests) in parallel. It also allows the same server to service more than one type of request. The ports from 0 - 1023 are called "privileged ports" and are assigned to well-recognized services. For example, when you a request to view a web page to a web server, it will usually be sent as a request to port 80 of the web server's IP address. (If the web page is being sent as a secure page to a URL beginning with https://, the port number will usually be 443.) As mentioned in the previous section, in order to find out the IP address of that web server, you first resolve its name using a DNS server. The DNS requests from your computer would be sent to port 53 on the DNS server. Since most residential customers aren't expected to run any public servers like a mail or web server, the firewall in most home routers will summarily deny any traffic from the Internet with a destination IP for your home that is attempting to use a port in the privileged port range. Ports above 1023 aren't officially assigned to a service, but many have become de facto standards. These are known as "unprivileged ports." Port 5109, for example, is an unprivileged port often used by AOL's Instant Messenger.
Most people think of a firewall only as a means for keeping unwanted or malicious traffic from the Internet out of your home LAN. While that is true, it is equally important that your firewall is keeping unwanted (or malicious) traffic from your LAN off the Internet. For example, Windows PCs periodically query for and advertise network services on ports 137, 138 and possibly 445. (See the trace log below.) If you are connected directly to the Internet without a router or firewall (software), you are probably emitting these requests at a fairly regular interval over the Internet. For the most part, nobody cares and you are just adding to the unwanted/unnecessary traffic on the Internet. Worse, for those that do care - the hackers - you're pretty well lighting a beacon exclaiming "I'm a noob, and I want someone to rape and pillage my machine, please!" Operating a PC on the Internet without a good firewall in place as the equivalent of smearing your naked body with honey and running headlong into a bear den while screaming at the top of your lungs. A NAT router with a firewall will (usually) keep this information from finding its way on to the Internet.
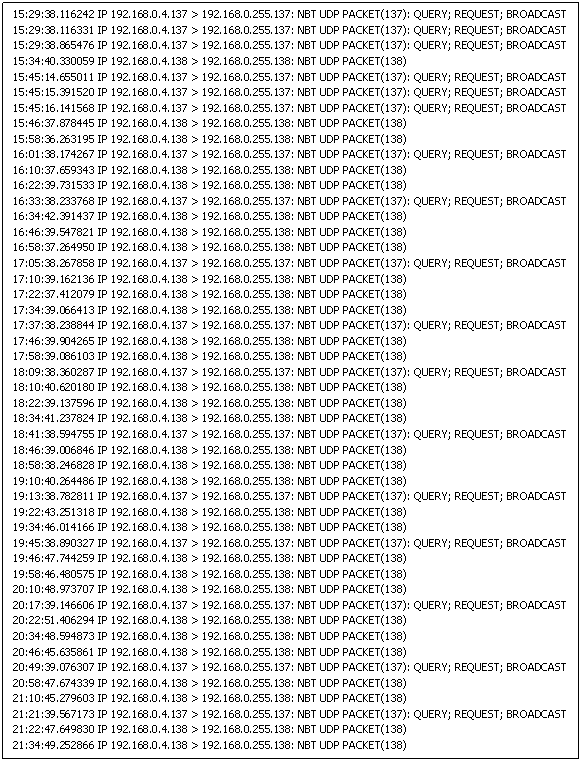
Network Trace of Microsoft Windows Machine Sending Out Periodic Broadcasts
Most ISPs now do a fair bit of screening traffic for you. For example, I log all network traffic that my firewall rejects. I'm paranoid that way. With my previous ISP, I had to stop logging the requests to ports 135-140 and 445 that my router denied. There was just so much of it, it filled my log up. My current ISP must be squelching that traffic somewhere upstream, because I see very little nowadays. A good router with a firewall will keep that traffic inside your LAN thus reducing the amount of useless traffic on the Internet. It also helps to make your home network and router less conspicuous and therefore, less of a target.

Firewall's also protect you to some degree from the effects of a Trojan horse program should you get one. The majority of the Trojan horse programs that I encounter in the wild are being delivered via email rather than an attack on my IP address directly. (The direct approach does not work if you have a reasonable firewall in service, so hackers have switched delivery mechanisms.) If a Trojan should slip through your virus/Trojan detection software (You do have virus/Trojan software on your machine, right?) and install itself, a firewall may still render it inert. If the Trojan's purpose is to wipe out your machine, the firewall won't stop it. However, a lot of Trojan's are designed to find a PC with high-speed connectivity and turn it into some sort of slave server. The Trojan will attempt to contact some sort of controller to let it know it's ready to receive commands. A couple popular use for this type of Trojan is to turn your PC into a host for illegal file sharing or as a sender for email spam. A well-configured firewall may possibly keep that the Trojan from contacting the controller and may keep the Trojan's controller from sending commands to the Trojan running on your local PC.
Most firewalls in home routers are "stateful packet inspection" (SPI) firewalls. With an SPI firewall, the firewall keeps track of all requests made by devices inside your LAN to destinations on the Internet (i.e., connections made to Internet servers). When traffic (a.k.a. a packet) from the Internet reaches your firewall, it should match one of the outstanding requests. If it does match, the firewall passes it to the LAN so it can reach the device that requested it. If it does not match, the firewall drops or rejects the packet. This essentially comes for "free" for router makers if they support NAT (and I can't think of one that does not). Since the router is already tracking connections for the purposes of NAT, SPI is already there.
There is a difference between dropping and rejecting a packet. If a packet is rejected, the router replies to the sender indicating the reason for the rejection. If a packet is dropped, the packet is simply squelched by the router with no indication to the sender what happened. Most home routers drop packets rather than reject them as this is simpler to implement and dropping packets is also stealthier. If your router tells a hacker it's rejected the packets they sent, they know you are there, but that they need to try another approach. If your router simply drops the packet, you don't appear to be there at all and presumably the hacker will go look for a likelier target.

This approach works for home users because most of us operate on an information "pull" model. That is, nothing is sent to a machine on our LAN out of the blue. We use a browser to request a web page and a web server somewhere on the Internet responds. When we get our email from an Internet email server, we make the request for it. Even when we play a game on the Internet, we usually join a centralized server; we proactively start the connection.

The providers of those services - the email servers, game servers, web servers, and so on operate on the model that requests for their services will be initiated from many locations outside of their "LAN." That is, they operate on a "push" model - they will be pressed into service as needed. Therefore, they require a different sort of firewall. That isn't to say your firewall is necessarily incapable of allowing you to host services. The section on Port Forwarding and Adding Firewall Rules goes into this in some detail.
Antivirus and Firewall Programs
Antivirus and Firewall Programs
Virus Protection and Personal Firewalls

This section is intended more as a warning than as instruction. Once you have an Internet Connection Sharing network, especially one that's always on like Cable and DSL, assume that there are people (more realistically, automated programs) attempting to break into your LAN from the minute you first connect. There will be. The firewall in your router is there to stop the hacking and break in attempts. That will help stop viruses from being spread into your LAN directly from machines on the Internet. Unfortunately, it doesn't stop you from reading email or browsing to web sites with malicious code. Email is a popular source for Trojan horses and viruses. They are generally disguised at attachments to emails the senders hope you will think is legitimate. I used to get 1-2 virus or Trojan infected emails on an average week, but this has dropped dramatically. I believe this is because I have greatly increased the amount of spam filtering on my email server. I also suspect my ISP is proactively scanning email looking for Trojans and viruses. Another source of viruses and Trojans is web site that have infected code. In many cases, just browsing to those sites is enough to run the malicious code. A firewall does nothing to stop those. This is why having an anti-virus program such as Norton Antivirus or BitDefender to name a couple, is so important. If cost is an issue, Bitdefender's free version or AVG's free antivirus software are very good free alternatives. Equally important is keeping your antivirus program up to date. New or modified viruses and Trojans appear on a daily basis. Your virus definitions and engine need to be updated at that same pace.

Not all viruses and trojan horses get into a LAN via the Internet. Other sources include a (laptop) computer, CD-ROM, or flash drive that was introduced from outside your LAN. That said, attacks from the Internet will greatly outnumber those that come from outside. So, how bad is it? I log the traffic that my firewall rejects and drops (with the exception of the Microsoft file sharing query traffic that I noted above). I often see 50 - 100 port scans a day that are usually probing specific ports or certain port ranges. When I see a specific port that gets probed a lot, I generally research it on the Internet to find out that the Virus du Jour is.
Remember, not all attempts to break into the computers on your home network are made for purely malicious purposes (e.g., erase your hard disk or crash your system). The goal of many hacking attempts is to take over control of your computers to use them for a purpose (e.g., make them a "zombie" file server for serving illegal files or to make them email spamming drones), to search hard drives for personal data such credit card and bank account numbers or to log keystrokes from certain web pages and programs in order to obtain passwords. Therefore, it won't always be easy to detect that a machine has been compromised.
Even though your router has a firewall, it's still not a bad idea to have a personal firewall running on every machine on your home network. Microsoft started including one with Windows XP (and even turned it on starting with Service Pack 2), but there are others like Zone Alarm Free, which is free, and Zone Alarm Pro, which is the more-advanced commercial version, that are well worth looking into. This may sound a bit paranoid, but in fact it's really a good defensive move. If one of the machines on your LAN does become infected, the personal firewall on the other machines may stop it from spreading. It's not uncommon for the cool new "warez crack" of StarBlasters 3D Mega-Expansion Pack IV - Online!!! that little your Johnny got from his friend Billy (since we know your little Johnny would never download illegal software) to contain a little something extra. That "extra" being a virus. Once Johnny installs that software his machine is infected and looking for others to infect. A personal firewall on his machine may prevent the virus from successfully contacting other machines. More likely, firewalls on the other computers will keep the virus from spreading out of Johnny's machine.
Additional or Upgraded Hardware
Additional or Upgraded Hardware
Additional Hardware
When I originally wrote this guide, I wrote it for two distinct groups of people: those that only wanted a Local Area Network (LAN) - generally for use in a small office - and those that were just getting a broadband connection in their home that they wanted to share. My approach then (and now) was that most of a Internet Connection Sharing network is exactly the same as a LAN plus a couple new components. The new components are those directly involved with connecting your home to your ISP - namely the cable or DSL modem and the network router (if you don't already have one and even if you, the ISP insists on using theirs). Some ISPs are also using a single device this serves both as the cable or DSL modem and as the combination firewall & router. (Unfortunately, a number of those only offer a single LAN port, so you would need an Ethernet switch to connect more than one computer to the network.) A wireless access point (WAP) may or may not also be present. We will also ignore whether the incoming high-speed connection is a coaxial cable (used for high-speed cable), a telephone wire (used for DSL) or something else in most of the discussions here. We've already discussed routers to some degree in the discussion of the LAN, but in this section, we address the equipment and configuration needed above what is needed for just the LAN.
Everything needed for the Local Area Network plus:
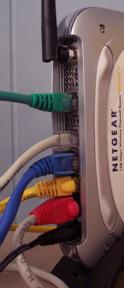
In the LAN examples, a simple Ethernet switch can be used to connect all the devices on your network together (or rather, connect the Ethernet cables from those devices). However, in the Internet Connection Sharing type of network, the router is often also the switch. Therefore, when planning your network, you run your cables to wherever your cable/DSL modem and router is. (Conversely, you can place the router wherever it's convenient to run the cables to. Just make sure there is a power outlet nearby.) The cable/DSL router is usually placed near the cable/DSL modem. However, you don't have to locate your cable/DSL router next to your cable/DSL modem if that isn't a good place to concentrate the cables to. (This point is moot is you only have a single device that functions as the modem and router.) Example 2 in the section on Planning Your Physical Network Layout goes into this possibility. You can also still use a switch in addition to the router if you prefer or if you need more Ethernet ports for your internal network than are supplied by the router. Example 3 (second floor) shows an example of this setup.
The picture below should look similar to the picture titled "Typical Local Area Network Setup Using Only a Switch" found in the section The Network Hub/Switch. As has been said before, a LAN is a subset of the BCS network. The additional connections and equipment are illustrated by the red lines in the picture below. The notional router being used here is similar to a switch, but with an additional WAN (wide area network or Internet) port. The WAN port is connected with an Ethernet cable to the DSL or Cable modem that connects to your Internet service provider's high-speed connection (e.g., coax cable or telephone line). In the next several sections, we discuss the modem and routers and what additional capability they bring to the table.
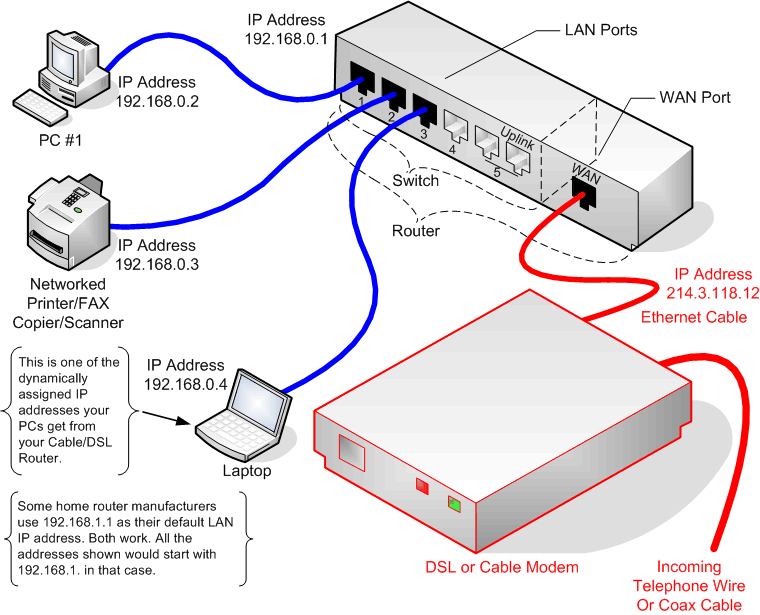
DSL/Cable Modem with Network Port
If you have cable or DSL Internet service, your high-speed modem connection enters your house as a signal either on a coaxial cable (cable Internet service) or a pair of regular telephone wires (DSL Internet service). Some device is needed to convert the incoming line to standard Ethernet protocol signaling on a standard Ethernet port. That is the job of the DSL or cable modem. Often, the DSL or Cable modem you use is supplied by your Internet Service Provider (ISP), so you may not have any choice about what you get. If that modem dies, you may have some flexibility in what you can buy as a replacement, however. I know that my local cable provider gives you the choice of buying or renting the modem from them or buying the modem yourself (from a list of recommended modems). DSL providers usually sell a specific modem to be used with their service.
Sometimes though, not having a choice isn't all bad. Often, DSL providers run promotions to give away or rebate the cost of the modem. I personally believe they make little or no money on sales of the modem itself. I researched my DSL modem on the Internet and consistently found it priced more than what my DSL provider sold it too me for. On top of that, my provider gave me a rebate toward the full purchase price. I believe that ISPs want the equipment they send out to be as uniform (i.e., as few different types) as possible. That makes it easier for the ISP's technical and customer service representatives to do their jobs.
Installation of your modem will either be done by your ISP or they will ship you a package with the modem and anything else you need to install the modem yourself. The latter option is termed a "self-install" package or kit. At one time, cable and DSL modems were almost always installed by the ISP, but both DSL and cable companies have started using self-install kits more predominately. I take that as a good sign as it means the ISPs feel that the technology has reached a point where untrained professionals (i.e., you) can be expected to install the modem with a good chance of success.
Install ADSL Low-Pass Filters (DSL only)
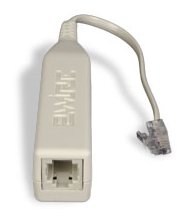
Asymmetric DSL (ADSL) is the most common type of DSL sold by telephone and DSL companies. With Asymmetric DSL, the download speed is faster than the upload speed; hence it's not symmetric or, rather, it is asymmetric. With ADSL, you may be supplied with and asked to install filters between your telephone jacks and telephone devices in order to begin using your DSL service. The one shown in the picture here is one of the ones supplied by my old DSL provider. There are also versions that take the place of a standard telephone wall jack. The reason these are needed is that your DSL service and voice telephone service share the same pair of wires. (If your DSL provider provisions a separate pair of telephone wires for your DSL, you will not need these filters.)
A simple of explanation for what the filters do is that voice quality telephone service requires only about 4 KHz of bandwidth. That's only a small fraction of the bandwidth a copper telephone wire is capable of carrying. Therefore, it's possible to have both telephone and DSL service sharing the same pair of copper wires. The DSL modem is smart enough to ignore the signal below the bandwidth reserved for telephone conversation (plus a buffer of an extra few KHz to separate the two and prevent crosstalk). However, your old telephone equipment is not that smart, so the filters block everything but the very lowest frequencies - the frequencies reserved for voice phone conversations. (Hence they pass the low frequencies and are called "low-pass filters.") My first DSL service used a separate phone line from my telephone, so I was a bit leery of using these at first, but after using them, I can say they didn't seem to adversely affect the quality of either the voice or DSL service.
There is a maximum of the number of filters you can install per household. For example, the limit on the ones I have is five total. That may sound like a lot, but don't forget you will need these for every phone in your house as well as devices like your Tivo (DVR) or other satellite TV DVR, fax machine, caller ID unit, answering machine, & computer modem (assuming you still need to dial in occasionally). You can daisy chained several phone devices off of one filter with no problem. That is, if you have a fax machine with both line in and phone out jacks, plus a caller ID with both line in and phone out jacks and finally a phone, they can be hooked together and into a single DSL filter without a problem. Take care to get and install two-line models of these filters if you have two incoming lines in your home (e.g., you have a separate line for your home and home office or separate lines for your telephone and your fax machine).
Connect the DSL or Cable Modem
Other than the physical input being telephone wire or coaxial cable, the cable and DSL modems can be treated more or less the same. (With FiOS, the ONT provides a standard Ethernet connection.) So the first step (if your ISP does not do this for you or if you are "self-installing" your modem) is to connect the coax or cable to your modem. For a DSL modem, the phone line clicks into the phone jack on the back of the DSL modem. (Don't confuse the telephone jack with the Ethernet port. For former is smaller than the latter.) The coaxial cable screws onto the cable connection on the back of the cable modem. Once you have done this, the rest of the installation is the same for either type of modem. (It is also the same from the point forward for FiOS.)
Next, you need to connect the Ethernet port on the modem to the WAN or Internet port on the router. The connection between the router and the modem may be one of those cases where a crossover cable (see the section on Cables) is necessary. The install kit will likely include a (very short) Ethernet cable, but it will not be a crossover cable in most cases. Some routers use MDIX (or auto-switching) ports on the WAN/Internet port, so a crossover may not be necessary. My approach is to try the cable supplied (assuming it is long enough to reach with your installation) and see if you get a link light. If you get one, great; if not, it's crossover cable time.
Typical Cable and DSL Modems
The figures below show an example of both a cable and DSL modem. We don't show a lot of choices here because there are many of them and generally your cable or DSL ISP chooses what modem you will be using. The ones shown here are reasonably representative of what is found in the wild.
| The Motorola SURFboard SB5100 is representative of cable DSL modems. The lights on the front show (from top to bottom), power, (cable) receive, (cable) send, online, PC/activity, and standby. |
|
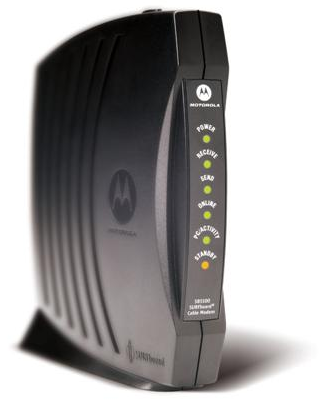
| The back of the Motorola SURFboard SB5100 has (from top to bottom) a 10/100 Mbps auto-sensing Ethernet port, a USB port, a terminal for the incoming coaxial cable, and at the very bottom a jack for the DC power supply input. Some cable (and DSL) modems will allow you to connect PCs (or a router and a PC) to both the Ethernet and USB ports simultaneously (respectively) assuming your ISP will allow you to have two IP addresses. Generally, you would only use one or the other and we encourage the use of the Ethernet port if at all possible. | 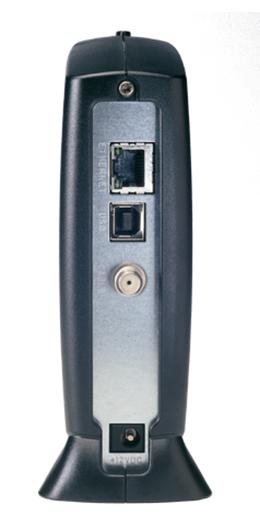 Copyright 2010 Motorola Corporation |
| The Westell WireSpeed 2100 is typical of DSL modems. From left to right, the lights indicate USB traffic, Ethernet traffic, (DSL line) ready, and power. |
|
| The back of the Westell WireSpeed 2100 has (from left to right) an incoming telephone wire jack, a USB port (rarely, if ever, used), the input jack for the DC power supply, a reset button and the Ethernet port. Like the cable modem, either the USB or Ethernet port, but not both is generally used. (And we again encourage the use of the Ethernet port.) |
|
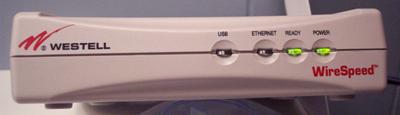
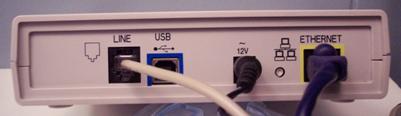
Router / Firewall / Switch (/Wireless Access Point)
The cable or DSL modem's job is to convert the incoming media of a coaxial cable or telephone line into a standard 802.11 Ethernet port. (That's also one of the purposes of the Optical Network Terminal [ONT] in Verizon's FiOS offering.) Typically, that one port is also assigned the single (static or dynamic) IP address that your ISP allots to your home or small office. The router's job is to share that one connection among potentially many devices on your LAN. It determines what network traffic should be routed from a device on your internal LAN to a device on the Internet and vice versa. I've often heard the anology that the routing function is like a traffic cop directing traffic. Really more analogous to a security guard at a private residence. If the router receives a network packet from one of the devices on your LAN that has a destination IP address that's outside, it will pass that packet through to the WAN or Internet. On the WAN side, the router will examine the packets it sees and if the packet matches the WAN IP address it is set to, it will pass the packet to the LAN (with some "adjustments" we will get into below) if there is a device on the LAN expecting it. The primary task of a router is to act as a gatekeeper or gateway.
Generally, residential (home) customers of an ISP are allotted only a single public IP address. That IP address may be issued dynamically using a DHCP server that the ISP maintains or it may be assigned statically. That single address only supports one networked device. The question then is how do you share this single IP address with more than one networked device from your LAN? You need some way of making all the computers and networked devices in your home appear to the outside world as a single device. Another task of the router is to do just that. (At least, that's the method used by most home and small office networks.)
I've seen several forum posts asking some variation of the question, "I only have a single computer to connect to the Internet. Is there any benefit to having a router?" In my opinion, the short answer is "Yes." While there is no technical reason why a single PC can't be hooked directly to the Ethernet (or USB) port of a cable or DSL modem, generally not a good idea. If you purchase, install, lock down, and monitor your PC using a good software firewall, connecting a PC directly to the modem may be fine. The problem is many people don't understand what it means to "lock down" their PC and leave too many ports open. Even fewer monitor their firewalls as they should. Microsoft's own Internet Connection Firewall has improved in the since the Windows XP Service Pack 2 release. Still, it often doesn't have the configurability and capabilities of a hardware router firewall. Commercial firewall software packages are better, but their cost is comparable to buying a hardware firewall router.
Typical Routers
The table below lists some typical wired Ethernet routers. The Wireless Networking Equipment section already listed some typical wireless Ethernet routers. The routers listed below differ in only that they do not have built-in WAP capability. These are becoming rare nowadays as the prices of the wireless-capable routers have dropped to match those without and the popularity of wireless networking has increased. Mostly, I see these used in small businesses that don't want the risk of having an active wireless network. (It's also possible to buy a wireless router and just shut off the wireless capability.)
| The Linksys BEFSR41 shown here is a cable/DSL router/firewall with a built-in 4-port 10/100 switch in the back for the LAN side. Linksys also makes a couple models with built-in wireless access points (WRT54GS), a single LAN port, and an 8-port model. The router is really only needed if you are planning to share an Internet connection. | 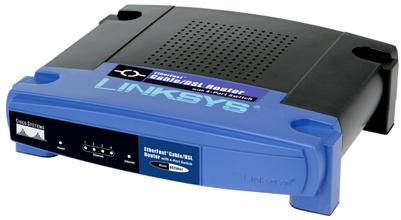 Copyright 2010 Linksys Corporation |
| The Netgear DG834N Rangemax is a router like the BEFSR41 above, but also includes a built-in DSL modem and an 802.11n wireless access point. Devices such as these take the place of a separate cable or DSL modem (like those shown in the previous section) and router. | 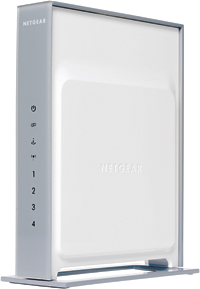 Copyright 2010 Netgear Corporation |
Additional Configuration
Additional Configuration
Additional Configuration for Internet Connection Sharing
You may have noticed earlier when we were configuring your router for your LAN connections, that there was a whole slew of settings we completely ignored. A number of those have to do with your wide area network (WAN) or Internet connection to your ISP. We didn't need to set them while we were concerned only with setting up the LAN, but now is the time. As with the previous sections, this section will attempt to teach by example. If you've made it this far, you're almost there.
Configuring Your External Internet IP Address
Most Internet Service Providers offer similar options to those you had to choose from for assigning the IP addresses for your LAN: dynamic IP address assignment using DHCP or static (fixed) IP assignment. (See Using DHCP IP Address Assignment for Automatic Configuration and Fixed/Static IP (Manual IP) Assignment, respectively.) Think about it this way, you are acting as an ISP providing Internet service for the networked devices inside of your home much as your ISP is providing service to your home. Many of the same procedures you used to set up your LAN are similar to what your ISP does for its customers but on a larger scale. Most ISPs offer dynamic IP (DHCP) service as their basic package - charging at least slightly more for static IP address accounts if they offer static IP addresses at all. Often, static IP addresses are offered only as "business" packages. Unless you are planning on running some type of services such as a web server or permanent game host server (again making sure that your service agreement give you the right to do so), dynamic IP service is fine for most home networks.
Connecting to Your ISP Using Dynamic IP Addressing
We'll start by assuming your Internet service is dynamic and uses your ISP's DHCP server to get the external IP address for your router. One thing that you might find a bit mind bending is that at the same time that your router is the DHCP server for the devices attached your internal home network (LAN), it is also a DHCP client to your ISP's DHCP server in order to obtain an IP address it can use to connect to the Internet. It can do both, and it won't get confused. Are you? Dynamic service from an ISP is so common that most routers are set up to work with it from the start. You may find that you are already connecting to the Internet at this point. It's still a good idea to go through the steps here and look at what the normal settings are.
As before, the first step in configuring the router is to log on to it. Do this by browsing your router's LAN address. For this exercise, I've set the router's LAN IP address to 192.168.4.1. All the LAN devices, therefore, are on the 192.168.4.0 network. If your router is still set to the factory default, browse to that IP address instead. You will need to make sure that the IP address of the Ethernet adapter on the machine you are browsing from is also on the same network. (In our example, that means it has an IP address beginning with 192.168.4.) If your router has DHCP enabled on the LAN by default, which most do, you will be given a valid IP address by the DHCP server. If not, you will need to manually set the IP address of the Ethernet adapter. You can check if you have a valid IP using Test 4: Checking for Valid IP Address. Browsing to the router's configuration main page is shown below. Your router's page will likely look different.
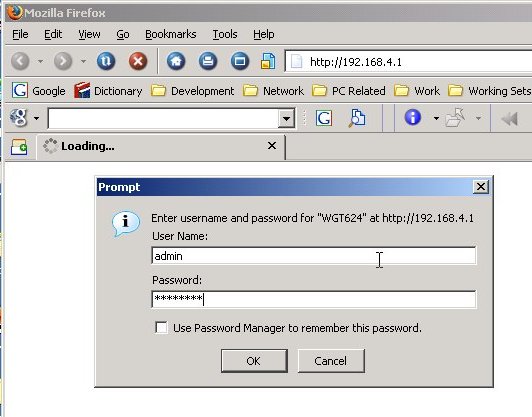
Login to the router with the password you set earlier. That will bring up the first configuration page, which for our example router looks like the following. (Your router may have a different first page. You need to find the page that lets you set the WAN or Internet IP configuration.)
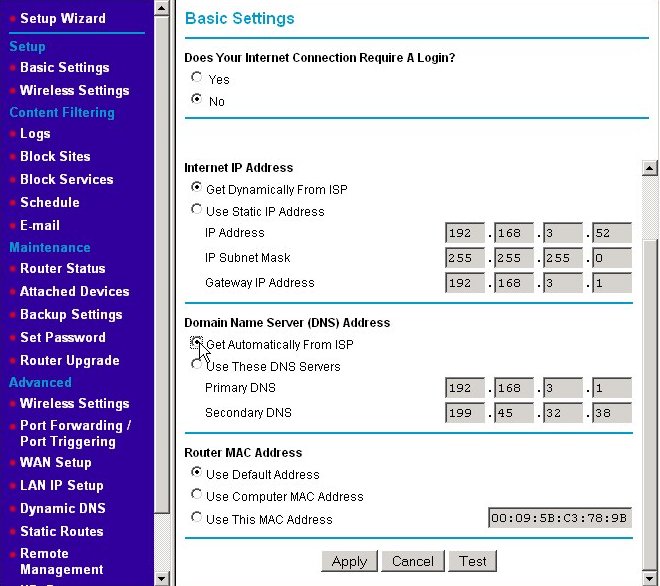
If they are not already selected, click on the radio buttons for getting your Internet IP address automatically from your ISP. This means your router should make a DHCP IP address request broadcast on the WAN to your ISP's DHCP server. You would also click the radio button to get the IP addresses of your ISP's DNS servers automatically. On most home routers, these are the default settings. If your router has these settings, you won't need to change anything. I'm changing from static to dynamic here so that you can see the changes. (It's quite possible that you will have full Internet connectivity the moment you hook up your cable/DSL modem to your router. The default settings apply to the majority of high-speed Internet users. Your router may not look like the one above but look for settings for configuring your WAN IP address and DNS settings somewhere on the basis, WAN, or Internet setup page.
In our example, we were using a fixed IP address of 192.168.3.52 for the Internet IP address. If you recall the discussion on routers and private IP addresses, any address beginning with 192.168 is not a valid public IP address. So how did I get such an address from my ISP? The answer is that I didn't. For this example, I've hooked a second router off of one of the Ethernet switch ports of my home's LAN. I'm treating my LAN as if it's my ISP's WAN. The "LAN" this router serves is a second, even more internal LAN. My reason for doing this is preserving harmony within my home. If I disconnect and reconfigure my real router to the Internet as I'm performing these examples and capturing screenshots, I tend to raise the ire of those people near and dear to me. Once you have had an Internet connection sharing home network for a while, try disconnecting it for an hour or two in the early evening. You'll make quick enemies. I guarantee it. That said, the actions you will take are the same. Just remember that IP addresses starting with 192.168.3 in my example represent the WAN or Internet connection and those starting with 192.168.4 represent the LAN. There are ISPs that use 192.168.x.x type addresses for the IP addresses they give their clients. This is somewhat rare though.
Press the Apply button to make the new settings effective. Occasionally when I do this, I can no longer browse the router's home page. If this happens to you, you may have lost your IP address. You may need to run the ipconfig /renew command to get a new one. (See the example in the section Changing the DHCP Server's IP Assignment Range.) The next screen shows the results of our actions.
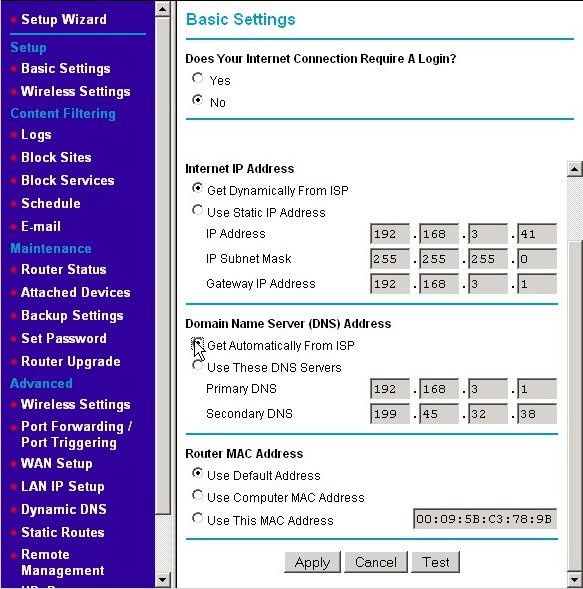
The IP address we received from the ISP's DHCP server is 192.168.3.41. The subnet mask, gateway IP address, and DNS IP addresses did not visibly change as these were already correct as my WAN settings. (Remember, I'm using a mock network inside my existing network. I just went from fixed to dynamic addressing in the example above. When you first connect your router to the Internet and apply your settings, the subnet mask, gateway IP address, and DNS values will likely change.) Most router manufacturer's put that addresses that were dynamically assigned in the text fields used for manual assignment, but grey them out (i.e., disable them from being edited.) Some just disable the fields and leave them blank, which makes it harder to see the effect of your actions.
Connecting to Your ISP Using Static IP Addressing
Connecting to your ISP using static IP addresses is much like setting up dynamic IP. You start by logging into your router as shown in the last section. However, you set the opposite radio buttons; namely, click on the Use Static IP Address radio button (also called "fixed" or "manual" IP addressing) and Use These DNS Servers radio button as shown below. (Again, the name on your router may be different. You're looking for a way that lets you manually type IP addresses into the four small text boxes like the ones shown.)
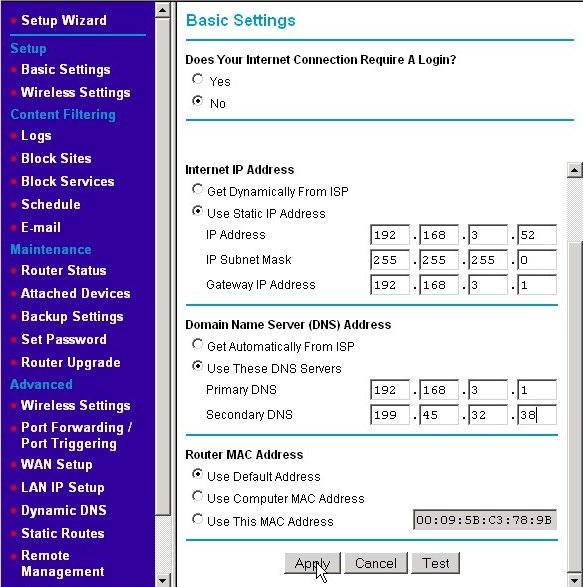
For my example network, I am making believe that my ISP assigned me the static IP address of 192.168.3.52. You would substitute the IP address that your ISP has assigned to you, and enter it into the IP address line. Each part of the IP address goes into a separate text box. (This is just like we did for assigning the internal LAN IP address.) The subnet mask is often set to 255.255.255.0, however, your ISP may give you another value. If so, enter that instead into the IP Subnet Mask line. Your ISP will also tell you what your gateway address is. For my example network, it is 192.168.3.1, which is actually the LAN IP address on my real internal LAN. Substitute yours in those boxes. Finally, enter the DNS server IP addresses given to you by your ISP. (ISPs often don't give these addresses to dynamic IP address customers as the DHCP response from your ISP's DHCP server will include that information. However, status IP address customers need to know that information, so if your ISP failed to give it to your, now's the time to see how good their technical support line is. Press the Apply button to make the new settings active.
Test Your Connection to the Internet
If all has gone well, you should now have connectivity to the Internet. One easy way to test this is to use a web browser to browse to a website that's almost guaranteed to be up. From one of the PCs on your LAN, try one of these websites: https://www.google.com and/or https://www.ebay.com. If you are not able to reach either of those sites, you may need to do a little troubleshooting on your LAN to WAN connection; see Test 5: The Handy-Dandy LAN Ping Test and Test 7: Testing for DNS Functionality. Repeat this test on the other PCs on your LAN (and other devices such as an Xbox [if possible]).
Port Forwarding and Firewall Rules
Port Forwarding and Firewall Rules
Port Forwarding and Adding Firewall Rules
This section could also be titled, "How to open yourself up to attack in a civil sort of way." Normally, if your router receives a request from the Internet, your router will not have a matching request from a device on your home LAN. Therefore, it just throws the request (packet) away. This is exactly what you want it to do. Normally those requests are from a hacker trying to see if your computer has no firewall in front of it. If so, they could easily see your published/shared files using a Microsoft file sharing query, for example. In the router's default configuration, no device on the Internet can initiate a request destined for your router or a device on your LAN; devices on the Internet can only send back responses to requests made from the router or devices on your LAN (e.g., browsing a web site).

Sometimes, however, you may want machines on the Internet to be able to initiate a request on a certain port or set of ports that one of the devices on your LAN will serve. The common use of this is when you want to temporarily or permanently provide a server for a game using one of computers on your LAN as the server host. (You should make sure that you have the right to run a server before doing so. See Want to Host an Internet Game Server? Check First.) For example, you might want to run an Unreal Tournament 2004 server so you and some of your friends can have fun chatting to each other over the Internet and killing each other. When an Unreal Tournament 2004 client running on one of friend's computers wants to join your server, it will originate the request with a destination IP address being the public address of your router and also to particular port. (Remember, a port is just a number from 0 - 65,535.) When that request reaches your router, you don't want the router to just drop the packet (for a change). Instead you want to router to forward that packet to the computer running the server.
Most routers will allow you to add a "firewall rule" that will forward traffic, which originates from the Internet and that is destined for a particular port on your router's public IP address, to the same or another port on one of the devices on the LAN. Note that the client sends the request to your public IP address not the private IP address of the server on your LAN. The action of setting up these rules and the router fulfilling them is called "port-forwarding." Some games require multiple ports to be forwarded (e.g., 6800, 1900, 21005). Some require that a range of ports (e.g., ports 27000-27099) be made available.
So the first thing to do is to determine what ports need to be forwarded to your game server. The web site portforward.com contains the procedures for setting up port forwarding for many routers (in addition to the example we're going to have here) and also a list of common ports that need to be forwarded for a number of games and other applications. Unfortunately, I found it missing some detail as the procedures are written in a generic fashion. Some games are also not in the list. When that happens do a search at http://www.google.com and use “<insert game's title here>” firewall ports as the search phrase. (Putting the game's title in double quotes makes Google search for that exact title as a single search term. For example, using "Unreal Tournament 2004" will find only those pages that have those words together and in order - rather than the words unreal, tournament, and 2004 as individual terms. That cuts down a lot of extraneous links from being returned.)
After a little digging in the search results, we find that UT 2004 servers receive requests on UDP ports 7777 and 7778 (Query Port) and 7787 (GameSpy Query Port) from UT 2004 players wishing to join the server. Additionally, the server will send TCP requests using the local port 28902 to the UT 2004 Master Server List (so that your server is put into the list of servers that the UT 2004 players see). However, since that TCP request is an outbound connection initiated by your UT 2004 server, you usually don't need an explicit rule for it.
We'll show setting up the necessary port forwarding by using the same Netgear WGT624 used in our previous examples. Other routers won't have port forwarding in exactly the same place, so you may have to search your menus for it. (This is where the pages at https://portforward.com/ can really help.) As we always do, start your session by logging into the router as shown in section Connecting to Your ISP Using Dynamic IP Addressing. Then, from the Basic Settings screen, choose the Port Forwarding/Port Triggering menu item under the Advanced menu as shown here.
That will bring us to the Port Forwarding/Port Triggering page as shown below.
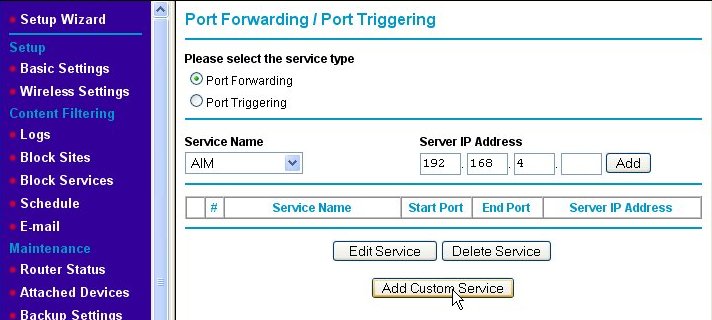
Make sure that the Port Forwarding radio button is enabled (if your router has such a button or check box). Click on the Add Custom Service button, which will take us to the Ports - Custom Services page.
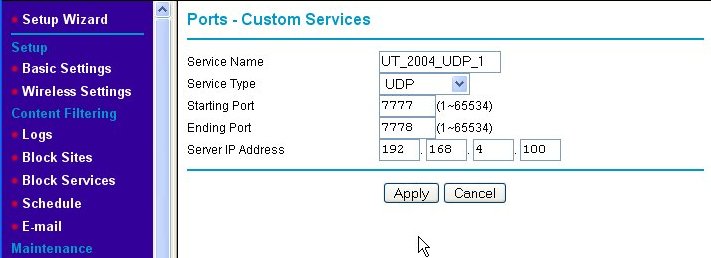
The Ports - Custom Services page is where we add the new port-forwarding rule for our game server. First, we enter a Service Name for our new rule into the text box, which in this example is "UT_2004_UDP-1." Then, we indicate that we wish this rule to apply to request sent using the UDP protocol by choosing UDP from the Service Type pull-down box. Next, since ports 7777 and 7778 are next to each other, we enter them as a range of ports (even though it is a short range) into the Starting Port and Ending Port text boxes, respectively. Finally, we type in the Server IP Address. Note that the IP address used is outside of the range of IP addresses that the router's DHCP server serves. This means that we assigned a static (fixed) IP address to the game server. Since the rules we're setting up are specific to one IP address, we like the game server's IP address to be set to that and never change. DHCP cannot guarantee this, so we use static IP addresses which do. (See Fixed/Static IP (Manual IP) Assignment for information about assigning a fixed IP address to your game server machine.) When we hit the Apply button, we are back at the Port Forwarding/Port Triggering page, but the rule we just added is now shown on the page.
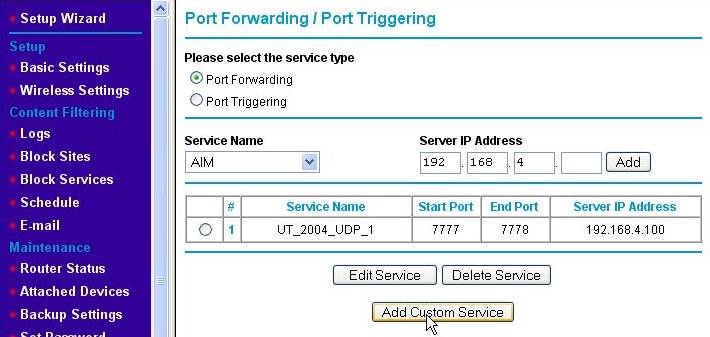
We need to add a second rule for UDP port 7787. We do this by again clicking on the Add Custom Service button and entering the information for the second rule as shown below.
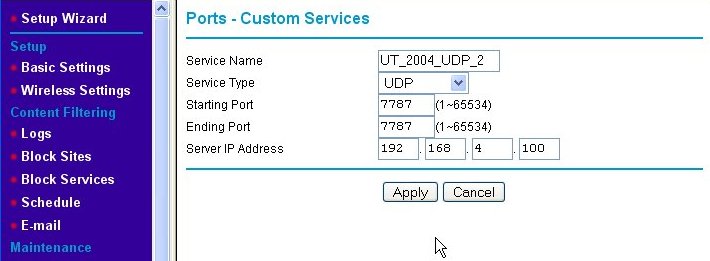
We name the second port-forwarding firewall rule "UT_2004_UDP_2." Note that the starting and ending port numbers are the same when defining a rule for a single port. Again, we press the Apply button and are returned to the Port Forwarding/Port Triggering page, but this time, both of the new rules are shown.
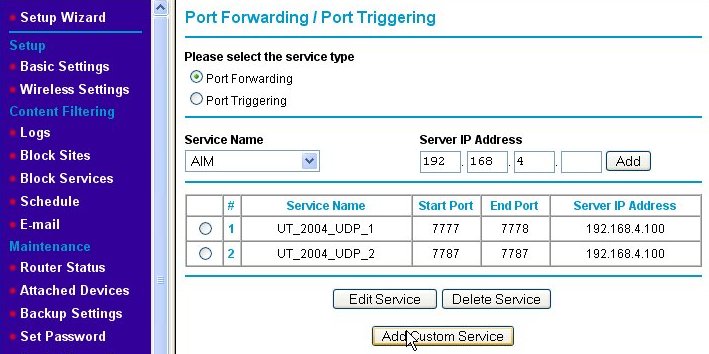
Now, we've added the port-forwarding rules, but there is one extra thing that needs to be done for this particular game server after it is installed. That is to edit the UT2004.ini file (using Notepad or some other plain text editor), search for the lines:
    [IpDrv.MasterServerUplink]

    DoUplink=True

    UplinkToGamespy=True

    SendStats=True

    ServerBehindNAT=True

    DoLANBroadcast=False
and change the ServerBehindNAT from "False" to "True" as shown. This solves a specific problem that makes the server behave itself when behind a NAT firewall such as the Netgear WGT624.
Maintaining Security with Port Forwarding
Maintaining Security with Port Forwarding
Maintaining Security with Port Forwarding
Now that you know how to open yourself up to attack in a civil manner, a few words of caution are in order. In ancient Internet times (i.e., 10 years ago or more), there were two approaches to how to set up a firewall. The first approach was to open all ports to all internal machines by default. In this approach rules were created to restrict traffic on those ports known to be "bad" or sources of trouble. This tends to make the life of system administrators easier because most traffic will be routed through the firewall by default. Unfortunately, as time went on and viruses and Trojan horses appeared using more and more ports, this approach became too unsafe.
The second approach is to close most or all ports by default and open only those known to be reasonably safe. This makes the system administrator's job tougher because every new service that their organization wants to offer to users on the Internet or services on the Internet to which the organization's internal users want access will often require rules to be added. However, it is much safer from a security standpoint. Because new viruses that exploit different weaknesses of operating system services found at certain ports and Trojan horses that use different ports than previously known ones, opening ports without a good reason is just a bad idea. All home office/small office routers I have used thus far have adopted the second approach by default, but can be made to operate under the first approach simply by opening large ranges of ports in the rules table.
You might be surprised to learn that your personal computer is most likely a server. No, I didn't say if you have a Windows Server 2003 machine or the like. I'm talking about any right-out-of-the-box, plain-Jane, straight-up PC you can get at Best Buy. Remember that whole topic about connecting up your home PCs so that you can share files, printers, and the like? Guess what? Doing that also makes them servers in every sense of the word. The File Sharing and Printer Sharing services are just that - services. If you share a folder or printer from your machine to other machines on your network a service is started and begins listening on a port on your machine for requests from other machines just like an Internet web server waits for requests for web pages from your browser. If you want to see this for yourself, open a command prompt window and type netstat -rn as the command. You will see something like the following screen.
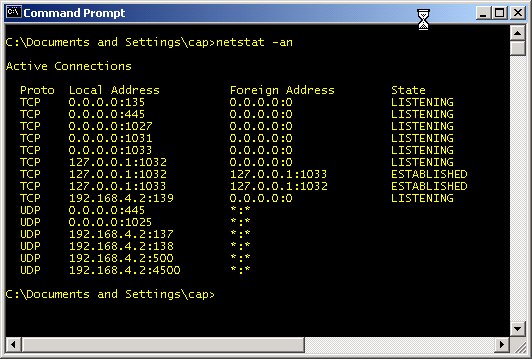
Any of the port numbers given above (i.e., the number after the ":" such as 135 and 445) are services waiting for commands. TCP and UDP ports 135 - 139 and 445 (and according to Microsoft, port 593) are used by the Windows file and print sharing service. TCP Port 1027 is used by Microsoft's Internet Connection Sharing service and the Internet Firewall. UDP Port 1029 is used by Microsoft's Local Security Authority (LSA), which is used to verify and compare user names and passwords (as a part of sharing files and printers). The Sasser worm variants attacked this port and often caused the service to shut down. This in turn would cause the system to reboot itself as a security precaution. Hence, this is a good example of a port you don't want to make available to the Internet. The above list might seem like more services that you would like to have running, but, in reality, that list is about the shortest it ever gets. This particular computer was just rebooted and connected to a router with no access to the Internet when this screenshot was captured. It only gets worse from this point. If you are curious and want to further investigate any of the ports you see in your netstat results, check out the section Test 10: Using the netstat command and TCPView to Check Port Usage.
Your file and printer sharing server will periodically broadcast that it has services available and inquire about other services from other machines. I'm going to assume that you probably didn't intend to share your files or printer with the entire Internet. At one time, I logged unsolicited requests from the Internet that reached my router. I saw Windows machines doing just that many, many, ... many, many times. It was so bad, that I stopped logging all the generous attempts of Windows machines on the Internet to give me access to their files and printers. The amount of this traffic varied from hundreds to thousands per day. I no longer see this traffic at my router, so I believe that ISPs have wizened up and now filter it. That and most people do have router/firewall products in place.
There are certain ports you should never open. Hopefully, it's obvious that the ports mentioned above - TCP & UDP ports 135 - 139, 445, and 593 - should never be open either going to or coming from the Internet. The table below lists ports that should generally not be open to inbound traffic. This means that you should be wary of adding rules to your firewall that allow Internet traffic through to any of the devices on your LAN over the ports listed.
| Port Numbers | Protocol | Use |
|---|---|---|
| 0 - 1023 | TCP/UDP | The ports in this range are known as "privileged ports." They are reserved for usage by specific services like a web server, FTP server, or email server. Unless you have a machine that is running one of these special services, there is no good reason to ever have a rule allowing traffic to any of the LAN machines using any of these ports. |
| 1025-1030 | TCP | Microsoft Remote Procedure Call (RPC) service: This port is used to allow other machines on the network to run services on a local machine. Inside of a LAN this is a useful feature, but Internet machines should not be allowed to run services on LAN machines. These ports also seem to have other uses in Microsoft systems. |
| 1026 - 1027, and to a lesser extent 1028 - 1029 | UDP | In Windows NT, 2000, and XP systems, these ports are used by the messenger service (a.k.a. "net send"). This should not be confused with the Windows Messenger application used for instant messaging (a la AOL Instant Messenger). The intent of the net send service was to allow system administrators to broadcast messages like "Dept. 43 file server going down for 1 hour of maintenance." Unfortunately, spammers started using the service to display messages like "You may have a virus. Visit www.imalowlifespammer.com for details." It's mostly just a nuisance. |
| 1434 | UDP | Probably not a concern to most home network users, but small businesses using Microsoft SQL server will want to keep this port closed to inbound traffic. It's intended to be used to allow remote monitoring of Microsoft SQL Server databases, but it was also the used to exploit SQL Server as one of the fastest spreading worms ever. (If you are a SQL Server user, keep port 1433 closed as well.) |
| 2745 | TCP | Opening this port does not actively open a machine up to attack. It is used by the Bagle and Beagle viruses as a port that allows the virus writer to upload and execute software on an infected machine. If the machine is not infected, there's no harm in opening this port. My personal feeling is, “Why take any unnecessary chances?” |
I derived the above list from looking at the incoming Internet traffic that was logged as denied by my firewall. Then I went to Google and use the port and protocol as a search term (e.g., "UDP port 1434") in order to find out what the ports were (mis)used for. I find http://www.linklogger.com/commonscans.htm a useful source for such information as well.
From time to time, it is a good idea to check the security of your firewall. This is best done from an outside source trying to poke its way in. There are several sites that will scan your IP (i.e., your firewall) for open ports. Most of these do so to try to sell you products for security. One that exists just to try to further security (awareness) on the Internet is (Steve) Gibson Research Corporation's Shields Up!, which is a tool that scans your IP and tells you what you may have open that could be exploited. Click the Proceed button to get to a menu of scan types. I generally like all the first three: File Sharing, Common Ports and All Service Ports. It's good to get in the habit of running this tool regularly. Another good tool is nmap, but that tool is much more complex and probably beyond what most home network users can work with.
The DMZ Machine and Why It Is Evil
A De-Militarized Zone or "DMZ" machine - for the purposes of a home network - is one computer that resides at a static IP address on your LAN that has been designated to be fully exposed to the Internet. Normally, if the firewall receives a packet that does not map to a request made by one of the devices on the LAN, it just drops the packet. However, if a DMZ host has been designated, the firewall will instead route the packet to the DMZ server. That means the DMZ machine is potentially bombarded with requests from the Internet that it may or may not be prepared to handle. Many of those requests will be attempts to hack or infect the DMZ machine.
The security risk to the DMZ machine is high, so why would somebody wish to designate a DMZ machine? A good reason for having a DMZ machine is when you want a machine to be outside of the firewall in order to be a dedicated server (web server, mail server, Unreal Tournament 2004, etc.) and you are willing to isolate that machine from the rest of the machines on the LAN as much as possible. Unfortunately DMZ servers are usually used for a "bad" reason. Sometimes, it is very complicated to set up all the port forwarding firewall rules necessary for a particular game or other server. Some require three, four or more rules to be added. Some routers may not support the number and types of firewall rules that need to be added. Just designating the machine as a DMZ server seems like a good alternative because the work of adding those rules is avoided.
When you designate a computer as a DMZ machine, you've effectively placed it outside of the firewall protection provided by the router. Therefore, if you're going to have a DMZ machine, treat it as a leper. Assume it has been compromised the moment you attach it to the Internet. Don't store any sensitive data on it - up to and including reformatting the machine and reinstalling a fresh copy operating system before starting to use it as such. Only designate a machine as the DMZ machine if you are not going to use it for any other purpose. Install a software firewall with only the only open ports being those needed expressly by to the server and a few other services like outbound ports 80 and 443 (for http and https, respectively).
More importantly, the other machines on your LAN should be protected from the DMZ machine. Install personal firewalls on every other machine and device on the LAN and configure those firewalls to deny any traffic from the DMZ machine with the exception of the ports it's been specifically set up to use for whatever service it is offering. That way, if the DMZ machine does get compromised, the other machines on the LAN may remain safe.
Troubleshooting
Troubleshooting
Network Testing and Troubleshooting
So what do you do if you've followed this (and maybe other) home networking guides step-by-step, but still something's not right. Everything works except .... Or everything has been working great for weeks, but now one of the computers can't connect, and you don't know why. This section is dedicated to troubleshooting those pesky network problems. When I started writing this "quick" guide to home networking, which later turned in to the full-length novel it is today, this is the section I was most interested in writing. Network problems are bound to happen given enough time. I play with my home network a lot, so I tend to cause my own problems. (First rule of engineering: If you mess around with something long enough, you will eventually be successful in breaking it.)
These steps are the ones that I follow myself, so I'm certain they can help at least some of you out of a jam. The first time you are bringing up a new home network or adding new device (e.g., computer, Xbox 360) to an existing network, it's a good idea to follow the steps in order. However, when troubleshooting a device that had been working you might want to skip right to test 4 or test 5. I don't usually start with test 1 in that case myself. I start farther down and if a test fails, I work my way backwards towards test 1. After you've done this for a while, you'll get a feel for where to start just by the way the failure behaves, but these steps are always here in case you encounter a problem that resists being solved.
The subsections here fall into four categories of testing: testing the Ethernet Adapter (test 1 and 2), testing LAN Functionality (tests 3, 4 and 5), testing Internet connectivity (tests 6 and 7), and diagnosing a slow network (tests 8, 9 and 10). Within each category, there are two or three tests to perform. The basic approach is to check the adapter itself to see if the problem is within the computer's own hardware. If these tests pass, we move out from the system under test to the LAN. Network-wise, this is the next link in the change. If the LAN tests pass then we move outward again to the Internet connection (also called the Wide Area Network or WAN). The four category covers the case where the Internet connection is not down, but the performance is not what it once was or seems slower than it is advertised at. Finally, there is a short section that discusses useful tools for diagnosing networks.
Test 1: Making Sure the Ethernet Adapter is Recognized
Test 1: Making Sure the Ethernet Adapter is Recognized
Testing the Ethernet Adapter
When I originally wrote this troubleshooting guide, not all PCs had an Ethernet adapter. Nowadays, it's pretty much a given. Even so, it's quite possible - especially when building a new computer from scratch or reinstalling Windows - that the drivers are not installed and the adapter isn't working. There are some easy tests that can be done. If you can't get similar successful results to those you will see in this section, then your Ethernet card/port/adapter is not properly installed or the drivers it relies upon are not properly installed. You'll likely just be wasting your time to even try to go on. These tests are simple, but it's also essential that your Ethernet ports pass them.
Software driver upgrades have also been known to cause issues and break working systems. Sometimes issues arise because the system is trying to be "smart." I have a laptop that attempts to conserve battery life by turning off the power to the wired Ethernet port when it's running on the battery. If there isn't a wired Ethernet connection up when I unplug the AC power, it shuts the port off. The bad thing is it doesn't turn the port back on when inserting a cable thereafter so long as it remains on battery. (There's a Control Panel in my particular case that will let me re-enable the wired Ethernet port.) Other laptops have a physical switch that turns off the wireless Ethernet adapter. These can get switched off by accident. Suffice it to say there are cases where an Ethernet adapter may not be recognized even when you know it is (or was) there.
Test 1: Making Sure the Ethernet Adapter is Recognized

The first test is to just verify that the Ethernet port is recognized by the operating system. We will be using a Windows 10 operating system for the screenshots. (The original graphics in this section were taken from a mix of Windows 2000, XP and Vista, Windows 7, and Windows 10 machines - just to give you an idea of how long these issues have been around.) In most of the tests, the various flavors of Windows machines have the same tools with a slightly different look. Occasionally, manufacturers forget to install the drivers for some of their devices, and sometimes a driver installed for some completely different device can interfere with the LAN driver. For me, this occurs most often when performing a major upgrade (such as upgrading from Windows 10 to Windows 11).
The System Properties dialog window will appear as shown below. Next, click on the Device Manager link.
If you don't have a My Computer icon, right-click on the name of your computer in any Windows File Explorer window and pick Properties from there (as shown below).
In the System Settings dialog that appears, click in the Device Manager link.
Alternatively, click on the Start button (typically in the lower-left corner), and type device manager into the search box. Choose the Device Manager Control Panel from the list (as highlighted in the picture below).
Regardless of the operating system path that brought you here, the Device Manager dialog window should now be displayed. It is roughly the same for all versions of Windows.
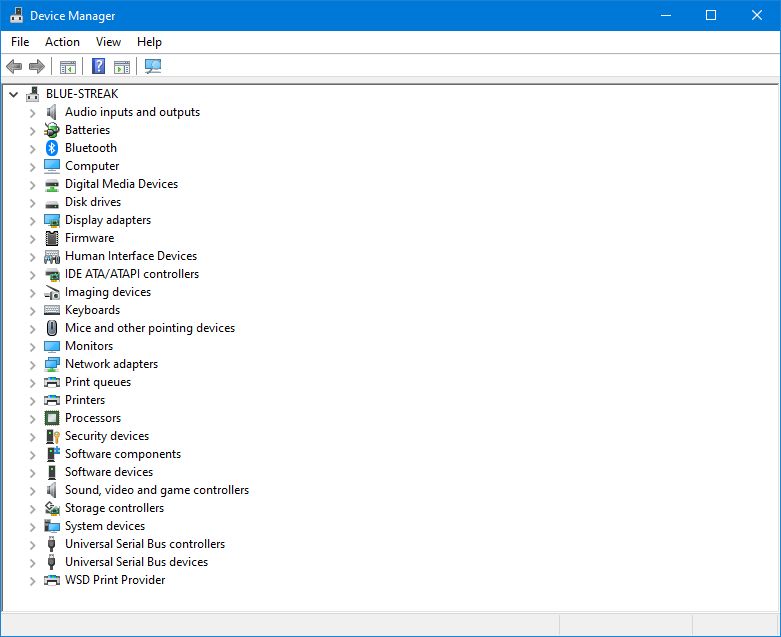
If your Ethernet adapter is recognized as a device by the operating system, it will appear under the Network adapters portion of the Device Manager list. (By default, the devices are listed alphabetically by type.) If you see Network adapters listed, click on the "caret" to the left of it to expand that entry. You could see your specific Ethernet card (NIC) listed there as shown below. If you don't see such an entry, see Problem 1: There isn't any entry named "Network adapters" in the Device Manager or there is no entry in the Network adapters that corresponds to my Ethernet adapter.
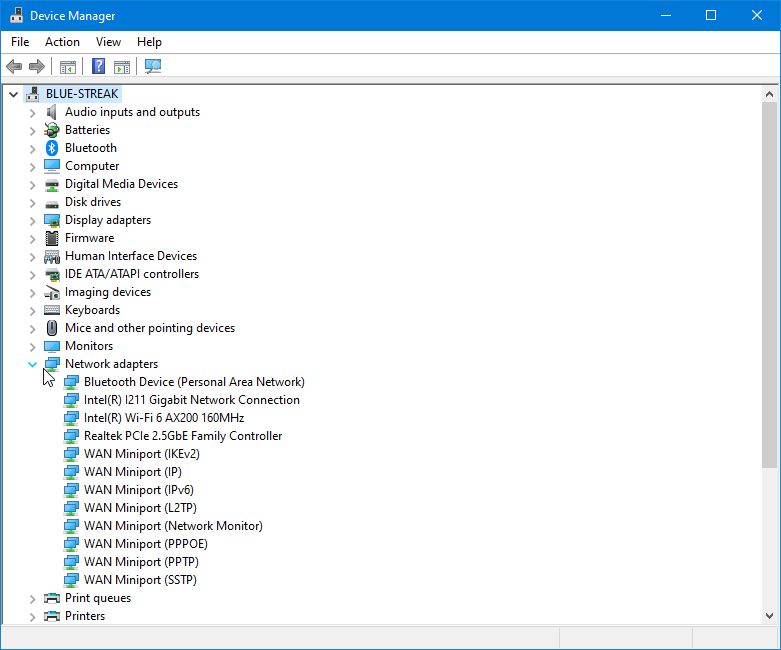
The computer shown above has two Ethernet adapters (Intel I211 Gigabit Network Connection and Realtek PCIe 2.5GbE Family Controller) and a wireless Internet adapter (Intel Wi-Fi 6 AX200 160MHz). Right-click on the entry for the network adapter that we are troubleshooting (e.g., Intel I211 Gigabit Network Connection) and choose Properties from the pop-up menu. (You can also just double-click on the entry.)
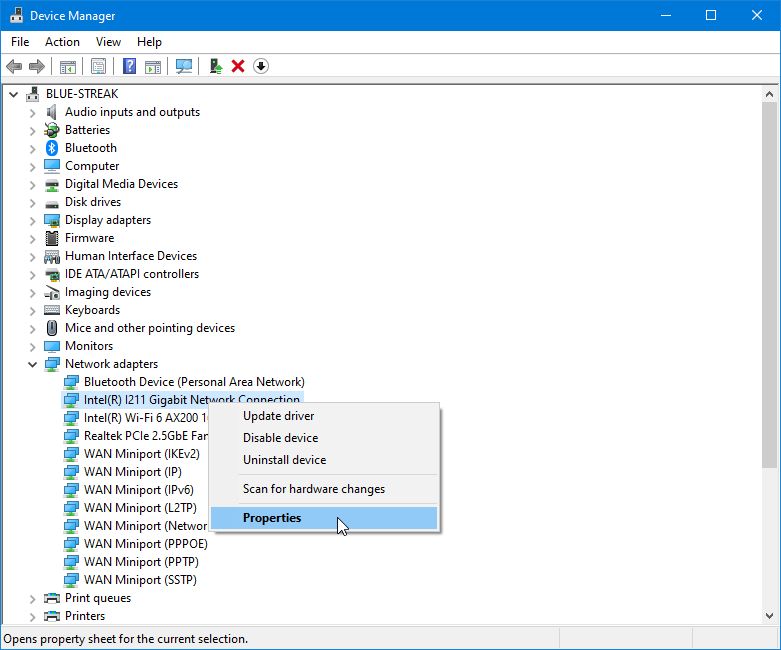
The properties of your Ethernet adapter should look similar to the one below. Pay particular attention to the line that reads, "This device is working properly." This is what we want it to read.
Problem 1: There isn't any entry named "Network adapters" in the Device Manager or there is no entry in the Network adapters that corresponds to my Ethernet adapter
The usual culprit is a bad or missing driver when you know you have the Ethernet adapter installed, but it doesn't appear under the Network adapters list. Look in the Device Manager for the Other devices entry. (Generally, there will not be an Other devices entry if all devices are installed properly on your PC or there will not be any devices listed under the entry.) If there is one, expand it by clicking on the plus sign. If you see a device with a name similar to "Ethernet Controller," it's almost guaranteed you have a (lack of a) driver problem. Possible solutions:
- Uninstall the device and let it be rediscovered upon reboot.
- Get the latest drivers from the manufacturer. (Make sure you know your card's exact manufacturer, model number, and version. I used several Linksys LNE100TX cards in the past, and there were three or four versions of that model. Each used a different driver.)
Problem 2: There is an error message in the Device status field (and/or there is an exclamation mark in the Device Manager next to the adapter)
What you want this field to say is, "This device is working properly." If you have any other message, you likely have a wrong, corrupted or missing driver. Microsoft has a nice list of the device manager error codes here, along with some suggested solutions. Generally, uninstalling and reinstalling the correct driver fixes this issue.
Test 2: Testing Basic Local Connectivity
Test 2: Testing Basic Local Connectivity
Test 2: Testing Basic Local Connectivity with ping and ipconfig
In this part, we run a simple localhost ping test to ensure that the computer can talk to itself properly. That may sound strange, but the operating system uses the localhost IP for many things. It is also a further step in ensuring things are going right, and it's simple to perform. If this test works, it doesn't guarantee that your network is set up correctly, but it if fails, it almost guarantees that this computer won't communicate with any network.
First, we need to open a Command Prompt window, which can be done in several ways. One way is to type cmd into the Search box of the Task Bar, as shown below.
This will bring up a list of matches for the text typed, which should include the Command Prompt app, as shown below. Click on the Command Prompt app entry to expand the choices for starting a command prompt window (which will be shown to the right). Click on the Run as administrator entry from the list of choices below the Command Prompt.
An administrator Command Prompt window like the one shown below should open.
In the Command Prompt window, type in the ipconfig command at the prompt and hit return.
We are seeking additional confirmation that the Ethernet adapter is present and recognized. Don't worry about the IP addresses returned from the ipconfig command at this time; see if you have one or more adapters listed. (Note: To establish a valid link, you may have to connect a cable between your Ethernet adapter and a port on your [router or] switch. Some Ethernet adapters require this before they are recognized as being present.)
Next, type in the command ping 127.0.0.1 as shown in the screenshot above. The IP address 127.0.0.1 is reserved as the "localhost" or "loopback" address for every device to refer to itself. It's always a valid address for the machine. Typing ping localhost will result in the reply responses shown above. Later, we'll assign an IP address (or have one assigned to us), but the localhost name is always available. If everything is set up properly, you will see replies from the ping command like the ones shown below. Technically, you should always be able to ping 127.0.0.1 even if there is no Ethernet adapter installed in your computer so long as the basic networking software has been installed. The localhost ping verifies that.
If you aren't getting this, you should recheck that your Ethernet adapter and the required drivers are installed (and that you've installed the proper drivers for the operating system you are using). I've never had this fail if with an Ethernet adapter that's correctly installed.
If you typed ipconfig and got something like the following response, check to make sure your network card is still properly inserted. You should also redo test number 1.
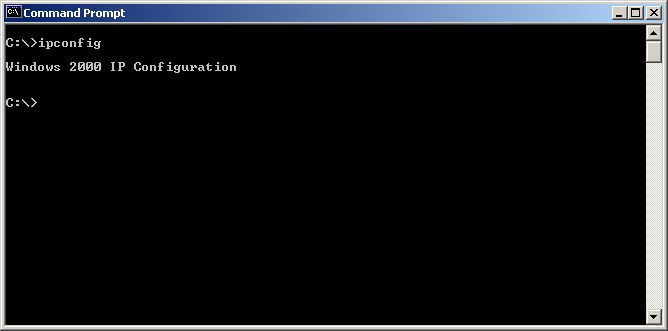
Back in the days before built-in Ethernet ports were common in laptops, I occasionally forgot to insert my laptop card. The above response is what I got in that case. Also, I've seen cases where the Ethernet cable was jerked on hard enough (e.g., stepped on or tripped over) to pull the Ethernet adapter partially out of the PCI slot in a desktop machine. If you suddenly start getting the above response on a desktop machine that's been working fine "forever," either the card has become unseated from the PCI slot, or it has just plain died. I've had both happen. (Check the cable as well.) If you get the above response from a new Ethernet adapter, it usually means the drivers installed weren't the right ones or failed to load for some reason. Although rare, I have had a brand new Ethernet adapter fail right out of the box.
Test 3: Check the Link Lights
Test 3: Check the Link Lights
Test 3: Check the (Physical) Link Lights
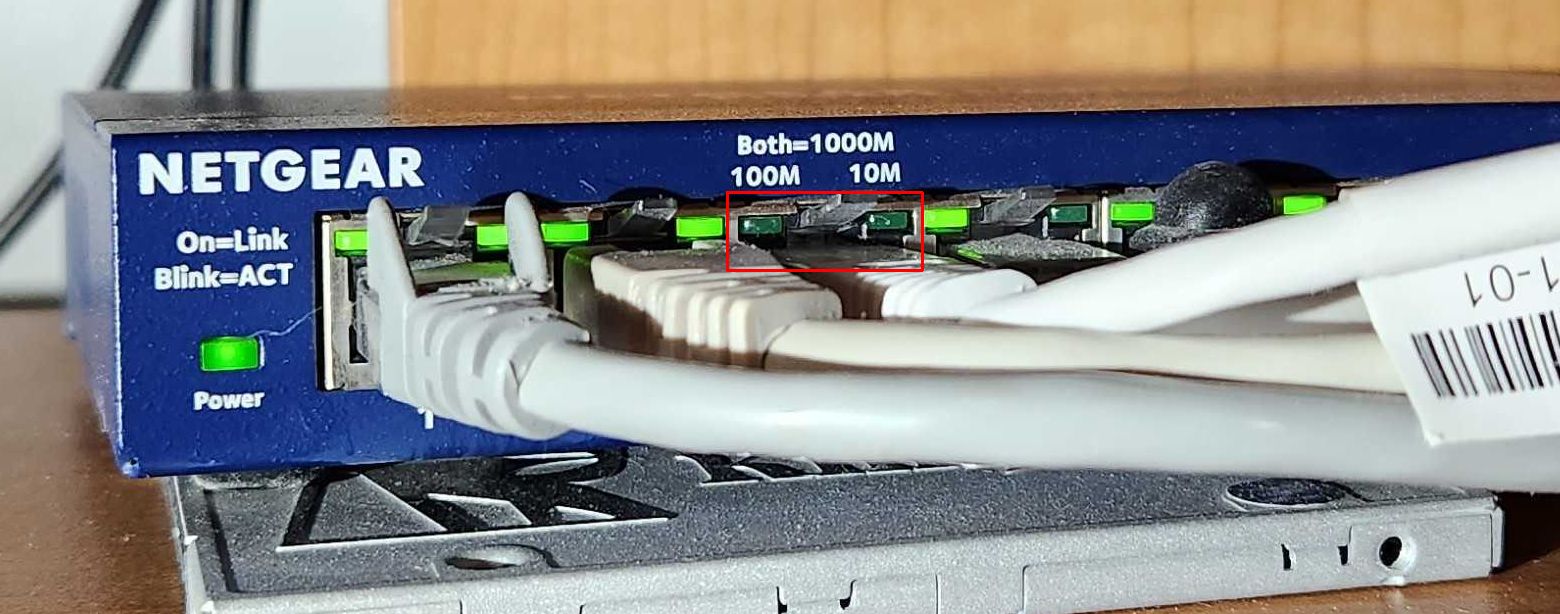
If you've made it past tests 1 and 2 (and the problem still persists), it's time for one of the quickest tests you can do. Look at your router or the switch to which the device is connected and ensure that the link lights for that device are (still) on. This may seem ridiculously simple, but kids are kids, cats are cats, and bad things can happen to network cables even if you haven't touched them. The cat doesn't have to chew completely through the cable. Just piercing the outer shell and severing one of the eight wires inside is sufficient. Swapping the cable for a known, working one for a quick test can verify whether that's the case. In the picture above, the link lights for the device attached to port 3 are not on. Either that device is turned off, the cable is disconnected, or the cable (or port) is bad.
Cables aren't the only culprit to problems at this step (but they are the most common). Power supplies on routers and switches fail from time to time. I've had switches that just decided not to switch anymore. I had a switch that used to run just fine for about a month at a stretch and then freeze completely. All the lights would be on, but the link light never blinked, indicating traffic being passed. With that switch, just unplugging and plugging it back in made it start working again. When this reached maximum annoyance, I replaced the switch. If you run the ping test from step 2 while watching the router/switch, you should see at least one of the lights on the port (corresponding to the device from which the ping is being run) blinking to indicate activity.
Occasionally, one of the ports on a switch will fail while the others remain working. Try swapping the cable to an unused port (or temporarily try a used port, but don't forget to plug the other cable back in if it's in use). If the cable works fine on an alternate port, you might have been trying to use an uplink port or a port that has gone dead. In the latter case, replacing the switch is probably a good idea. I had an Ethernet cable that got hit by lightning during one particularly bad storm. One switch, the Ethernet card on a printer, and another Ethernet adapter were killed instantly. However, one of the other switches was apparently among the walking wounded. At first, one port stopped working, and then another. A good static electric shock can do this as well. If you find one dead port on a switch, expect another and then expect to replace the switch.
Test 4: Checking for a Valid IP Address
Test 4: Checking for a Valid IP Address
Test 4: Checking for a Valid IP Address
At this point, we've verified that we have a viable network adapter, the adapters drivers are loaded such that it can talk to itself using a localhost ping, and that the link light on the router shows that the cable is connected and a link established. Now we need to see if we have or can get a valid IP address. We can do this by using ipconfig in a command window to see what our IP address is. An ideal result is to see something like the following screen.
This shows that was have an IP address of 192.168.0.2. If we are using the DHCP protocol to get our IP addresses from a DHCP server (most likely built-in to our router), this means that we have connected to the server and retrieved an address. (See Using DHCP IP Address Assignment for Automatic Configuration for details on how to set your Ethernet adapter to use a DHCP server.) If we are using static IP addressing, we should see the static IP address we assigned to this machine. (See Fixed/Static IP (Manual IP) Assignment for details on using static IP addresses.)
When using DHCP assigned IP addresses, a couple of anomalous situations can occur. If you execute an ipconfig command and get back an IP address of 0.0.0.0 as shown in the top half of the screen below, most likely your machine has lost its "lease" on the DHCP address it had and then failed to get another. I most often see this when I have reset or reconfigured the router. As shown in the bottom half, performing an ipconfig /renew will generally cause the machine to get a new DHCP IP address.
The second anomalous result and the one I see more often is a when the machine failed to get a response from the DHCP server within a given amount of time. The IP address assigned to the adapter is not valid for the LAN and seems almost whimsical.
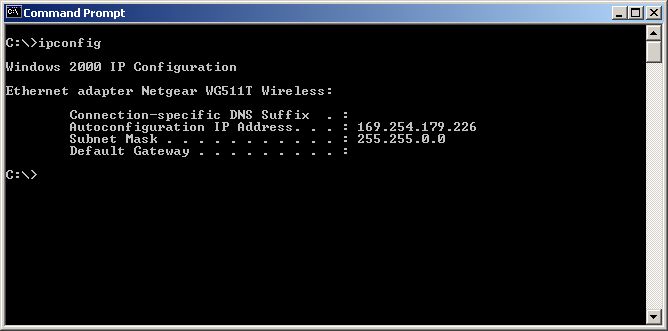
If you are just setting up your home network for the first time (or installing a new router/firewall), you may want to make sure that the DHCP is on. (See Changing the DHCP Server's IP Assignment Range for details on how to check.) Most routers will have it turned on by default, so assuming you did not explicitly turn it off, the most likely suspects are the cable and Ethernet adapter - in that order. Try a different cable. Retry Test 1: Making Sure the Ethernet Adapter is Recognized and Problem 1: There isn't any entry named "Network adapters" in the Device Manager or there is no entry in the Network adapters that corresponds to my Ethernet adapter. If you are getting this result with a wireless Ethernet adapter, most likely your wireless medium configuration is not correctly set up. (See Configuring the Radio Medium for a Wireless Access Point and Wireless Ethernet Adapters.)
For an established home network - that is one that has been up and working for a while - when the DHCP request times out and gets a bogus IP address like the one above, the usual suspect is the connection to the router and most likely the cable. If the Ethernet adapter is a wireless adapter, usually the wireless configuration has gotten changed and the system can no longer connect or you were (are) out of range of the WAP when the lease expired.
Occasionally, I've had a router just "go stupid" and stop communicating. This usually requires a power cycle to recover. Since most routers don't seem to come with an on/off switch, this means pulling the plug.
Test 5: The LAN Ping Test
Test 5: The LAN Ping Test
Test 5: The Handy-Dandy LAN Ping Test
You might wish to repeat the test Test 1: Making Sure the Ethernet Adapter is Recognized and check that you are not having Problem 1: There isn't any entry named "Network adapters" in the Device Manager or there is no entry in the Network adapters that corresponds to my Ethernet adapter (at least the second one) before proceeding. What we are about to do is to ping from one of the connected computers to either one of the other computers in our local area network or to the Router/WAP. (If you have a Local Area Network without any WAP or router, you will need to ping one of the other machines.) If you are pinging one of your other machines, make sure it is on and configured appropriately. You may want to do a quick check to make sure the link lights on the router or switch are still lit for both machines (as outlined in test 3). For this section, my LAN IP addresses start with 192.168.4. When you are executing the commands shown in this section, substitute the beginning three octets (numbers before and between the periods) below with the ones for your LAN.
Open a command window if you don't already have one open. At the command line, you are going to be typing something like ping 192.168.4.1. If you have in router in your network, substitute the address of your router's LAN IP address for the one above. If you have an isolated LAN with no router and you are connecting your devices together with a simple switch, use the IP address of another machine on your LAN as the target of your ping. Successful results of ping-ing that IP address are shown in the window below. You will see the "Reply from <the IP address of the device you pinged> ..." along with the number of bytes sent (and returned) in the ping packet and the round trip time it took for the ping to complete. (Note that round trip time is the time taken for the message to travel from your machine to the pinged device and back again.) Since we are pinging another device on the same LAN (a.k.a., another device on the same "wire" although that's more figurative than exact), the time is very small. By default, Windows pings the target device four times. (We will see how to change that number later.) The statistics for the four pings is also given at the very bottom including the number of messages sent, received, and lost and the minimum, maximum, and average round trip time.

Unsuccessful ping attempts will usually have results like those in the following screen. If your ping test was successful, skip on to the next section, Test 6: The Handy-Dandy WAN Ping Test.

Possible Causes of a LAN Ping Test Failure
Incorrect IP Address: Check to make sure that the IP address you typed in the ping command was the correct one. Typing four sets of numbers is error-prone at best, and I get them wrong all the time. (This is why the Domain Name Service came about.) If you pinged the IP address you intended, type the ipconfig command into your Command Prompt window. For my network, the result looks like the following screen.
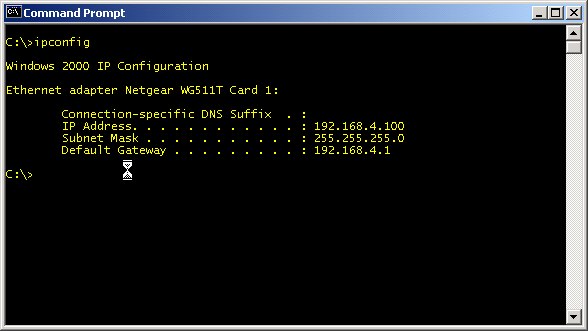
My IP address is 192.168.4.100 (as I am using a static IP address for this example and that's the number to which I explicitly set my Ethernet adapter). Since my network number is 192.168.4.0, any other device on my LAN will also start with 192.168.4. Make sure that the IP address you tried to ping is on the same network as (i.e., the first three numbers match) the machine you are pinging from.
Once your network is set up and working, this number will rarely change (unless you like to play with your network a lot like I do). However, if you recently reset the router (using the router's reset button) or you upgraded the router's firmware, the router's LAN IP address may have been reset to the default settings. (See Changing the Router's LAN (Internal) Network Number for the general procedure on how to set those back to the numbers you chose for your LAN.)
Check the Ethernet Adapter: If you got a response from the ping like the one below, which is just the title "Windows 2000 IP Configuration" and nothing else (with your operating system's name in place of "Windows 2000"), this usually means that your Ethernet adapter isn't inserted (generally applicable only to laptops) or at least, is no longer recognized. If your Ethernet adapter is a PCI or USB version, check to make sure it is still firmly seated in the PCI slot or USB port, respectively. (Sometimes removing and reinserting the PCI card or USB adapter will fix the problem.) If your Ethernet adapter is permanently attached to your motherboard, this is rarely the problem. However, a hard yank of someone tripping over an Ethernet cable has been known to break an Ethernet adapter off of the motherboard. Check the lights on the motherboard's Ethernet adapter (and the corresponding light on the switch/router) to make sure they are still lighting when the cable is inserted. If an built-in Ethernet adapter becomes inoperative, you can add a PCI or USB Ethernet adapter in its place.
Assuming that we are not having a physical problem with the Ethernet adapter, this is a good time to try to recall any hardware or software you recently installed before the problem began. Hardware conflicts are rarer than they once were, but do still occur. Software conflicts that prevent the Ethernet adapter's drivers from loading also occur. Test 1: Making Sure the Ethernet Adapter is Recognized will help in determining if this is the problem.
Check the Ethernet Cable: If the response from the ping mentions something like "Cable Disconnected" or "media error," the problem is usually with the Ethernet cable. This may also be reported by some wireless Ethernet adapters when the wireless configuration is incorrect and the adapter can't communicate with the WAP. However, the link between the adapter and switch has failed. Check to make sure the router/switch is still on and the link lights are on as well. If the cable is bad, the link and activity lights on the adapter and on the switch will not be lit for that cable.
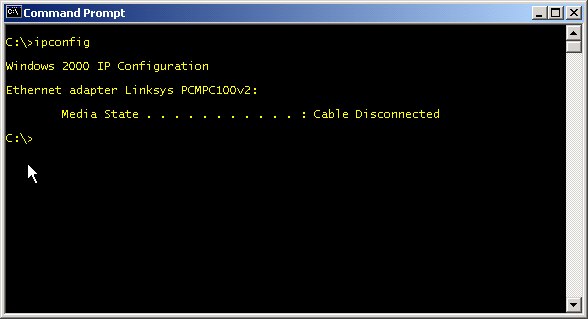
Try another cable if possible to see if the problem disappears. Cat and dog chewing notwithstanding, it's somewhat rare for a cable to suddenly fail somewhere along the middle (unless you've tightly bent the cable around a corner, which can cause failure over time due to the strain). Usually the problem is in the boots/connectors. Try flexing the cable at the point it goes into the connector and remove and reinsert the connector into the Ethernet port on both ends of the cable.
Upon occasion, routers and switches just loose their sanity and stop communicating (as do the other devices attached) with the network. Try turning off the device and the router and turn them back on. Also, I've had single ports on a router fail, so try the cable in an alternate port on the router. (The latter is pretty rare, but I've had it happen on three different switches/hubs at various times.)
Windows XP Firewall or Other Personal Firewall: If you are pinging a Windows machine with a personal firewall installed, you may get a window on the target machine asking you to create a rule for incoming ICMP pings. It is safe to allow pings for those machines inside your LAN, so allow ping, but only for machines in the IP address range of your LAN. Some personal firewalls may just deny incoming pings without asking you to add a rule or informing you of the denied request. In this case, you may have to explicitly add a rule to allow pings from other devices on your LAN. Recently, Windows XP users who applied Service Pack 2 got an extra surprise because it turned on the Internet Connection Firewall as a part of its emphasis on increased security. Network services of all sorts that previously had been working fine suddenly stopped.
Ping Test Tip
When you're trying to track down a cabling problem on your LAN, repeatedly pinging another device like the router can be quite helpful. However, by default, the ping command in Windows only pings four times and exits. In order to make it ping more times, the "-n" option can be used. Typing ping -n 1000 <IP address> for example will cause the ping command to be issued 1000 times. That's usually enough time to fiddle with the cable and ports. To stop the ping before it reaches 1000 pings, hit CTRL-C (the Control [CTRL] key and the letter C together).
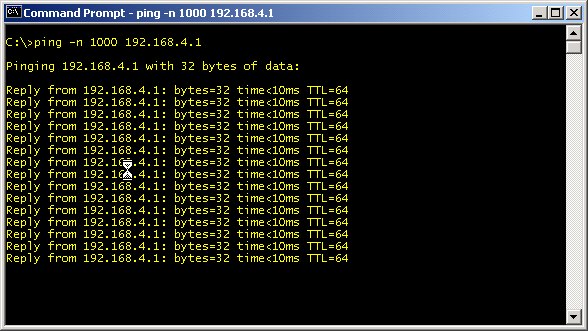
While the computer is pinging the other device, you should be able to see the activity lights on the router for that port flicker indicating activity.
Test 6: The WAN Ping Test
Test 6: The WAN Ping Test
Test 6: The Handy-Dandy WAN Ping Test
If you are having trouble reaching services on the Internet (e.g., email, web sites, game servers), it's a good idea to first try at least one quick LAN ping test (from the computer to the router) as shown in Test 5: The Handy-Dandy LAN Ping Test. Once you have checked and passed the LAN ping test, a good approach is to first ping things relatively "close" from a network point of view and then ping IP addresses further and further away. This helps isolate if the problem is in your network, your ISP's network or even further out.
Baby Step 1: Ping Your Router's WAN Gateway Address
The first step is to ping the gateway address that your router is using to communicate with the rest of the Internet. If you have a fixed IP address, this is relatively simple because your ISP will have told you what your gateway address is when they assigned you your IP address. Open a command window and type ping followed by your WAN gateway address as in the screen below.
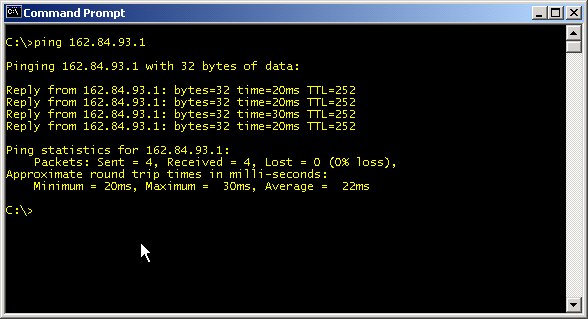
If you have a dynamically assigned IP address, determining your gateway address can be a bit trickier, but your router will likely give you a hand. First, you first need to find out if your router has successfully retrieved an IP address from your ISP's DHCP server. Your router's status page should list your current external IP address. The follow screen capture illustrates that case.

Recall that for the purposes of demonstrating the various problems that can occur, I have set up a test network inside my real home network. This is why the IP address I received is another non-routable (private) IP address. The IP address retrieved was 192.168.3.41 in this case. (See Private IP Addresses for more details on private IP addresses.) When you look at the status page for your router, it will likely be a public IP address like 162.84.93.33. The gateway address was also retrieved at the same time, which is 192.168.3.1. Most routers will display the gateway address they received in the DHCP response. Substitute that IP address in the ping command shown above. If it doesn't display the gateway explicitly, try using the first three octets (e.g., 162.84.93) and end with a .1 (for a full IP address of 162.84.93.1). In the command window above, the ping to 162.84.93.1 is a ping to my ISP's WAN gateway for a real IP address. If your ping test is successful, skip to the next step, Baby Step 2: Ping Your ISP's DNS Server. If not, proceed into the following troubleshooting section.
Troubleshooting a WAN Gateway Ping Failure
If you aren't able to successfully ping your ISP's gateway address (or you aren't getting a valid IP address returned from a DHCP request), the problem is generally isolated to the connection between your router and DSL/cable modem or the modem's connection to the ISP. It's also possible your ISP may be having a temporary (planned or unplanned) outage.
Log into your router and browse to its status page. (If you are unable to log into your router, check to make sure it has power. Also, try to ping the router's LAN IP address as was done in Test 5: The Handy-Dandy LAN Ping Test.) If your router shows an Internet address that is not valid (like 0.0.0.0 in the screenshot below) most likely you've lost connectivity with your ISP. (That's assuming you had connectivity before. If your high-speed connection is a new installation, it may not be active yet.) The first thing to check is the power on the modem and Internet/WAN lights on the router and modem.
On the example router shown here, the Netgear WGT624, the power indicator is the light to the far left and the light that is second from the left, which is a lowercase letter "i" with a circle partway around the bottom, is the WAN/Internet port. They are green when the router has power and the connection to the DSL or cable modem is correct, respectively. If the power light is not lit, check your power adapter and power connection on the back of the unit to make sure they are plugged in. If it is, try moving it to another plug. (Use an extension cord if it's inconvenient to move the router.) I've have a number of those little power adapter "bricks" die, so don't be surprised to find out that the router won't power up even when you try a working outlet. (Radio shack has substitutes for these with variable DC voltage outputs and tips that will work with all sorts of devices. Check to make sure the amperage is sufficient.)
Next, check the corresponding lights on your Cable or DSL modem. On the example cable modem shown to the right, the power light is at the top and labeled "Power" and the LAN light is labeled PC/Activity and is the second light from the bottom. Finally, check that your connection to your ISP is established.
On most DSL modems I have used, there is a single light labeled "Internet," "Ethernet," "WAN Connection" or something similar. It should be lit and steady when the connection is established to your ISP but no traffic being sent or received. Typically, the light will blink or flicker when Internet network activity is occurring in either direction. Note the Ethernet light is on in the picture below.
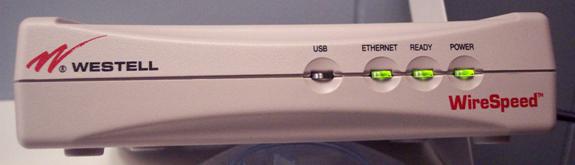
If the Ethernet light is not lit, it's time to start suspecting your service from your ISP is down. First, make sure that the telephone line from the DSL modem to the wall is secure. You may want to try another telephone wire just to be sure. Also, check to see if your regular phone service is working. If both your DSL and telephone service are out, your line may have been cut or disconnected. That's a problem for your phone company to deal with. If the problem lies just in your DSL connection, you should call your ISP's technical support and see if there is a general problem they are aware of, if they are doing some planned upgrades or maintenance they didn't notify you about, and if you are the only person with an outage and need to report it.
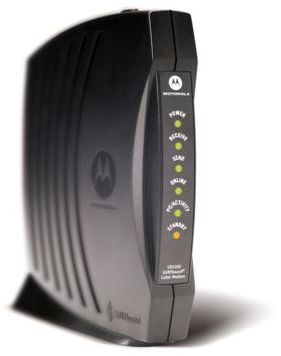
On the particular cable modem shown here, the Motorola SB5100, three lights are used to show you the status of your cable connection to your ISP. The first light (second from the top under the Power light) is labeled "Receive" and is the receive channel established light. It is lit when a downlink (incoming) connection from your ISP is established. The next light down is labeled "Send" and is lit when an uplink (outgoing) channel to your ISP has been established. If either the Send or Receive light is not lit, it's probable that your cable service is down or the cable is broken or disconnected. The next light is labeled "Online" and indicates all necessary negotiation such as DHCP address assignment has completed. When this light is not lit, it generally means that the DHCP negotiation failed either initially during power on or after a DHCP IP address lease has expired and a new IP address could not be retrieved from your ISP's DHCP server. If your cable appears to be in working order, you should call your cable Internet service provider to find out is a general problem they are aware of, if they are doing some planned upgrades or maintenance they didn't notify you about, and if you are the only person with an outage and need to report it.
Baby Step 2: Ping Your ISP's DNS Server
Once we've been able to ping our ISP's gateway, the first "network hop" outside of our own equipment, the next test is to see if we can reach our ISP's DNS servers. We will do this by pinging the IP address of one of those servers. Of course, before we can do that, we need to know what those IP addresses are. If you have fixed/static IP service, as part of your initial sign-up package or email, your ISP should have included the IP addresses of the DNS servers it wants you to use. They will generally give you two (or more) addresses. We need two so that our router can still have DNS services if one of the servers goes down. (Remember, the DNS service is used resolve the names of Internet sites like "www.godiva.com" to their respective IP addresses. Without the DNS service, we won't be able to reach any web sites other than by IP address.) If your ISP didn't supply those IP addresses, check their web site or call their technical support line and ask for them.
If you have dynamic IP address service using your ISP's DHCP server to get your Internet IP address, you may have to do a bit more hunting. You should be able to call your ISP and ask for the numbers, as was mentioned above, or your ISP may have listed them for you when you signed up. Like we did in the last section (to find out your currently assigned IP address), we can use your router's status page to find out your current DNS server IP addresses (if you have ever successfully used the service in the past). The Basic Settings screen of the Netgear WGT624 gives this right below the Internet IP address as demonstrated below.
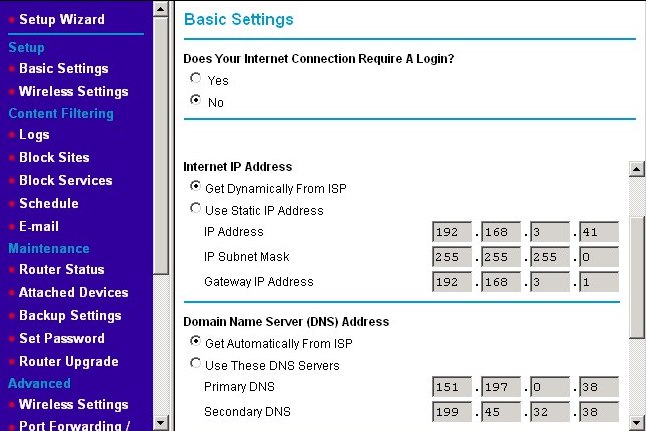
The two IP addresses in this example are 151.197.0.38 and 199.45.32.38. Now that we know the IP addresses of our DNS servers, we can proceed with the ping test. Try both IP addresses to see if the ping test passes by reaching the DNS server. An example using the second of my example DNS servers is shown in the following screen capture. If you are successful with your ping test here, skip to Baby Step 3: Ping A Well-Known IP Address. Otherwise, continue on into the following troubleshooting section.
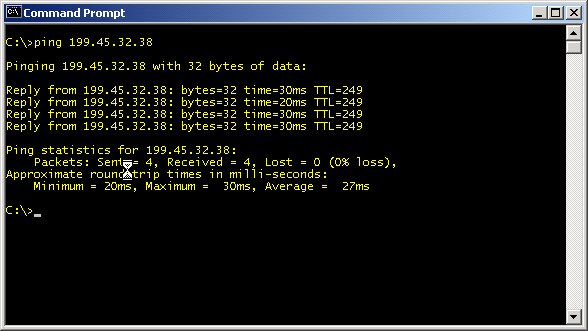
Troubleshooting a DNS Server Ping Failure
If the ping test to your gateway address for your ISP passes, but your ping test to your ISP's DNS servers fail, your ISP may be having a problem within their internal network or their DNS servers are down. Interestingly, if the DNS servers are down, we actually still have full connectivity to the Internet, but we've lost the capability to resolve names into their corresponding IP addresses. Without that capability, we won't be able to browse the Internet, fetch email, access game servers, or anything that else we try to access by name. Unfortunately, it also may be true that the DNS servers are fine, but your ISP does not allow pings to their DNS servers. If you suspect that this is the case after following the procedures in this section, try the tests in Test 7: Testing for DNS Functionality. (Note to ISPs: It's perfectly acceptable to reject or drop ping requests originating from the Internet at large, but you should accept ping requests from your own clients. Note to others: I have yet to have an ISP that blocks ping requests to DNS servers from their clients.)
Another possibility is that the IP addresses for the DNS servers have changed, but your ISP didn't inform you. (This is usually only a problem with static IP address accounts as dynamic IP addresses will get the new DNS server IP addresses the next time your router retrieves an IP address from your ISP's DHCP server. If you do start having this problem and you are using dynamic IP addressing with your ISP, try rebooting or power cycling your router to force it to get the new information.) One of my previous ISPs liked to move their DNS services from one IP address to another without informing anyone. They didn't do it often; the IPs changed maybe once or twice a year at most. First, they would move one and some time later they would move the other. Also, if your ISP gets bought out by another ISP or your ISP buys another ISP in the same geographic area, they may decide to consolidate DNS servers and other resources, which may change the IP addresses you need to use.
As a final check, try pinging one or more of the IP addresses in the following list: 198.41.0.4, 192.228.79.201, 192.33.4.12, 128.8.10.90, 192.203.230.10, 192.5.5.241, 192.112.36.4, 128.63.2.53, 192.36.148.17, 192.58.128.30, 193.0.14.129, 199.7.83.42, & 202.12.27.33. These are the IP addresses of the Internet's root DNS servers (current as of December 12, 2008). These occasionally do change, but only one or two and even then only over a period of years. When you try to browse to an address that your ISP's DNS server doesn't have, it consults a DNS server ranked above it. If that DNS server doesn't know the address, it contacts a DNS server higher up the chain of DNS servers until one of the root servers is reached. These are the addresses of those root servers. They may know the answer directly. They may know which DNS server to contact as the primary DNS server responsible for that domain name. If they don't know the address for a name and can't find a server that does know, the name doesn't exist as far as the Internet is concerned. Not all of these DNS servers allow themselves to be pinged, but most do.
If you try four or five of the IP addresses in that list and none of them respond, the problem is in your ISP's internal network or their connection to the rest of the Internet. You aren't able to reach IP addresses outside of your network, but you can reach the gateway. This is a problem for your ISP to solve, so you need to call their technical support line. If the problem is this big, they're almost certainly going to be already aware of it, but they should be able to give you the scope of the problem and when they think it will be fixed.
On the other hand, if at least one of those root DNS server IP addresses responds to a ping, your ISP's DNS servers are down, they don't respond to ping requests, their addresses have changed an you weren't notified or your ISP is having problems with loosing DNS requests (because of faulty equipment or an overloaded, congested network). The problem may clear up after a short while in the case of congestion, but this is still a problem you should contact your ISP about. Not all of the network problems you'll encounter on the Internet are yours. When you call your ISP's technical support line, verify that the DNS servers are up, and if they are, what their IP addresses are.
Baby Step 3: Ping A Well-Known IP Address
If you are not able to ping your DNS servers (See the previous step.), it's a sure bet that you won't be able to complete this step. However, even if you are able to ping something at the IP address your ISP's DNS servers are supposed to be at, all you really know is that some device at that address responds to a ping. The next test, Test 7: Testing for DNS Functionality, will help us determine if that machine is really a DNS server.
This test is to ping a well-known site like www.google.com or www.ebay.com or your ISP's web server (e.g., www.verizon.com, www.xfinity.com). The successful results of such a ping are shown below. If you get a successful ping to one of these sites, but you can't reach a particular site like www.joes-small-insignificant-web-site-is-down.com, your connection is probably just fine. Poor Joe, however, has got a problem with his/her site. If one well-known site doesn't answer the ping, try another. Every site goes down occasionally. They might just be doing routing maintenance or upgrading. If pinging Google and one or two other well-known sites all fail, go to the trouble shooting section below.
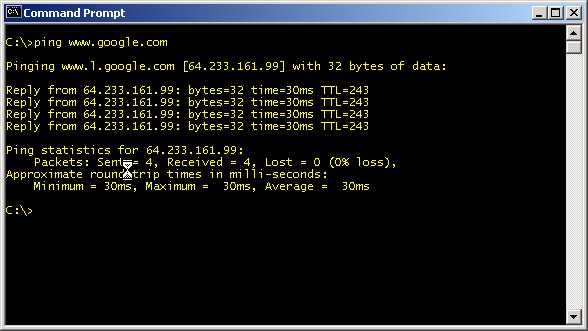
Troubleshooting a Well-Known Site Ping Failure
Assuming you've gone through the previous (baby) steps, troubleshooting here means we were able to ping our gateway and beyond that to some device(s) that we believe to be our ISP's DNS server(s). Unfortunately, pinging a system beyond that failed. This might be because our ISP's DNS servers are not working correctly or your ISP's connections beyond its own network are experiencing problems. Now, we'll try to determine which.
If pinging a well-known site like www.google.com returned "Unknown host" then it is likely your ISP's DNS servers are down. This is because sites like Google and Ebay are highly redundant and at least one of their machines should respond. You may again want to try pinging the root DNS servers (using their IP addresses) given in the list in the previous section. If you can reach two or three of them, it's even more likely dealing with a DNS server failure at your ISP. If we cannot reach the root DNS servers either, the ISP's network connection to the rest of the world is in question. It's time to call your ISP's friendly technical support line in either case.
If pinging www.google.com returned "Destination host unreachable" or "Request timed out," the DNS servers are probably working fine, but the ISP is having connection problems to the rest of the Internet. It's still time to call your ISP. If you have success pinging the well-known sites, but you try this same test for www.joes-small-insignificant-web-site-is-down.com and get either of these responses, it's most likely Joe's site that is down, not your ISP. Joe's site may also have moved to a new IP address, but your ISP's DNS servers haven't been updated yet. In either case, wait a while and try again. Don't call your ISP about Joe's site being down (unless you are Joe and your ISP is hosting your web site). They don't care about Joe. They don't care if you can't reach Joe, because they probably can do a thing about it. On the other hand, if you can't reach Google, that might spark their interest.
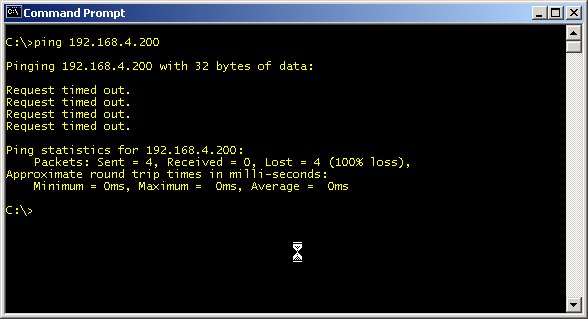
Test 7: Testing for DNS Functionality
Test 7: Testing for DNS Functionality
Test 7: Testing for DNS Functionality
The function of the DNS server was the topic of Introduction to the Domain Name Service. Everything from the game your are playing, your email program, your web browser and most other programs that use the Internet will use DNS servers to look up the IP addresses for names. You can look up IP addresses, too, using the nslookup command in a command prompt window. It's a good test when you are having trouble reaching sites on the Internet. The basic nslookup command starts an interactive session as shown in the following screenshot.
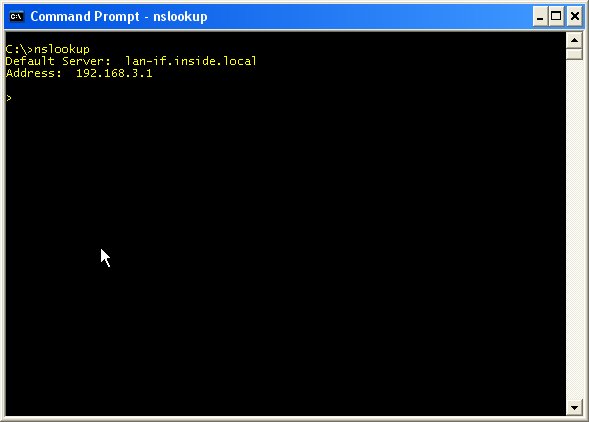
The nslookup session starts with the program displaying name and IP address of the default DNS server in use and the ">" prompt signifying that nslookup is waiting for a command. You should see one of the IP addresses that your ISP gave you (either statically or dynamically via your ISP's DHCP server) for your DNS servers in place of the IP address above. Some routers mask your ISP's DNS server by offering a "pass-through" service at your LAN's gateway address. In that case, the DNS server your see will be that IP address (e.g., 192.168.0.1) If you get "DNS request timed out" instead of the ">" prompt, you are having trouble reaching your ISP's DNS servers. We'll cover that in a minute, but for now, let's assume the DNS server is responding and nslookup is waiting for a command. We'll start with the most basic and most often used command, the name to IP address lookup. We do that by typing any site name at the ">" prompt. For example, I typed www.google.com and got the response you see in the screenshot below.
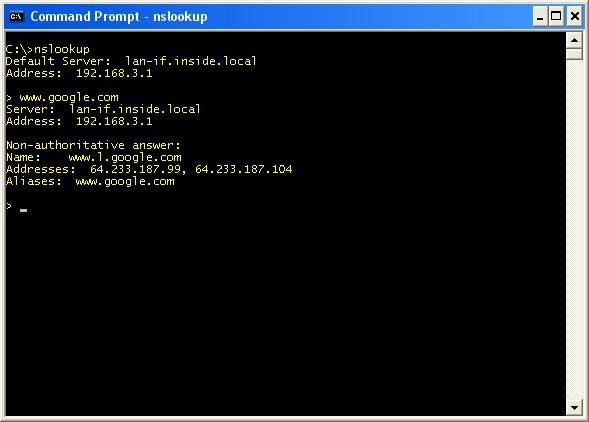
Unlike most sites, Google resolves to more than one IP address. The is because Google servers are replicated and geographically distributed all over the world, so more than one may be useable by your computer at any given time. This is also why Google makes a good test subject. Even if one or more Google servers are down at any given time, it's a good bet that at least some of them are up and responding and those will be the ones the DNS query returns.
You can pick the DNS server you wish to use by using the server command as shown in the screenshot below. I explicitly changed to one of my ISP's DNS servers using the command server 199.45.32.38 and hitting enter. The nslookup program acknowledged my change by listing the new "Default Server." Again, I try the names of a few well-known sites that are likely to be known by any DNS server.
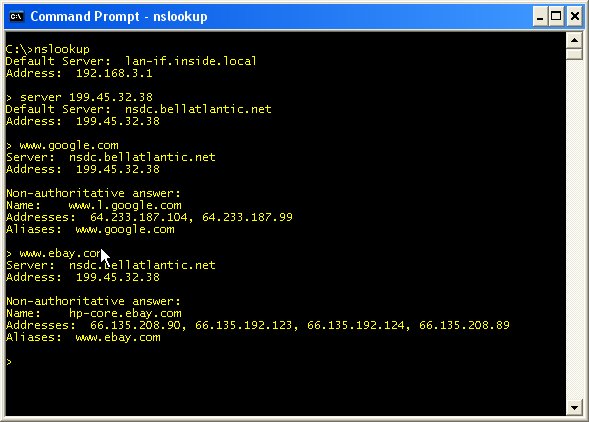
Next, I could try my ISP's other DNS server using the server command as above and the IP address of my ISP's other DNS service. It's a good idea to check both DNS servers provided by your ISP (or more if more are provided). If your ISP moves one of its DNS servers to a new IP address, the other one in your list will be used automatically. However, you've now lost DNS redundancy, which was the reason for having more than one DNS server available in the first place. If the remaining server should fail, be taken down for maintenance, or also have its IP address changed, you won't be able to access sites on the Internet except by IP address.
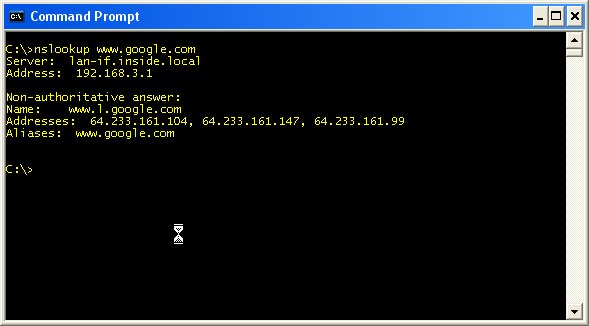
Finally, you can specify which DNS server to use when using the command line as shown in the next screenshot. This is also useful if you are getting the "DNS request timed out" error using your default DNS server. You can attempt to use your alternate (a.k.a., secondary) DNS server by putting its address.
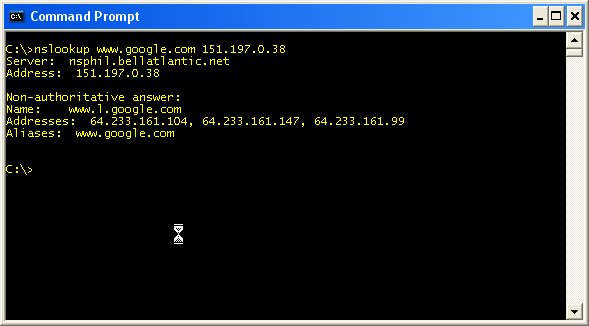
If secondary DNS query works, but your primary DNS server query did not, you might want to temporarily switch the order of the DNS servers listed in the TCP/IP properties for your Ethernet adapter. In Windows XP and Vista and even when using dynamic IP addressing, you can explicitly set the DNS servers to use as shown in the following screenshot.
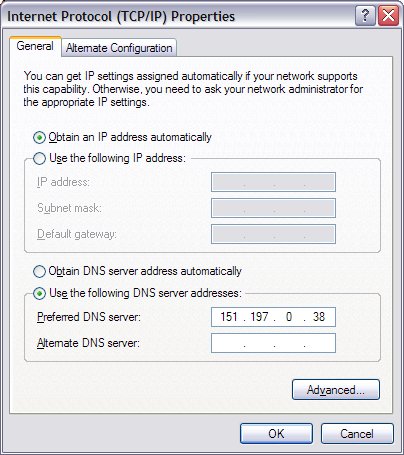
The example above supposes that the lone entry we are using for DNS is the secondary DNS server that we could successfully query. There is an alternative when you are using dynamic IP addressing for your LAN using your router's DHCP server. In this case, you can change the DNS addresses listed in your router's configuration page. The devices on your LAN would then need to ask for new dynamic IP addresses (e.g., using ipconfig /renew in a command prompt window). This may be simpler than changing each device individually.
Test 8: Testing Your Network Speed
Test 8: Testing Your Network Speed
Diagnosing a Slow or Overloaded Network
At some time, you'll likely find yourself noticing that your network seems sluggish. It's not down, but things web pages seem to be taking significantly longer than usual to appear in the browser, downloading files is slow or maybe the ping times to your favorite gaming server seem to have increased for no reason. This section of troubleshooting is to show some tools for use in diagnosing these sorts of problems.
Test 8: Testing Your Network Speed
If you are diagnosing a slowdown in your network, the first thing to test is to see if your local LAN is the problem or not. It could just be that the particular web site or game server to which you are connecting is congested. Your Internet connectivity is fine if that is the case, so there may be nothing you can do. On the other hand, there may be something within your LAN that's causing your slowdown. A quick way to check this is by using one of network speed test tools like the ones found at DSLReports.com, Speedtest.net or Speakeasy Speed Test. With the latter two tools, you (usually) choose the server that is closest to your geographic location. With the DSL Reports speed test, it picks a number of servers - both close and far geographically (either you can share your location or it will approximate it based on your IP address). It then runs simultaneous tests to those servers to get a composite picture. My results from the DSL Reports speed test are shown below.
I pay for 50/50 Mbps FIOS service and am getting upload and download speeds of 57.2 Mbps and 61.2 Mbps, respectively. This test shows that I'm getting a bit more than what I'm paying for. If I was having trouble connecting to a particular web site or game server but still got results like those above, I would have to conclude that my connection is fine, but there is a problem somewhere between my ISP and that server. One thing I might try in this case is use one of the tests that would let me pick a test server that is geographically nearer to the site I'm trying to reach (assuming I knew that information) and run the test again. If that test shows reasonable speeds, it's probably a problem with the site itself. Don't be surprised, however, if the speed test results when going across the country are significantly lower than those going 20 miles from your home. That's not unusual nor is there anything wrong (most likely).
If you don't see the expected speeds, first check that your test machine is the only one using the Internet connection. One thing you should do (or be prepared to do) is to disconnect all devices from the LAN except the one doing the speed testing. Physically disconnect the cables from the router/switch. This also includes shutting down any wireless connections from cell phones, laptops/netbooks/gaming consoles/TVs/DVRs and the like. (We often forget those are even on the network.) It may be easier to log onto the router and shut off the wireless radio temporarily. Run the speed test again to check that the result is the same.
What if the tests indicate you aren't getting the speeds you expect? (That is, what if you're not getting the speeds you paid for?) Assuming you have picked the nearest server to your location and maybe a few others in the same general area, if none of the sites return test speeds in the vicinity of what you should be getting, the next question is, "Is it them or me?" Is the problem inside your LAN, your portion of your ISP's network or somewhere else? Time to do some more testing.
Test 9: Checking LAN Usage
Test 9: Checking LAN Usage
Test 9: Checking LAN Usage
If network speed tests indicate you aren't getting the speeds you expect, the next step is to see if the problem is within your LAN or in the Internet. If your connection is shared among several devices used by others besides yourself, now is the time to ask around if anyone is downloading or uploading anything (large). It's also possible that one of the devices is doing an automatic update that you are unaware of. A cursory check can often find out who/what the culprit is. If not, it's time to do some snooping .. literally.
Tools that monitor network traffic (also called network "sniffers" or "snoopers") can be helpful with this step to some degree. Windows doesn't come with any such tools. There are few free tools available, but they can be difficult to set up and the results can also be difficult to interpret. One of the best I have found is Paessler's PRTG Traffic Grapher. It comes in both freeware and commercial editions. The freeware edition is limited to 100 "sensors," where a sensor is a network traffic metric. For checking LAN usage, we only need one sensor - one that monitors all network data as seen by the LAN adapter on which the software is running. This tool can be used for many other things than just checking your LAN usage.
If you think you might be interested in such a tool, go to Paessler's web site and download the the freeware edition of the PRTG Traffic Grapher. (The version at the time this example was created was 9.1.6.1962.) You can download a PDF version of the manual found at this link. There is also an HTML version of the manual. Both contain installation and operational instructions.
Unfortunately, running this tool on one of the machines on the LAN yields an incomplete picture. You may recall that in the discussion on hubs and switches, once the switch has learned where the devices on the network are attached, it only sends data to the ports that require it. That means you will see all the data coming to and from the particular machine upon which the monitoring tool is running, but none of the traffic from the other devices on the network unless the monitoring machine is the source or target of the traffic. There are enterprise-level (i.e., more costly) switches that allow a monitoring port to be enabled such that all traffic is sent to it, but those found in typical home and small offices do not.
Monitoring tools are still useful to verify that the ISP's connection is up, but given that a typical home user can't rely on such tools to get a picture of the whole network, we have to resort to more rudimentary methods - seeing the lights. In Test 3: Check the Link Lights, we checked that the lights we expected to be are were indeed lit. In nearly all routers/switches, there is one light per port. If the port is connected to a device, the light is lit. The light remains steady when there is no traffic coming from or going to that port. On the other hand, the light will flicker or blink to indicate traffic on that port.
Start by checking the link/activity lights on the router (or switch) closest to your ISP Internet connection. If you have a port on your router that is flashing wildly, you have your first clue. If this is a stand alone switch and two of the ports are flashing wildly and more or less in concert, you again are narrowing the search. Typically, one of ports connects to another switch or directly to the router that shares the Internet. Whatever device is connected to the other port is probably the cause of the slowdown. It doesn't necessarily have to be another computer/Xbox/etc. hogging the Internet connection. If you have one computer transferring a lot of large files to another computer over the LAN such as when doing a full backup, that may well generate sufficient traffic to slow down the LAN to the point the Internet connection is also affected.
Once you know which device (or devices) are involved, it's time to investigate them more closely. If this is little Billy's gaming PC, he may be updating a game on "patch Tuesday." Sometimes these patches are several hundred megabytes in size. With the increased use of online game (purchasing) services like Steam, downloading several gigabytes of data isn't unusual. It may well be your network is slow for just such a reason. Time to ask Billy what's up and also time to remind him of the family downloading etiquette. It may also be a good time to explain to little Billy that while downloading games for free from BitTorrent sounds neat, one letter from the RIAA to your ISP about alleged copyright infringement may well end your family's Internet fun for good (at least with that ISP). Other possibilities include such things as the Xbox getting an Xbox Live update or even your DVR or DVD player getting a new firmware update. If you suspect a computer, but can't isolate what exactly the source is, installing something like the network monitor mentioned above can be a big help.
What do you do if, on the other hand, you look at your link lights and none of them are blinking madly? You see an occasional blink a couple times a second, but by and large, nothing really seems to be going on on your LAN. In this case, it may be time to give your ISP's technical support line a call. Before calling, disconnect all devices from the LAN except the one doing the speed testing. Physically disconnect the cables from the router/switch as necessary. This also includes shutting down any wireless connections from laptops/netbooks/Nintendo DSi's/TVs/DVRs and the like. When you call your ISP's technical support line, they may ask how many computers are sharing the connection, so it's good to be able to say credibly that you only have one device at the moment - the one reporting the sub par speeds. I have even gone so far as to hook up a laptop directly to the connection from my ISP - bypassing the router/firewall/switch completely - in order to test the connection. That configuration pretty much rules out any possibility that the problem is in your router or elsewhere on your LAN.
ISP's can generally run their own speed tests to your neighborhood or even your specific connection. Don't be surprised to call and find out they are already aware of and working on the problem. If you are a cable modem subscriber, don't be surprised if this problem tends to crop up every weekday around the time kids are getting home from school. The first thing they often do is check their email, their Facebook/Twitter account (or whatever social networking site is currently popular) and then play a game or two. Some portion of most cable networks are shared among several customers or whole neighborhoods. During the peak times of the day, the shared portion becomes saturated with traffic. In this case, you may need to complain to your cable provider about the problem - possibly on a daily basis. They can do things to balance the network up to and including running more cable.
Test 10: Using the netstat command and TCPView to Check Port Usage
Test 10: Using the netstat command and TCPView to Check Port Usage
Test 10: Using the netstat command and TCPView to Check Port Usage
What happens if you can trace a network slowdown to a particular computer, but nobody knows what could be causing it to use so much bandwidth? The device could be running any number of legitimate background updates or services that use an Internet connection. Unfortunately, the same machine could have been compromised by a trojan hourse or virus and now it's relaying tons of spam email or acting as an illegal file sharing service. We need to invesigate what processes are using the ports on your system and how they are using them. (This is when installing a network traffic monitoring tool like Paessler's PRTG Traffic Grapher can be quite helpful since we've narrowed the problem down to a machine [or two].) Luckily, there are some tools and Windows and some nice free tools to help us with this step. The first one we'll mention is the netstat command.
The command "netstat" is short for "network status." It can used to show the configuration and status of the network on the machine on which it is run. It's a good idea to periodically run the netstat command to see what services you have listening for connections. If you see a port listed that is new and unexpected, it is a good idea to do a Google search on that protocol and port. For example, if I look on a Windows XP system that is connected to a few services on the Internet, I might see the following screen.
The "-a" option instructs netstat to display the active network connections. It lists the protocol (either TCP or UDP), Local (IP) Address, Foreign (remote IP) Address, and the connection's state (for TCP connections). Since I am using the Windows XP operating system in this example, I can add "-o" option to display the process ID number or "PID" of the program using that port. (The "-n" option instructs netstat to use raw IP addresses in its results rather than attempting to resolve the IP addresses to their respective domain and host names.)
Generally, it is the remote (foreign) connection information that we want to inspect. Let's assume we decide that having two connections to Internet servers at (the remote) destination port 5190 somewhat suspicious. The process ID associated with that port 2864. Now, we need to find out what process matches this process ID. For that, we can use the windows Task Manager. To bring up the Task Manager, you can either hit Ctrl-Alt-Del (Windows XP only) or right-click (not left-click) on an empty spot in the toolbar at the bottom of the screen as shown here. From the popup menu, choose the Task Manager.
The task manager is shown below. Click on the Processes tab to bring that tab to the front as shown. This lists all the active processes on your system by name, PID, user name (of who started the program), percentage of CPU that task is using, and the amount of memory that task is using. Clicking on the title of any column will sort the entries in ascending order. (Clicking a second time will reverse the sort to descending order.) Click on the title of the PID column to sort the entries in PID order and look for the PID of the suspicious entry (2864).
From the Task Manager window above, I find that the application's name is aim.exe, which is the name of AOL Instant Messenger application. If I didn't know what aim.exe was, I would Google that name along with the either the source or destination port and protocol (e.g., "aim.exe tcp 5190"). If a search using the source port doesn't turn up anything conclusive, try the destination port (or both). If you do find a application listening on a port that turns out to be a known virus or Trojan horse, your fun is just beginning, but at least you're aware of its presence. (Eradicating the problem is left as an exercise for the reader.) In this case, what I've found is AOL's AIM communicating on its default port of 5190. There's nothing to see here. Move along.
The netstat command is a fine tool, but it is command line driven as opposed to having a standard graphical user interface (GUI). It also just runs once unless the command is issued repeatedly. Therefore, it can't show changes in connections as they occur. The upside it that it comes installed on Windows 2000 and above though, so it's pretty much guaranteed to be there. (Although the -o option is only available in Windows XP and above.) However, there are some nice GUI-based tools out there for investigating the traffic on specific computers and on your LAN. We'll start with TCPView from Microsoft's own TechNet site.
TCPView displays a list of the current TCP and UDP connections established with the computer upon which it is run. It's very much the same information that netstat had, but in a nicer viewing format. Additionally, TCPView can be set to recheck the connections at 1, 2 or 5 second intervals and displays the differences from the previous check. Connections that change state from one update to the next are highlighted in yellow; those that are deleted are shown in red, and new connections are shown in green. (TCPView calls the connections to other IPs, "endpoints.") The owning processes name and PID are also shown, which saves looking them up via other means.
Using TCPView, you can look for unexpected connections as before. However, with TCPView, you can immediately see what processes those connections are from/to. Additionally, if any of those connections look questionable, you can close them by right clicking on the connection and choosing "Close Connection" from the popup menu.
Useful Tools for Network Troubleshooting
Useful Tools for Network Troubleshooting
Useful Tools for Network Troubleshooting
In this section, I'd like to list the tools mentioned previously, and add a few others that I use. At some point, I plan to expand this section with examples for the tools not already used elsewhere. For now, this is just a list of those tools with a short explanation of each. It's a work in progress.
ipconfig - The command used in a command prompt window on Windows-based systems to display the current IP settings of the Ethernet adapters.
netstat - A command used in a command prompt window that will return various sorts of network status and configuration information. It can be used to find out how your computer is routing data and what ports are listening for connections or using outgoing connections.
nslookup - A command used in a command prompt window that queries a domain name server (DNS) with a command network name (e.g., www.google.com) and returns an IP address associated with that name.
ping - The command used in a command prompt window that can be used to send a test message to another device which will reply with the same message.
Ping Plotter - A Windows program available in free, standard and professional versions that does the same thing as tracert and ping, but with a graphical display that makes it easy to see where network slowdowns are occurring. The free version includes a 14-day trial to the other versions. The professional version is pricey, but the standard version is $40. The main differences are the ability to trace two targets at once (e.g., one known to be reliable or close and one that is under test) and keep the trace history for an indefinite period rather than only 10 minutes.
Process Explorer - A Windows program from Microsoft that can ferret out what services are running with every option imaginable. Works on every Windows OS since Windows XP. Windows' Task Manager has a Services tab that provides some of the functions, but not at as fine of level of granularity.
Speed tests - Web sites that will allow you to perform a speed test over the Internet to see if you are getting the speed you are paying for. Good speed tests can be found at www.dslreports.com, www.speedtest.net, myspeed.visualware.com, and www.speakeasy.net.
tracert - A command used in a command prompt window on Windows-based systems to trace the route taken by a packet send from your computer to another computer or device. (Linux/Unix users will recognize this as a version of traceroute - with differences.) The IP addresses of the intermediate nodes are given along with the time it took for the response. The information is the same as that returned by Ping Plotter, but is included with the Windows OS like ipconfig, ping, nslookup, and netstat.
WinIPconfig - A Windows GUI version of the ipconfig command.
Wireshark - (Formerly known as Ethereal) A program for Windows, OS X & Linux that can be configured to capture data traffic based on a set of criteria like source IP address, port number used, etc. Gathers statistics on what it captures.
My History of Home Networking
My History of Home Networking
The Raison D'être Emerges
After having been on Macintosh for several years, I bought my first IBM-compatible PC, a Compaq Presario 4716, in 1997. Windows 95 finally had enough functionality that I could leave my Mac behind without (too many) regrets. By that time, the tide was shifting, and games were no longer simultaneously released for both the PC and Macintosh. More often, they weren't released for the Macintosh at all. That Compaq had an unusual configuration in that it had the PCI and ISA slots mounted on a daughter card that was inserted perpendicularly to the motherboard. I took that system apart so often and tinkered with it so much that I wore down the connectors. I used to have to slam the daughter card into the motherboard to guarantee a connection. My tinkering gathered full force. I maxed out the memory to the full 128MB. Added a graphics card (in place of the onboard graphics). A second disk. A bigger first disk. A faster CD-ROM drive. An I/O card for more ports. I went through two or three brands of modems because goodness knows, I had to be able to connect at the full 53Kbps. (The one that came with it was only 33.6 Kbps. Shudder.) Ah, the good old days.
While gaming on that wonderful 4716, I also did contract software development and had a Compaq Presario 1672 laptop. My daughter had taken over an old PowerMacintosh 6100 (then upgraded with the AV Card, more memory, more disk space, and a faster CD-ROM drive) as her own, which left my son out in the cold. I bought him his first PC - a no-name brand with a K6/II+ 350MHz processor, a PC Chips motherboard, and the first AGP graphics card we ever had in the house. (I can't recall what the original graphics card was, but eventually, I upgraded it to a Leadtek GeForce 3 Ti200.) I got the original PC from a questionable source on eBay that Microsoft eventually sued out of existence for selling Windows 95 software for which they hadn't paid. I also bought a laser printer, which was an HP4000N with a JetDirect network card. That laser printer ran until about February 2020.
I bought my first true gaming machine from Falcon Northwest in the middle of 1999. It was hopped up with a blazing 700 MHz Athlon K7 Slot A CPU, the original GeForce 256, and a pair of VooDoo2 1000s in SLI mode (expressly for playing Falcon 4.0 flight simulator). It also had Seagate Cheetah 15K RPM SCSI disk drives with an Adaptec controller and a Hercules Fortissimo sound card. The system came with Klipsch ProMedia 4.1 speakers (no longer manufactured) that could vibrate the floors and walls. At the time, Intel was blindsided and worried about the K7. So much so, the Asus motherboard did not have the Asus name or logo anywhere on it. The rumor at the time was that Intel had threatened the board makers that if they supported the K7, they would have issues getting more Intel chips. (It was several years - and several iterations of both the Intel and AMD CPU lines - before Intel came out with a chip that could beat AMD CPUs.) It was a seriously killer rig .. at the time. It was also the last commercial machine I bought. I returned to building my own machines after that, and I have done so ever since.
We had enough systems that we needed a home network. I wanted it, if for no other reason than so that I could share that expensive HP printer. My first network was a simple, closed local area network (LAN). The Windows PCs and my work laptop could exchange files. All machines - including the Macintosh - could use the printer (since it had Postscript, too). Initially, I used fixed IP addresses that were manually assigned to all the machines (i.e., no DHCP server at all) and used a simple Ethernet hub to connect everything. We even played several LAN games. Every machine still had a dedicated modem for Internet access, and we all shared a single (Erol's) dial-up account over a dedicated phone line. While this worked, one of the family members tended to hog the dial-up connection. Yes, it was me.
The solution to sharing the dial-up line turned out to be my old Compaq Presario 4716. That and Linux. Specifically, RedHat Linux, which at the time was freely available. (This was before RedHat decided that home and small business users weren't worth serving and started the Fedora project. Fedora was bad at the beginning.) I turned that system into my router/firewall/DNS server. Whenever any of the computers on the network needed to get on the Internet, the Linux box would dial up my ISP if it wasn't online already. It would hang up after an hour of idle time. We had 3-4 computers sharing a whopping 50 Kbps dial-up connection. (I even had a pair of very early wireless networking PCMCIA cards that topped out at 2 Mbps. I had to install a PCMCIA adapter in my Compaq to make it work. I don't think they were 802.11-anything.) It went surprisingly well, considering. Most homes at that time were accessing the Internet using dial-up, so most websites were conservative about the graphics they displayed. AOL was going strong. Google just barely existed. YouTube didn't even exist. By agreement, large downloads took place only late at night after we went to bed, but general web browsing and email worked just fine. The figure below (click on the thumbnail to expand) shows the beginnings of a real network.

Of UT and DSL
Something magical happened in early 2000. I discovered that DSL was available in my neighborhood from a small company called "Rhythms." Rhythms didn't offer residential DSL, though, which meant I had to get higher-cost business DSL with a static IP address. In fact, it was $184.00/month for 384K SDSL (synchronous DSL or with the same down and up speeds) with 32 internal static IP addresses and one external static IP address. I called and asked one of the technical support reps if it was OK if I put up a mail server and a web server as I hadn't seen anything in the contract about it. His response was something to the effect that it's business DSL; if it was not illegal, I was allowed to do it. I registered pcweenie.com and pcweenie.net with Network Solutions, put a second Ethernet card in my Compaq 2716, installed a web server, an FTP server, and an email server. A domain was born.
As the network diagram shows, I added a few more systems to the network. (I left the modem in the Compaq just in case I was forced to go back; I never used it again.) All of these IPs were still externally routable IP addresses. I could (and a few times accidentally did) print to my printer from anywhere I had Internet access. Now, I had an actual wireless router (the Linksys BEFW11S4), so I split my 32 IP addresses into two networks of 16 IP addresses, and routed half of them through the wireless router.
Keep in mind, this was before built-in wireless was normal - there were no iPads or tablets of any kind. Cell phones were still expensive and, not "smart" for the most part. The iPhone and Android phones didn't come out until years after this. Wireless networking at this time meant add-in (PCMCIA) cards in laptops. Even limited to laptops, it was easy to see that wireless networking would alter how the Internet was used.
The online gaming landscape was nice enough to wait until we had a decent Internet. Quake III Arena and Unreal Tournament (UT) were both released (within a couple of weeks of each other) just before getting DSL at our house. After that, there were some fun multiplayer games (or at least games with multiplayer added), like Half Life's Counter Strike mod, which later became a game in its own right. I logged many, many happy hours playing Unreal Tournament.
Unfortunately, I managed to outlive Rhythms as they went into chapter 11 in the middle of 2001. I switched to Network Access Solutions (NAS). (See the diagram below.) I bumped up to 512Kbps/512Kbps and later 784Kbps for $186/month, and while they gave me 32 IP addresses, they wouldn't give me a separate "external" IP address. They apparently didn't do that. Therefore, if I wanted my devices behind a firewall (and I really did), I had to split the 32 IPs into two 16-IP address networks and waste a dozen of those addresses as "external" IPs. That left me with only 14 usable "internal" IP addresses. That wasn't a big deal at the time since I didn't have 14 devices on the Internet. I did have to bypass the WAN portion of the Linksys BEFW11S4, which effectively changed it from a router to a wireless access point. Oh, the good old days.

Finally, I switched to Verizon DSL in October 2004 (and several PC builds later). (See the diagram below.) I never had a complaint about the service from NAS, but Verizon finally woke up and noticed that others were eating their lunch. And Verizon was both faster and much cheaper. This service was 1.5 Mbps down by 384Kbps up for $99/month. I couldn't pass up twice the speed incoming for half the price even though I did take an upload speed hit. The downside was Verizon only gave me a single fixed IP address. I got to learn about NAT routing in Linux. Verizon later bumped that up to 3 Mbps down by 768K up for the same price. Was I really happy? Of course not.
I See The Light
In the summer and fall of 2005, Verizon trucks swarmed my town. They were burying bright orange plastic conduits everywhere. After a little digging of my own (pun intended), I found out the conduit was for a new fiber to the premises service. Verizon Fios was coming to town. Internet service would initially be 15 Mbps down by 2 Mbps up (which was later bumped to 20 Mbps down and 5 Mbps up for the same price). Static IP addresses were only offered for business accounts (as it was for DSL), but for the same $99/month, I was paying already. I signed up to be notified when it was available. When the crews came through and buried the conduit in my yard, I was ready to hold a light, bring them drinks & food, or whatever else would help speed them along. I checked the "Can You Get FiOS?" site daily until one day, it said, "Yes!" I ordered FiOS on December 23, 2005, and installation took place on January 12, 2006. The golden days had arrived.
About a year later, Verizon started offering Fios TV service. I switched from DirecTV to Fios TV. I liked DirecTV (via Satellite) except for one major issue: whenever it rained or snowed heavily, DirecTV got washed/snowed out. Of course, when it's raining or snowing like that, it is prime time to watch some TV - except I couldn't. Fios TV wasn't all hugs and puppies either, though. After about a month, I ditched the Verizon (Motorola) DVR for a pair of single-channel cable cards and a TiVo Series 3 DVR. Perhaps I felt I had to rebel a little. In reality, the Motorola DVR that Verizon was using crashed daily, lost recorded programs, lost programming schedules, etc. The second time the DVR crashed during the Superbowl game, I knew it had to go. I upgraded to the TiVo and started using dual single-channel cable cards. I loved my TiVo DVR with DirecTV, so it was an easy choice. (I later switched to a single dual-channel cable card.)
I stuck with Fios and Fios TV - more or less in the same form - for over a decade. My kids went from being little to being teenagers, and, finally, to out on their own. So many devices came and went along the way. My speed eventually went to 25 Mbps down/up. The following are just a couple of phases along the way. The first is from September 2012, and the second is from December 2015.
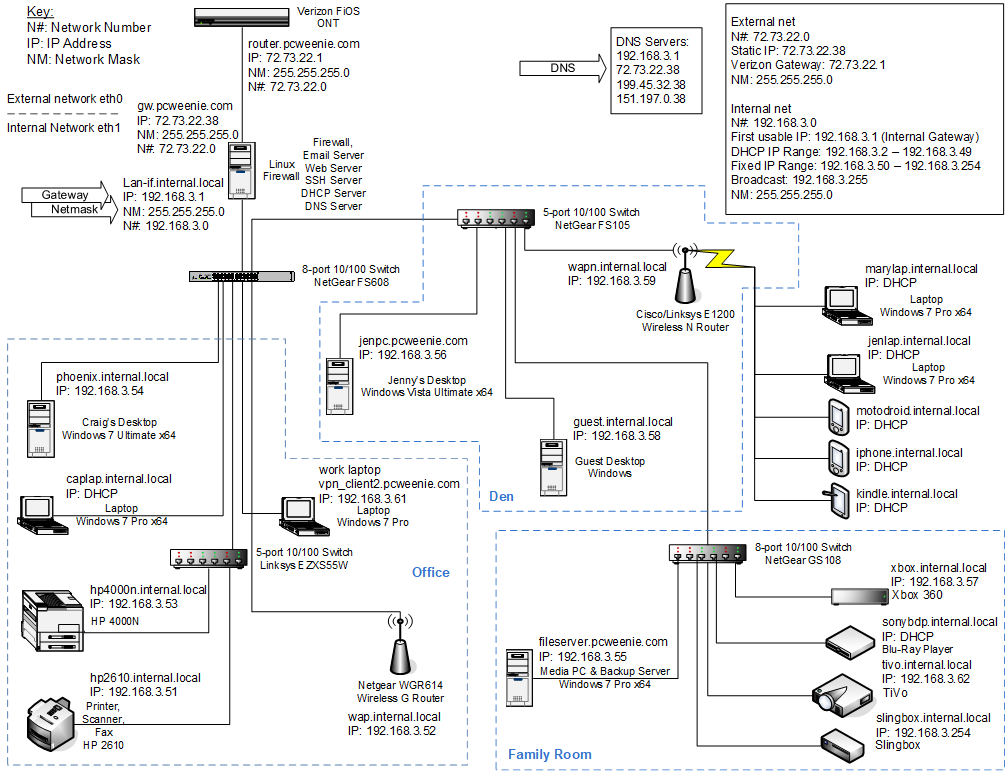
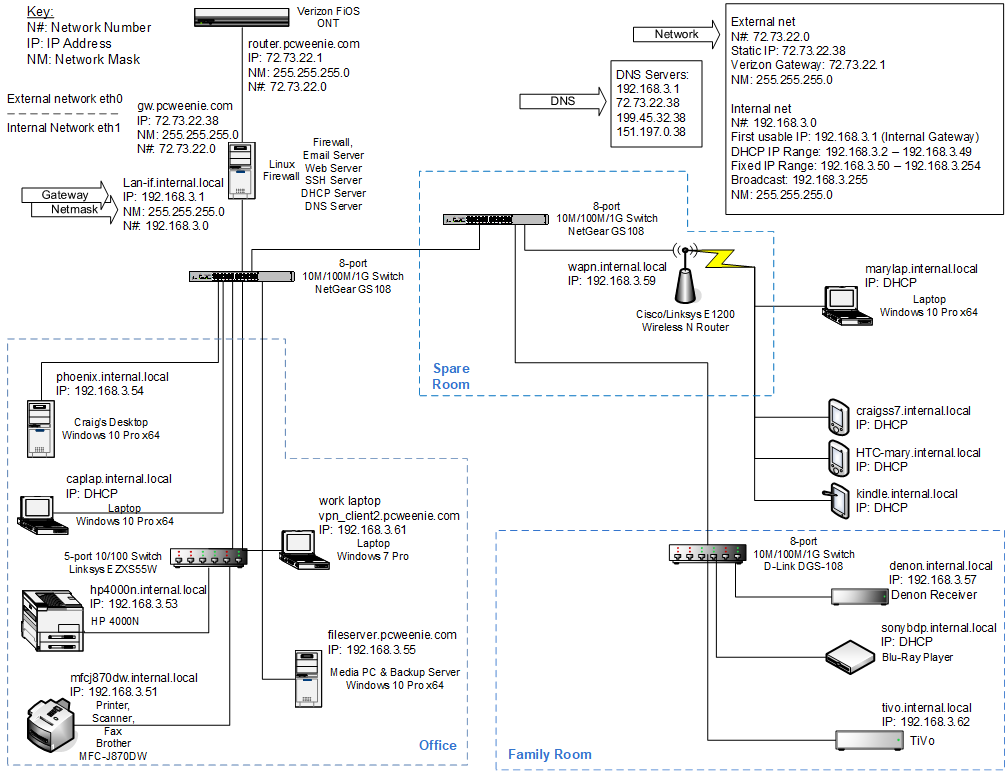
The End of an Era
I was docked to the Verizon mothership for over a decade. At the highest, I sent Verizon about $500/month for landline phone service, wireless cell phone service, Internet service (initially business-level, but later residential), and Fios TV. In January 2016, I moved my web and email server to Linode and changed from business to residential FiOS. That gave me twice the speed (50 Mbps down/up) for 40% of the cost (which had risen to $125 over the years). That meant giving up my fixed IP address at home, but I no longer needed it. I had looked into hosting my email and web server someplace other than my basement for years. The cost went from prohibitively expensive (hundreds of dollars/month) to no-brainer cheap (tens of dollars/month). We also got rid of our landline telephone service. From my home network's perspective, it seemed like things were getting simpler.
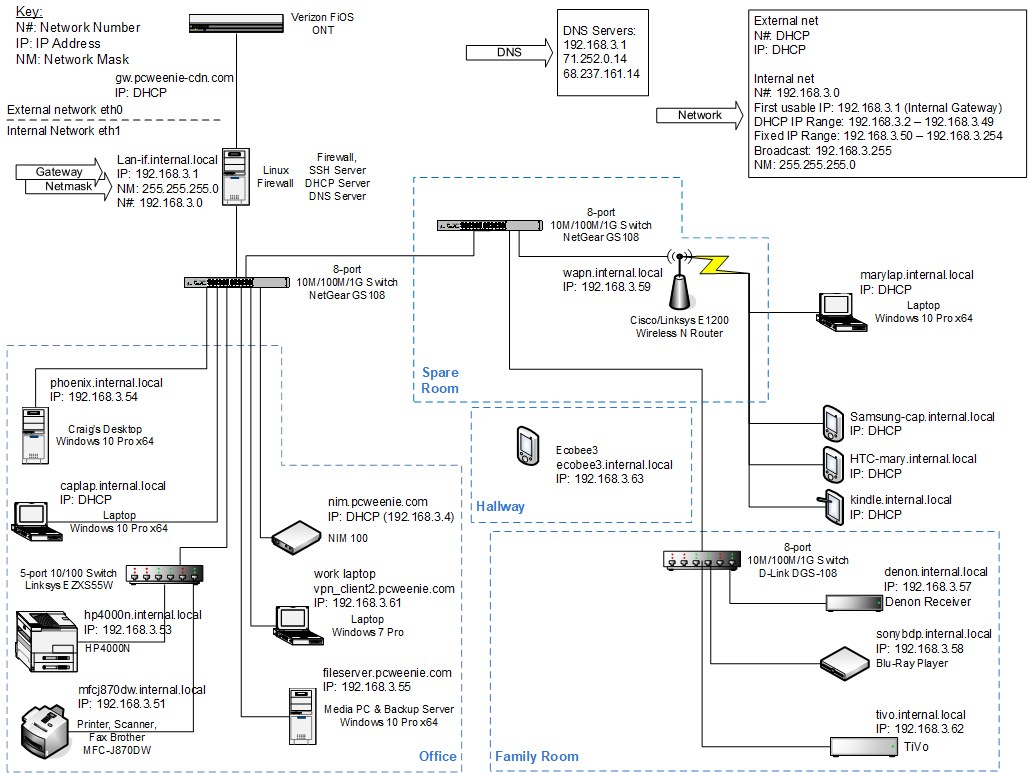
We ditched FiOS TV and replaced it with a pair of Roku Ultras and PlayStation Vue YouTube TV. We switched because FiosTV's fees and other charges kept going up. The base service, equipment rental, and TiVo's monthly programming totalled $127/month. Conversely, PlayStation Vue was $40 / month. However, we kept seeing more and more Loading. Please wait buffering screens, so we kept trying other streaming services. We eventually settled on YouTube TV (for the same $40/month).
I have added more phones, Amazon Echo Dots, a Tap, and the original Echo. Also, an Ecobee thermostat, a couple of Android tablets, SteamLink, Harmony Hub, and so on. I ended up having to increase the range of DHCP addresses. I changed to using the DHCP server to allocate IP addresses based on MAC addresses. That lets me have DHCP addresses that are "fixed" to known devices while leaving a bunch open for visiting devices such as my kid's cell phones. The following diagram I find almost scary.
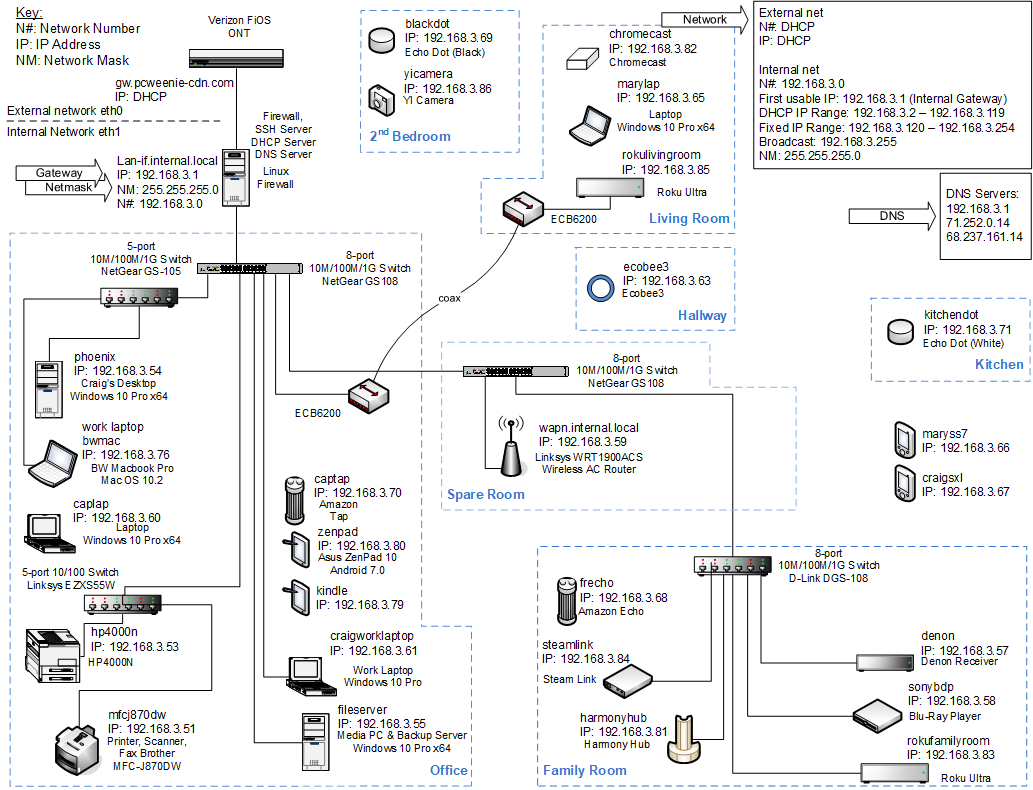
My firewall machine is still a Linux box, although it's now Ubuntu rather than Red Hat. (There was a period of Mandrake Linux in there somewhere.) I use it as a firewall/router (iptables), SSH server, DNS server, and DHCP server for the internal LAN for all the devices in my house, and those that my kids and their kids bring over.
I switched from Verizon Wireless to Google Fi last summer. That move has consistently reduced my cell phone costs by about $50/month. At that time, Verizon provided only my Internet service—one less Verizon service.
I kept Verizon Fios Internet service until December 2022. My fastest Fios speed was 75/75 Mbps down/up. (The speeds I have had at one time or another include: 384 Kbs up/down, 512 Kbps up/down, 768 Kbps up/down, 1.5 Mbps down / 384 Kbps up, 3 Mbps down / 768 Kbps up, 15 Mbps down / 2 Mbps up, 20 Mbps down / 5 Mbps up, 25 Mbps down/up, 50 Mbps down/up, and 75 Mbps down/up.) Everything was running fine until the day I left. I rarely had any downtime. So why leave?
I may be old-ish, but I play many PC games. Many of those games are 20 to 50 GB each (or more). I don't have enough room to keep all the games I "own" on my PC, so I download them as I want to play them. I was paying $55/month for 75/75 Mbps (which generally ran at 83/86 Mbps), and those downloads took a long time. When the house up the street was on the market, I used that address to see what I could get as a new customer. The result was 200/200 Mbps for $15/month less than what I paid ($40/month). This wasn't the first time I had checked. I had been checking for years, but recently the price dropped even lower with a 10-year price guarantee.
Queue the Verizon Customer service call. The nice people on the other end tried but couldn't help me. I actually think they tried, too. They always tried to upsell me to Verizon's 1GB service (which is really 940Mbps service) for something in the $110/month range. (That would be twice what I was paying, not the same or less.) The 200/200 Mbps service would be $70/month, and the 400/400 Mbps service would be $85/month. These offers were not going the right way, price-wise. So then I asked to set up to discontinue the service, as I had the Xfinity order in the cart ready to hit submit. I got sent to the customer retention group. Then, I finally got it. Even the customer retention group could not help me. Not that they didn't want to. Their system would not let them offer me a better price because I was an existing customer; it was not an option. So now, I'm an Xfinity 800/20 Mbps customer for about $5 more/month. I had Xfinity for just under 2 years, and I tested 940/24 Mbps. It was quite reliable. Everything was new, like the coax from the curb and the cable modem in my closet. The TL;DR version is that I went from paying Verizon about $500/month for many services to $0/month for none.
The End is Never the End is Never the End ...
After just under two years, I returned to Verizon Fios in December 2024. Besides Xfinity taking a couple of months to bury the cable running across the sidewalk in front of our house, I had no issues with Xfinity. For $60/month, I had rock-solid 800/20 service (that consistently tested at over 900 down and 24 up). Additionally, I could use Xfinity Wi-Fi hotspots around my town and many places I visit locally, which saved me from using my (limited) cell data. I didn't have to deal with any of the notorious Xfinity data caps (because of competition from Fios and local fixed wireless services).
So why leave Xfinity? The same reason I left Fios. As many Xfinity customers will attest, customers need to watch their bills and be especially mindful of when agreements expire. Mine was set to increase from $60 to $100 per month at the end of a 2-year agreement. Somehow, a 66% cost increase just because I remained a customer didn't seem fair. I likely could have gotten the same deal for another year or two if I had "negotiated" with Xfinity, but why bother? I placed an online order for Verizon Fios. Ta-da, I was a new customer! Now, I have 500/500 Mbps down/up for $60/month. I really do miss being able to use the Xfinity Wi-Fi hotspots, though.